Now that the holiday knitting is over, I'm taking time to make a list of all the delicious things I would like to knit next. I find it so amusing because the list is so long that I doubt I will ever knit them all. But still, it's fun to think about knitting all that stuff.
I'm not thinking about all those knits idly, oh no, I am working on projects while I'm thinking about other projects to come, of course. And what better time to start next year's gift knitting than now, hm?
On the left you can see what I'm working on today, a version of Joel's Scarf from The Knitting Experience Book 1: The Knit Stitch. Sally Melville was inspired by the Doctor Who Scarf when she designed it, giving it her own colors and stripe pattern to suit her own aesthetics. I wholeheartedly approve. I always did love the idea of a very long striped scarf, but never felt the need to make an exact replica of any of the originals.
This scarf I'm making for my eldest son, who loves to wear unusual accessories. He has grown to expect a gift hat from me each year, the wackier the better. I hate to disappoint him. I guess I'll have to make a hat to go with the scarf, won't I?
I've had to substitute some of the colors in the scarf. Some of the colors have been discontinued and some simply aren't available at my local shop. As for the rest, well, I really didn't like that Patons olive green at all. So, here's what I'm using:
Patons Classic Wool Merino in leaf green, old gold, royal purple and paprika.
Lion Wool in cadet blue and dark teal.
Cascade 220 Heathers in rust.
I like the way these colors play off one another. The feeling is cheerful without being too bright or garish. I also like the fact that you can almost knit this in the dark. It's a great tv knitting project, yards of garter stitch, easy peasy.
Friday, December 28, 2007
Tuesday, December 25, 2007
Merry Christmas
These were the last of the knitted holiday gifts. I finished them yesterday, wrapped them up and sent them off with the rest of the booty to be delivered on Christmas Eve.
3 washcloths for boys in brightly colored stripes that make them easy to find in the laundry. Their mother hopes that when they have their own garter-stitch goodness they will leave her dishcloths alone. We will see.
I am taking a break from knitting today. I'm going to spend some time planning and deciding what I want to knit next. I want to make some more baby hats and socks for afghans for Afghans, finish the second half of my plum socks and start a cardigan for myself. There are dozens of other things that have caught my eye, and it helps to at least make a list to remind me of these delightful knits waiting to be made. I'll work on that later this evening.
Just now, I'm finishing up dinner preparations. We're having a simple meal, some of it prepared ahead of time and reheated, some of it made fresh this afternoon, but none of it was complicated. Roast turkey with gravy, stuffing, cranberry orange sauce, crudites, sparkling cider and panettone for dessert. For my eldest son, it's all about the stuffing.
I hope you all are having a wonderful day with your families.
Saturday, December 22, 2007
Yet More Holiday Knitting
The holiday knitting continues between batches of cookies and loads of dishes and laundry, with Christmas carols playing in the background. Sometimes peaceful, sometimes crazy stressful, such is family life.
On the left you see a little hat I made as a gift for my cousin, who will be celebrating her first birthday next month. It was a very quick knit, made from super bulky yarn. You can make this hat while watching tv in an evening. Yes, even you! The pattern is Omly's Action Baby Hat and you can find it here. I don't have any circulars or double points in the proper size for this yarn, so I used straight needles, knit it flat and seamed it up the back.
On the right is a little group of kid's play kitchen accessories, 2 'dishcloths' and a pretend 'oven mitt'. Or, they can be a set of bathtime accessories for your favorite toddler. Either way, the kids just love the squishy texture of garter stitch and if you give them these, they will leave your dishcloths alone. Maybe.
Inexpensive worsted weight cotton yarn is all you need to make them. The mitt pattern is in the previous post here, and the dishcloth is Abigail's 4-Corners dishcloth here. I made changes to her pattern to make it smaller, I cast on 12 stitches, then short-row decreased down to 3 stitches for each quadrant. If you cast on about 8 stitches, you get a great coaster.
You still have time to knit a couple of little projects like these for last-minute gifts, so get busy!
Happy Holidays, everyone!
Friday, December 21, 2007
Child's Mitt Pattern
As promised, here is the pattern for the bath mitts I made for my 4-year-old. They have been knitted flat in garter stitch in one piece and are seamed along the outer edge of the hand and inner edge of the thumb. They are designed to fit a preschool aged child loosely, which makes it easier for them to put them on by themselves.
Materials:
You will need 1 ball of worsted weight cotton yarn, a pair of size 7 US/4.5 mm needles, a tapestry needle and a stitch holder or a bit of contrasting yarn to hold thumb stitches.
Stitches used:
Garter stitch = knit every row.
M1 = increase a stitch by knitting into the front and the back of the next stitch, or using your favorite method.
K2tog = decrease by knitting 2 stitches together.
Cuff:
Cast on 30 stitches. Knit 16 rows in garter stitch (8 ribs).
Row 17: Knit 14 stitches, m1, knit 2, m1, knit 14; 32 stitches.
Row 18: Knit across row.
Row 18: Knit 14, m1, knit 4, m1, knit 14; 34 stitches.
Row 19: Knit.
Row 20: Knit 14, m1, knit 6, m1, knit 14; 36 stitches.
Row 21: Knit.
Row 22: Knit 14, m1, knit 8, m1, knit 14; 38 stitches.
Row 23: Knit 14, place the next 10 stitches onto a holder, cast on 2 stitches, knit 14 making sure to not leave a gap (see photo right); 30 stitches on needle.
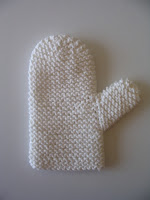
Knit 24 more rows in garter stitch (12 ribs). Your mitt should look like the photo at left.
Row 48: *K2tog, knit 3* repeat between *'s across row; 24 stitches.
Row 49: Knit.
Row 50: *K2tog, knit 2* across; 18 stitches.
Row 51: Knit.
Row 52: *K2tog, knit 1* across; 12 stitches.
Row 53: Knit.
Row 54: *K2tog* across; 6 stitches.
Cut yarn leaving a 10"/25cm tail, thread the end onto a tapestry needle and draw the yarn through the remaining stitches and pull up tightly. Fasten off. It should now look like the photo at right.
Thumb:
Put the thumb gusset stitches back on the needle, as shown.
Row 1: Cast on 2 stitches onto right-hand needle, knit the 10 stitches from left needle, cast on 2 stitches; 14 stitches.
Knit 14 rows (7 ribs).
Row 16: *K2tog* across; 7 stitches.
Cut yarn leaving a 6"/15cm tail, thread the end onto tapestry needle and draw yarn through remaining 7 stitches. Pull up tightly and fasten off. It should look like the photos at left and right. The knitting is done, now it's time to sew up.
Finishing:If you're new at sewing up garter stitch using mattress stitch, Knitty has a great article with lots of photos that shows you how.
I recommend that you start sewing up the longer seam of the outer palm first. This stabilizes the mitt and seems to make it easier to work on the more fiddly thumb.
Start sewing up the thumb by seaming the length of the thumb seam, and finish by grafting those extra 4 thumb stitches to the 2 cast on palm stitches they match up with, smoothing and pulling up any little holes you come across. Weave in ends and you're done.
Want to put a ruffle on the cuff for a feminine touch? I embellished this mitt with a simple crocheted edge.
Round 1: 2 Single crochet in each cast-on stitch around the cuff, slip stitch in first stitch to join, chain 2.
Round 2: Double crochet in each single crochet around the cuff, slip stitch to top of chain, fasten off. Weave in ends.
Materials:
You will need 1 ball of worsted weight cotton yarn, a pair of size 7 US/4.5 mm needles, a tapestry needle and a stitch holder or a bit of contrasting yarn to hold thumb stitches.
Stitches used:
Garter stitch = knit every row.
M1 = increase a stitch by knitting into the front and the back of the next stitch, or using your favorite method.
K2tog = decrease by knitting 2 stitches together.
Cuff:
Cast on 30 stitches. Knit 16 rows in garter stitch (8 ribs).
Row 17: Knit 14 stitches, m1, knit 2, m1, knit 14; 32 stitches.
Row 18: Knit across row.
Row 18: Knit 14, m1, knit 4, m1, knit 14; 34 stitches.
Row 19: Knit.
Row 20: Knit 14, m1, knit 6, m1, knit 14; 36 stitches.
Row 21: Knit.
Row 22: Knit 14, m1, knit 8, m1, knit 14; 38 stitches.
Row 23: Knit 14, place the next 10 stitches onto a holder, cast on 2 stitches, knit 14 making sure to not leave a gap (see photo right); 30 stitches on needle.
Knit 24 more rows in garter stitch (12 ribs). Your mitt should look like the photo at left.
Row 48: *K2tog, knit 3* repeat between *'s across row; 24 stitches.
Row 49: Knit.
Row 50: *K2tog, knit 2* across; 18 stitches.
Row 51: Knit.
Row 52: *K2tog, knit 1* across; 12 stitches.
Row 53: Knit.
Row 54: *K2tog* across; 6 stitches.
Cut yarn leaving a 10"/25cm tail, thread the end onto a tapestry needle and draw the yarn through the remaining stitches and pull up tightly. Fasten off. It should now look like the photo at right.
Thumb:
Put the thumb gusset stitches back on the needle, as shown.
Row 1: Cast on 2 stitches onto right-hand needle, knit the 10 stitches from left needle, cast on 2 stitches; 14 stitches.
Knit 14 rows (7 ribs).
Row 16: *K2tog* across; 7 stitches.
Cut yarn leaving a 6"/15cm tail, thread the end onto tapestry needle and draw yarn through remaining 7 stitches. Pull up tightly and fasten off. It should look like the photos at left and right. The knitting is done, now it's time to sew up.
Finishing:If you're new at sewing up garter stitch using mattress stitch, Knitty has a great article with lots of photos that shows you how.
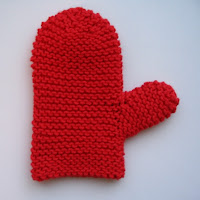
I recommend that you start sewing up the longer seam of the outer palm first. This stabilizes the mitt and seems to make it easier to work on the more fiddly thumb.
Start sewing up the thumb by seaming the length of the thumb seam, and finish by grafting those extra 4 thumb stitches to the 2 cast on palm stitches they match up with, smoothing and pulling up any little holes you come across. Weave in ends and you're done.
Want to put a ruffle on the cuff for a feminine touch? I embellished this mitt with a simple crocheted edge.
Round 1: 2 Single crochet in each cast-on stitch around the cuff, slip stitch in first stitch to join, chain 2.
Round 2: Double crochet in each single crochet around the cuff, slip stitch to top of chain, fasten off. Weave in ends.
Monday, December 17, 2007
More Holiday Knitting
This is the latest batch of holiday knitting, cotton dishcloths and scrubbies to be sent along with cookies and such to relatives out-of-town.
These darlings have all been made with free patterns available on the web: Abigail's 4-Corners dishcloth (the 3 cloths made with ombred yarns) and Tribbles (the 3 little round scrubbies) are my favorites, Bernat's Knit Eyelet and Simple Ridge Dishcloths (green cloth in the center) and Eloomanator's Diagonal Knit Dishcloth (green cloth on the left), which is only available on Ravelry right now.
I've also made a pair of these child-sized bath mitts in Lion Cotton. I think they will make a great gift for the 4-year-old. He can use them in the bath, of course, but he can also use them for imaginative play. He likes to pretend he's an Iron chef and I believe he will use these as oven mitts in his play kitchen. It will be interesting to see what else his imagination will make of them.
I will post the pattern for these soon.
Edit: Pattern posted here.
Tuesday, December 11, 2007
Baking Frenzy
I have a few more pieces of holiday knitting completed, but I'm in the middle of my annual holiday baking frenzy right now. I'm too busy to photograph the new knits and blog about them today, but I will do so soon.
In the mean time, I thought you might enjoy a quick photo of the contents of one of the tins I've been filling with cookies to ship to friends and family far away. These are quick and easy cookies to make, simple drop cookies for the most part, without decoration because I just don't have time this year for fussy stuff.
The contents are, moving clockwise beginning upper left: Chai-Spiced Cookies from Pillsbury Classic Cookbook #320 (This year's Holiday Cookies book), Strawberry Drops made from a cake mix, Oatmeal Raisin Cookies from the oatmeal box, and Surprise Chocolate Bites from Better Homes and Gardens Easy Baking magazine.
I must go, I have more cookies to bake, and a mountain of washing up to do.
Wednesday, December 05, 2007
Paying it Forward
I signed up for "Paying it Forward" on Kat's blog.
I felt no hesitation whatsoever over signing up for this, I make handmade gifts all the time. I'm always trying out new patterns, ideas and different media. This should be a breeze.
The guidelines:
"I will send a handmade gift to the first 3 people who leave a comment on my blog requesting to join this PIF exchange. I don’t know what that gift will be yet and you may not receive it tomorrow or next week, but you will receive it within 365 days, that is my promise! The only thing you have to do in return is pay it forward by making the same promise on your blog."
Want to participate? Be one of the first 3 people to leave a comment on this post and make the same promise on your own blog.
Tuesday, December 04, 2007
Holiday Knitting
I managed to squeeze another 3 squares for Oliver's blanket into the mail to Kay before the deadline. That makes a total of 17. Those squares were fun to make, especially the miters because each one was done in a different color, no two alike.
Every now and then my family would hear me chuckle over my knitting for no apparent reason. They don't know how much it amused me to think about Kay and company arranging those hundreds and hundreds of squares. That's going to be some sewup party.
I have dug in to my holiday gift knitting with the same gusto as my charity knitting. I have just finished my 4th adult-sized hat for various undisclosed relatives. Undisclosed because one never knows when they will decide to visit the blog and I am big on keeping gifts a surprise.
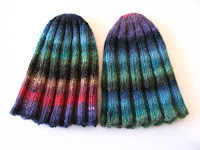
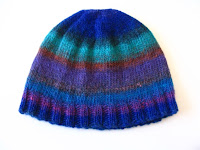
I will share the patterns, however. The 2 'Ribbed Caps' (photo upper left) are from Vogue Knitting On The Go Caps & Hats Two. The cap on the right was made without a pattern, cast on 80 stitches and knit until you run out of yarn basically. The self-striping effect of Noro Kureyon provides all the interest in these hats.
The pink hat on the left is the '11th Hour Hat' from Nevermore Knits. Yes, she posted the pattern yesterday, I must be one of the first people to try it out. I started the hat early this morning and finished late tonight. It was fast tv knitting, I want to tell you. I'll definitely be using this pattern again.
I got my Ravelry invite! You can find me there by the name Ariliss. What a fun place to go play!
Tuesday, November 27, 2007
Shipping the Charity Knitting
I've been to the post office today to ship my charity knits. It was hard for the 4-year-old to let them go, he had the idea that they were all for him, but then, he tends to think everything is for him anyway.
The totals: 14 4" squares of sock yarn on their way to Kay for Oliver's blanket project and 7 sets of baby hats and socks on their way to afghans for Afghans. I tied each set of hat and socks together in its own little bundle so that they wouldn't 'lose' each other in transit.
The baby hats and socks made such a lovely little rainbow, I just had to share the photo here. They were so cute that I just wanted to keep making more, and I will, after I get my holiday knitting done. For now, I just wanted to get these little darlings shipped in time for the deadline.
So, back to that purple sock I was working on. It's nearly done, but it doesn't seem as interesting as those darling little baby hats, does it?
Saturday, November 24, 2007
Top-Down Baby Hat
I had a small amount of some leftover Noro that wasn't enough to make an item by itself, but if I added a bit of a matching solid colored yarn it would make a baby hat. I didn't know how much area the Noro would cover. If I started knitting at the cuff, it would make a narrow stripe of varied color, leaving most of the hat a boring solid color. I wanted to make the most of the special yarn, so I decided to knit the hat upside-down. I started at the top of the crown with a few stitches and increased as I worked my way down to the brim. It worked very well! Here are the details so that you can try it too.
Top-Down Baby Hat
You will need a small bit of leftover Noro Kureyon (or other worsted-weight self-striping yarn) between 6g and 10g, and some matching solid worsted weight yarn. My completed sample hats all weigh 28g and use Patons Classic Merino Wool as the solid.
You will also need a set of 4 or 5 size 7US/4.5mm double-pointed needles, one needle 2 or 3 sizes larger for binding off, a tapestry needle to weave in the ends, a tape measure and a pair of scissors or other cutting device. If you don't have size 7 needles, use size 6 or 8. For this project, precise gauge isn't important.
Using Noro, cast on 8 stitches, leaving a 4-inch/10cm tail.
Row 1: Increase by knitting in the front and the back (KFB) of every stitch; 16 stitches. Arrange stitches on 3 needles in the following manner: 6 stitches on the first needle, 4 stitches on the second needle, 6 stitches on the 3rd needle. Join, without twisting the work, and begin knitting in the round. Edit: Or use the Emily Ocker Circular Cast-On, here.
Rnd 2: Knit.
Rnd 3: *Knit 1 stitch, KFB in next stitch* repeat between *'s across row; 24 stitches.
Rnd 4: Knit.
Rnd 5: *Knit 2 stitches, KFB in next stitch* across row; 32 stitches.
Rnd 6: Knit.
Rnd 7: *Knit 3 stitches, KFB in next stitch* across row; 40 stitches.
Rnd 8: Knit.
Rnd 9: *Knit 4 stitches, KFB in next stitch* across row; 48 stitches.
Rnd 10: Knit.
Rnd 11: *Knit 5 stitches, KFB in next stitch* across row; 56 stitches.
Rnd 10: Knit.
Rnd 11: *Knit 6 stitches, KFB in next stitch* across row; 64 stitches.
Rnd 12: Mark this row with a bit of yarn tied around the first stitch. Knit across the row.
At this point your hat should look something like the photo at right. Yes, there's a hole in the middle, but that's alright, you'll close that up when the hat's all done.
Continue knitting every row on 64 stitches, changing to your solid color when you run out of Noro, until the work measures 3.5 inches/9cm in length from the marked row.
Start working K1P1 ribbing for the cuff (or K2P2, or garter stitch) and continue until cuff is 1.5 inches/4cm long. Bind off with larger needle and cut yarn leaving a 4-inch/10cm tail. Remove yarn marker. Using tapestry needle, weave in the tail from the cast-off edge.
Edit: If you have used the Emily Ocker Cast-On, disregard the next section and simply weave in the yarn tail from the crown of the hat.
Thread the tail at the crown of the hat onto the tapestry needle. Run the needle through the 8 stitches on the cast-on edge (see photo at left) and pull through gently, and run the needle through stitches a second time.
Pull up yarn, gathering up the cast-on edge until it closes completely. Weave in the end.
If you want, you can add earflaps to it. See my pattern here to find out how.
Now all you have left to do is to make a pair of simple 24-stitch socks to match. Some patterns can be found here and here. These patterns make the same basic sock, the only difference is the stitch used for the leg and the heel flap.
Knitting Holiday
We had a nice Thanksgiving at our place, it was imperfect but absolutely delightful, just like the cherry pie. I hope my U.S. readers all had a pleasant holiday as well. One of the unexpected pleasures was the chance to knit while others napped.
As for the Canadians, well, we all know you had a fine time last month. "Firstest with the mostest" as my grandmother would say. Don't rub it in.
The downside is that the Christmas season is officially open and the materialistic feeding frenzy has really begun. Let's all try to resist that impulse to buy, buy, buy! that the manufacturers have paid so much to have hammered into our brains through the medium of television, hm?
Lately I've been spending my time making baby hats and socks to donate to afghans for Afghans. Yes, I have done this before, and I'm doing it again. I'm knitting as many as I can before the deadline, which is December 3rd. There's a Knit-And-Crochet-Along too.
I'm using my Infant Earflap Hat pattern without the earflaps. This makes a simple toque with a fold-up cuff that allows for growth room. When my babies outgrew their hats, it was never a case of the hat being too tight, the hat would be too short and no longer cover their ears. Giving a little extra height to the hat is a good idea.
I had very small amounts of leftover Noro Kureyon in my stash that I used to good effect in some of these hats. I really like the way they turned out, these are my favorites so far. I will tell you how I made them in my next post.
Won't you join us and make a set this weekend? Whether you make them for charity, your favorite little one, or for a future baby shower, these are very fun to make. You can come up with an excuse to make some, can't you?
As for the Canadians, well, we all know you had a fine time last month. "Firstest with the mostest" as my grandmother would say. Don't rub it in.
The downside is that the Christmas season is officially open and the materialistic feeding frenzy has really begun. Let's all try to resist that impulse to buy, buy, buy! that the manufacturers have paid so much to have hammered into our brains through the medium of television, hm?
Lately I've been spending my time making baby hats and socks to donate to afghans for Afghans. Yes, I have done this before, and I'm doing it again. I'm knitting as many as I can before the deadline, which is December 3rd. There's a Knit-And-Crochet-Along too.
I'm using my Infant Earflap Hat pattern without the earflaps. This makes a simple toque with a fold-up cuff that allows for growth room. When my babies outgrew their hats, it was never a case of the hat being too tight, the hat would be too short and no longer cover their ears. Giving a little extra height to the hat is a good idea.
I had very small amounts of leftover Noro Kureyon in my stash that I used to good effect in some of these hats. I really like the way they turned out, these are my favorites so far. I will tell you how I made them in my next post.
Won't you join us and make a set this weekend? Whether you make them for charity, your favorite little one, or for a future baby shower, these are very fun to make. You can come up with an excuse to make some, can't you?
Monday, November 19, 2007
The Atrocity
There is a story in my family about the time Grandma had her house 'done' by an interior decorator. The living room was formal, low-slung and the furniture was all white and gold-except for one tall wing chair upholstered in a green/black toile. It was the one piece that kept things from being too matchy-matchy as we would say today. The decorator called it The Atrocity, and stressed that every room needed one.
I am taking a cue from this design philosophy and including an Atrocity in my shipment of afghan squares to Kay for the Oliver's Blanket fund raiser. This one square does not match in any way the others I've made, but I know that other knitters have made brightly colored squares to go with it. I've also made a set of mitered squares, just because. Kay should have fun working with these.
Friday, November 09, 2007
Knitting For Boys
For a while now, in between socks, I've been knitting little 4-inch squares from leftover sock yarn for Oliver's benefit. Michaela has organized a little fund-raiser in the U.K., and Kay is helping out by collecting squares here in the U.S. (You can click on the names to read more about it).
My effort has been going slowly. Coming down with this head cold hasn't helped much either. I still manage to put in at least an hour of knitting in the morning and another hour in the evening. When I feel up to it, I grab odd moments of knitting when I can. I hope to contribute at least a dozen afghan squares before the end of the month.
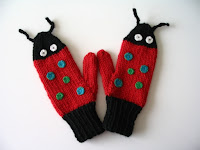
I've just finished sewing the spots on this pair of Buggy Mitts for my little boy. He said he wanted lady bug mittens, but when he saw me grab a square of black felt off the shelf to make the dots he insisted he wanted bright colors instead.
You can find the pattern here. I have added a few rows of length to this pair to fit my son's long, tapered fingers.
He says he wants me to make him a pair of bumble bee mittens next!
Monday, November 05, 2007
Mom's Sock Blowout
The sock was whole and in good condition when she put it on this morning, but somewhere between breakfast and the Carol Duvall Show the heel blew up.
Fortunately it doesn't take long to reknit a heel. Cut out the old one, insert needles into the live stitches, knit the heel flap and turn the heel, weave the seam and you're done.
Apparently I didn't use reinforcement yarn when I made that pair of socks. Regia sock yarn doesn't come with any. I made sure to include some reinforcement when I reknit the heel.
This is the first of a purple pair of socks I'm making for myself using the Basic Ribbed Socks pattern from Vogue Knitting On The Go: Socks Two. I made the child's size for my youngest and they turned out so well that I decided to make a pair for myself.
The yarn I'm using is Socka and it doesn't come with reinforcement yarn. After what happened to Mom's Regia sock after such a short time, I think I'd better not omit reinforcement of some sort. It's going to be difficult to find a matching color nylon thread or yarn. I've been reading about others experiments with wooly nylon and think I'll try weaving some in from the wrong side.
Thursday, October 25, 2007
Kid Knitting
I've made another pair of socks for the 4-year-old. He appreciates them so much and demonstrates such enthusiasm for my efforts that it motivates me to knit more for him.
This pair was knitted from the Basic Ribbed Socks pattern in the little book Vogue Knitting On The Go: Socks Two, altering only the foot length to about .5 inch longer than the child's actual foot measurement for growth room. The yarn is Lang Jawoll superwash. I did not use the included reinforcement yarn for heels or toes this time because I simply forgot about it. It's ok, he will probably outgrow them before he has a chance to wear them out anyway.
I have finally finished the child's red sweater I started a year ago. Fortunately I had chosen to knit it 2 sizes larger than he was actually wearing at the time. Losing track of the project in storage for several months hasn't been the disaster it might have been, as it turns out it's the perfect size for him now with a bit of room for him to grow.
The cardigan was meant to have a hood, but the child didn't like it when it was finished. I removed the hood, ripped it out and knit a simple ribbed collar instead. He liked this version much better.
To review the project, the pattern was the Stephane Jacket from Annie Blatt Creation Magazine #1 and the yarn was Schachenmayr Nomotta Extra 100% superwash wool, a DK weight yarn.
I did make a few alterations to the pattern. I adjusted the stitch and row count to match my gauge, and I added extra length to the body and sleeves to fit my child (who tends to be tall and slender) and for growth room, which at his age seems to be confined to height only. I made sure this added length was in full pattern repeats so that the design would still look balanced.
Wednesday, October 10, 2007
Socks and Doll Clothes
I've finished the pair of Araucania socks for my mother. In the photo at left, you can see where I ran out of matching reinforcing yarn just before turning the heel. (Click on the photo to see a larger version)
The difference in color is subtle enough that you can only really see it up close, as in the photo at right.
Mom just loves them, and is so happy to be able to switch off between the 2 pair of handknit socks I've made for her.
I couldn't let the 4-year-old feel left out, of course, so I made him a quick pair of thick socks in some leftover worsted yarn (Patons Classic Wool) to wear around the house as slippers.
I also made a little outfit for the baby doll with some of that grab bag yarn. I don't know what the yarn is, but it feels like a cotton and synthetic blend. The pattern comes from an old Patons booklet of doll clothes. The doll itself was made by my mother from a pattern by Judi Ward called Bare Baby, and you can find it here. It is rather lifelike, and all the kids just love to hold 'the baby'.
Wednesday, October 03, 2007
Socks
I had a stack of half-made socks waiting for my attention for so long that I had forgotten they existed. Has that ever happened to you? Well, it happens to me with alarming regularity. So, as I say, I found this group of guilt-inducing projects and pounced on them, right ferociously I might add. Now they are Finished Objects and will never threaten my peace of mind again.
And with hands properly limbered up from sock knitting, I dug in and whipped up a pair for the 4-year-old with some of the leftovers. He is very happy about this and loves his new socks. He is looking forward to more sock booty, just as soon as possible if you please, thank you very much.
I find that the boy has some difficulty putting on his own socks if they have ribbing at the top. He is at an age where he simply must do everything By HimSelf, and so I have made his socks with the garter stitch cuff to make things easier for him.
After seeing the colorful sock yarn additions to the stash, my mother has requested another pair of socks. Which I have dutifully started knitting. I have one finished and am working on the second.
Which brings me to a dilemma. Halfway through the heel on this second sock I have realized that I am going to run out of reinforcement yarn long before I reach the toe. I have more reinforcement yarn in my stash that doesn't quite match but comes rather close.
The yarn that I'm using for toes and heels on this pair of socks is from my stash, purchased in 1990 and the yarn is hard to find anymore. I could do as Elizabeth Zimmermann suggests and use quilting thread as reinforcement, it would be easy to match the color, but the texture would not be the same.
The texture is important to Mom, and she agrees that using the off-color reinforcing yarn from stash to finish the sock is a good idea. She then went on to suggest ripping out the toe on the first sock and reknitting it with the off-color companion yarn in order to make it match the second sock.
I gave her The Look.
Tuesday, October 02, 2007
Yarn Peep Show
My local yarn shop recently had a drawing for a hefty gift certificate. To my immense surprise I won that drawing. See what I chose to spend that gift certificate on!
In the photo at left, Rowan Felted Tweed in Bilberry. Delicious rich purple that just happens to match my new fall outfit. I want to make a simple chanel-style jacket with this. Mmmmmm. Yummy.
So of course while I was there picking out my prize I found the grab bags in the back of the shop, and the new sock yarns.
I just couldn't resist the one grab bag of wild pinks and purples (photo at right). The one color range that is in such short supply in my stash. The colors I need for handknits for the little girls in my family! Just look at all the little hats and mittens and wee handbags-to-be in there!
Doesn't that just bring out the Barbie-girl in you to see all that pink-and-fuschia? (Insert sound bite of little girls squealing here)
Then the sock yarn... Oh my, it's a new shipment of Araucania hand-dyed sock yarn, so new it hadn't even been priced yet. Wow, first pick of skeins right out of the box!
On the left, some tie-dye colors that the 4-year-old fell in love with. These will become socks and more socks. On the right, shades of bittersweet and rose with a hint of aqua that I just had to have. This will be saved for a special project that even I haven't figured out yet.
So much for the stash-only diet.
Subscribe to:
Posts (Atom)