Sunday, December 10, 2006

Holiday Activities

Close-up of my treeIt's always busy this time of year, so many things to do. Whether baking, decorating or shopping in preparation for get-togethers with friends and family, our to-do lists are full.

I am trying to simplify my life (and my list) to make more room for just enjoying time with family. I have a houseful of family members staying from out of town this year and it is tempting to over-schedule myself trying to make everything 'perfect'. I am resisting by scaling things down a bit. For instance, I chose a small tabletop tree instead of the traditional 6-footer because it takes much less time for the group to decorate and is more enjoyable for the folks with shorter attention spans.

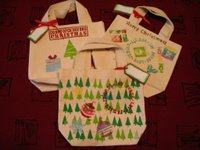
Make-n-take from local scrapbook storeI am also taking fewer shopping trips and choosing more enjoyable places to visit. I refuse to participate in the frenzy that has become all too common at popular retail stores with mega sales that encourage people to push and shove and fight over this bargain or that. Instead, I take my family to responsible stores like my local scrapbooking shop. A creative bunch, they hosted a 'Make and Take' event that even the 3-year-old could enjoy. Hubby and teenagers all had fun with foam stamps and acrylic paint decorating little canvas bags that we plan to use as gift bags.

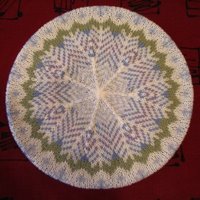
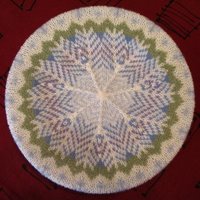
Snowflakes TamThis effort has paid off. I've had much more time to spend with my loved ones, and I've even had time to knit a bit in the evenings. Here is my new fair-isle wheel tam. I have decided to follow Mary Rowe's lead and give it a title- Snowflakes.

The pattern is my own, but it is inspired by the work of many people. I have studied books, magazine articles and examples on the internet. Some good books on the topic - Knitted Tams by Mary Rowe, Traditional Fair Isle Knitting by Sheila McGregor, 45 Fine and Fanciful Hats to Knit by Anna Zilboorg and 1000 Great Knitting Motifs by Luise Roberts.

Find the pattern here.

Snowflakes Tam Pattern

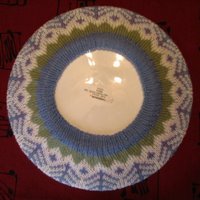
Top of Snowflakes Tam blocking on a dinner plateBottom of Snowflakes Tam blocking on a dinner plateThis is Snowflakes, my fair-isle wheel patterned tam. It will fit most small to medium sized adult heads. It is my own design and I'm sharing it with you here. If you want to learn more about making these lovely hats you can see my list of reference books in this post.

This is not a beginner's project, I would call it intermediate level. It involves 2-color knitting in the round using tiny size 1 US/2.25mm and size 3 US/3.25mm circular and double pointed needles. The challenge is to keep your tension even throughout.

Materials: Fine wool yarn that knits to a gauge of 28 stitches=4"/10cm. It must be wool or it will not block to shape. I used GGH Merino Soft, Lane Borgosesia Merino Extra Fine, and Le Fibre Nobili Tajmahal. You will need one 50 gm ball each of 5 colors or leftover yarns in the following amounts-

24 grams white
8 grams green
12 grams blue
4 grams pale blue
4 grams lavender

You will also need one stitch marker or small loop of contrasting yarn and 16"/40cm circular needles in size 1 US/2.5mm and size 3 US/3.25mm and a set of 4 double pointed needles in size 3 US/3.25mm or whatever size you need to knit your yarn to gauge.

Directions: Using size 1/2.5mm circular needle and blue yarn, cast on 134 stitches for ribbing. Join, being careful not to twist stitches, place stitch marker on needle to mark beginning of row, and work 1x1 ribbing (knit one, purl one) until tube measures 1"/2.5cm, or about 11 rounds.

Increase round: Switch to size 3 US/3.25mm circular needles. Knit 3, increase by knitting into the front and back of next stitch, *Knit 4, increase in next stitch* repeat between *'s around ending Knit 3, increase in next stitch. 168 stitches.

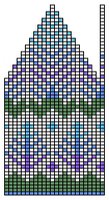
Knitting chart for Snowflakes TamBrim: Knit every round following the chart at left for color placement. Read the chart from bottom to top, from right to left, the way that you knit the piece. The chart is repeated 7 times around the hat. Continue moving the stitch marker to keep track of beginning of round.

Crown: Starting on row 36 of the chart, you will begin making double decreases every second round to shape the crown of the hat, represented by the single column of stitches. (The chart makes a stair-step to represent the stitches decreased out of the crown.) The center stitch of the decrease is prominent and decorative, and is performed in this manner-slip 2 stitches as if to knit 2 together, knit the next stitch, pass the 2 slipped stitches over the stitch you've just knitted. You will want to keep your stitch marker at the edge of the decrease line.

Continue working, decreasing 14 stitches every other round, changing to double pointed needles when this becomes necessary. Draw yarn through last 14 stitches and pull tightly. Weave in yarn ends.

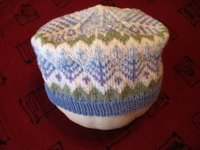
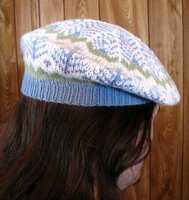
Snowflakes Tam before blocking, modeled by a pumpkinSnowflakes Tam on the headFinishing: At this point, the tam will look like the photo at left. It will seem a little small to fit an adult, but it will be a little larger after blocking.

To block the hat, wet it well and roll it up in a towel to remove excess water without wringing or twisting the hat out of shape. Gently stretch the hat over a dinner plate and pat it into place. See the photos at the top of the page to see what it should look like. Allow it to dry completely, which will take a day or two.

The photo at right is what the finished hat looks like, modeled by one of my teens.

Thursday, November 23, 2006

Happy Thanksgiving

simple cheese pastryHappy Thanksgiving morning. I want to share with you all my recipe for a simple yet elegant pastry I like to make for my family for holidays or special occasions.

Please note, this is not a low-fat recipe, that's why I only make it for special occasions.


Cheese Filled Pastry

1/2 package frozen prepared Phyllo dough
1/4 cup butter, melted

Filling:
1 8-ounce package cream cheese or neufchatel
1/2 cup sugar
1/2 teaspoon vanilla extract (or flavoring of your choice)
pinch salt

Preheat oven to 350f/175c. Brush a baking sheet with melted butter and set aside.

In a small bowl mix together the filling ingredients until smooth.

Open the package of phyllo dough and cover the stack of sheets with a damp cloth to keep them from drying out and breaking while you work. Working on a clean and dry board or counter top, carefully lay a sheet of dough on the dry surface and brush it with melted butter. Lay another sheet on top of the first and brush with butter. Continue until you have 8 layers assembled.
Spoon the filling along one short edge of the rectangle of dough and start rolling it, tucking the edges under to seal the ends, brushing with butter to make the dough stick together.
Place 2 more sheets of dough on work surface and place the rolled pastry on top of it diagonally, brush with butter and wrap the dough around it envelope style to seal the pastry.

Place the rolled pastry on the buttered baking sheet. Brush the pastry with butter one last time, sprinkle with a little sugar and bake it until well browned, about 30 minutes.

Serves 4-6.

Saturday, October 28, 2006

Pumpkin Largesse

Our pumpkin haulI received a request to see a photo of our haul of pumpkins from our multiple visits to the pumpkin patch. So, here you go Carol, a glimpse of our pumpkin largesse.

Yes, strictly speaking there are more than just pumpkins in that pile. The pumpkin merchants were selling squash of many types and referring to them all as different kinds of pumpkins. For the entertainment value perhaps. More likely to make the children demand more produce for the holiday.

In addition to the usual orange varieties, we chose the nearly red 'Cinderella Pumpkin', the white 'ghost pumpkin', striped 'tiger pumpkin' and crooked 'bent pumpkin'. You may recognize acorn, sweet dumpling, butternut and carnival squash. Some yams were added to the pile for good measure.

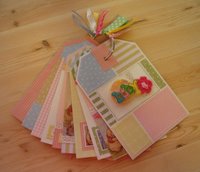
a baby brag bookHere is a baby brag book that I have been working on. It is made from cardstock tags measuring 4"x6" and decorated with patterned scrapbook papers, stickers and ribbons. The booklet is held together with a clip ring that has ribbons tied to it, so the recipient can make more tags to add to it if she wishes.

I made this mini scrapbook as a gift to accompany the yellow baby layette that I recently finished.

It was a lot of fun to make. I plan on making more of these.

simple cupcakes with sprinklesI made simple cupcakes for our upcoming neighborhood Halloween party. You know, easy stuff; cake mix, frosting in a tub, packaged sprinkles.

Never try to make just one batch of any baked good and send it off somewhere else, your family members will stage a revolt or a mutiny or somesuch.

So, of course, I made a second batch for the family. I have made the cupcakes even more 'special' by using different types of sprinkles. The party cakes only use one kind of sprinkles, and are therefore inferior. It has nothing to do with running out of sprinkles for our home cakes, going to the store and finding out they had run out of the kind I had used previously and having to choose another type, oh no. It is so that the 3-year-old can taste his cupcakes with different flavored sprinkles. Oh yes, I'm sticking with that story, you bet.

Monday, October 16, 2006

Pumpkins and Dresses

pumpkins and gourdsIt is time for our annual trip to the pumpkin patch.

Actually, I think we will be making a few trips this year. The pre-schooler is now old enough to enjoy the entertainments offered by the pumpkin purveyors and he wants to go back again and again. I have a feeling we will have more pumpkins in the house than we'll know what to do with.

I have continued to work on the red cardigan. I've completed the knitting and about one half of the sewing up. Lately I have been too distracted to finish it. Instead I have been working on my prayer shawl. It is simple and repetitive and does not require concentration, and it is something that I can pick up and put down easily while in waiting rooms.

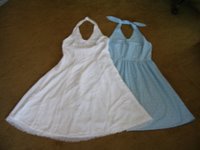
simple sundressesI finally have a photo to show you of the simple sundresses I made this summer for my friend's wedding. They were cool and comfortable for her to wear in the Las Vegas heat.

I apologize for their wrinkled condition. The photo was obtained stealthily by her mother and myself. The dresses were hurriedly pulled out of a moving box, laid on the floor for this photo, repacked and out the door again and into the truck.

I hope that I will get a better photo to post at a later date.

Friday, September 08, 2006

BBQ and a Hooded Cardigan

We had a pleasant time over the Labor Day weekend. Like many folks, we had a barbeque with friends and family. We don't do fancy BBQ like you see on the Food Network; we stick to simple, familiar foods that everyone likes, and prepare plenty of it.

Here's a collage photo of some of the offerings at our place this year.

Marinated steaks and chicken, hot dogs and assorted vegetables were grilled. We have had great success with mushrooms, bell pepper and zucchini threaded onto skewers before cooking. Baked potatoes, coleslaw, fresh melons and assorted buns and rolls filled out the menu.

This feast didn't take a lot of time to prepare. We purchased steaks and chicken from the grocery store meat counter that were already marinated and ready to throw on the grill. While the guys hovered around the BBQ, I cut up melons and baked potatoes in the microwave. I even had time to start a new project.

It's the end of summer, so I decided to make a sweater for the 3-year-old for the cooler weather of fall and winter. The Stephanie jacket from Anny Blatt Creation magazine #1 is just perfect. It's an aran-style hooded cardigan that I fell in love with at first sight. In fact, it's that one pattern that convinced me to purchase the book.

A side note here: Anny Blatt and Bouton d'Or books have great designs, but their pattern instructions are not always as detailed as I would like them to be. I am an experienced knitter, so I have no difficulty figuring out the bits they've left out of the pattern, but I chafe at the necessity of having to figure it out when I've paid a princely sum for a pattern book which should include all the information one needs to recreate the garment.

If you are not an advanced knitter, you may have difficulty following some of the patterns in these books. I recommend that you make sure you have an experienced knitter that you can ask for assistance, whether a friend or your local shop owner, your first time using one of these patterns.

In the photo on the left is the beginning of the back of the sweater. In the photo on the right is my progress after a full week. The sweater back, left front and right front pieces are completed.

As you can see, my youngest has chosen a lovely watermelon red for his sweater. This is Schachenmayr Nomotta Extra 100% superwash wool. 22 stitches x 30 rows = 4 inches/10cm on #5US/3.75mm needles. I like the yarn so far, it has a nice texture and it doesn't split very easily while knitting.

Wednesday, August 30, 2006

Teal Layette

Pingouin Layette fall/winter '95/'96I was at my local yarn shop recently and was looking through the selection of baby pattern books. There are quite a lot of them to look at I must say. My favorites are the French ones, Pingouin, Anny Blatt and Bouton d'Or. Sometimes I find a nice English or German one.

This time I found a Pingouin that I didn't already have and squealed with delight. The ladies in the shop are used to this behavior and shared my pleasure with knowing smiles.

After finishing with the patterns I moved on to the sale bins. 40% off is not to be ignored. I found quite a bit of Sirdar Rio in nice soft colors. It's 60% cotton and 40% acrylic, making it a good choice for summer or multi-seasonal garments. So I stocked up.

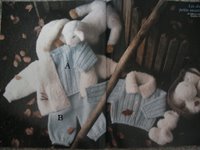
Pingouin Layette fall/winter '95/'96 patternThis is the specific pattern that interested me in this Pingouin book. The long sleeve pullover A and the pants B in the photo at left. It's a simple classic outfit suitable for either gender. I like the stitch pattern on the pullover and the color is divine. I found some Rio in just that shade, so wanted to try it out.

There is one problem with the pattern-I don't like the 2x2 ribbing they used with the 2x4 garter rib stitch of the body of the sweater. To me, it doesn't look like it's in keeping with the design. I also don't like the little rolled edges, they just have a tendency to collect baby drool. So I changed it to single rib.

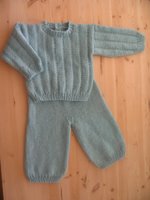
Finished Teal LayetteSo here is the finished product. I do like the single rib much better with the pattern stitch. Sirdar Rio has nice stitch definition and it doesn't split easily while knitting.

Because the yarn is cotton rich, it also doesn't have a lot of elasticity. This made the waistband a little too loose. I have installed a drawstring for the time being, but may use some elastic thread to pull it up properly around the waist in future.

This is one of the things that may happen when substituting yarns in patterns. Cotton doesn't behave the same way as wool, which doesn't behave exactly the same way as synthetics. To make things more confusing, different yarns of the same fiber will behave differently too. I find baby clothes are a good way to experiment with yarns to discover just what kind of fabric they will make before I decide to make an adult sized garment.

Edit: This newborn-sized outfit used 4 balls of Sirdar Rio.

Tuesday, August 29, 2006

Yellow Layette Finished

I've finished sewing up this little newborn-sized top that I made from Plymouth DreamBaby DK. I used the pattern for the Marnes pullover from Bouton d'Or Layette & Junior book #13. I didn't need to make any adjustments for gauge.

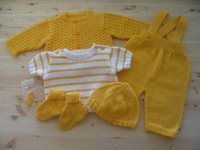
It is the last piece of the yellow layette I've been working on. I originally intended to make a layette using yellow and white DreamBaby and multicolored Hobby yarns. I started with the jacket in Hobby last June and the pants and hat in Dreambaby last October. Now that I have made more pieces I have decided not to combine the two in one layette. The yarns somehow don't look right together when they are knitted up. I will simplify things and keep to the yellow and white Dreambaby in this layette.

Here is the complete set, including a little zip bag with a spare button, a bit of yarn for repairs, and a ball band with laundering instructions.

I will include several other items when I wrap this up because I will be giving it to a close relative and I want it to be a very special gift.

Edit: This newborn-sized layette used 5 balls of yellow and one ball of white DreamBaby DK. Great yardage!

Thursday, August 24, 2006

The Sewing-up Basket

My sewing-up basket is getting full. I have a bit of catching up to do. I have been spending a lot of time away from home lately. While I'm out and about I find it quite easy to knit things, but not so easy to sew them up.

So, the basket fills.

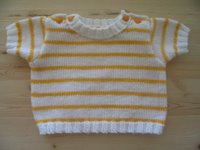
What you can see on the top layer are 2 baby sweaters. One short-sleeved in white with yellow stripes in Plymouth DreamBaby DK, and one teal long-sleeved pullover in Sirdar Rio.

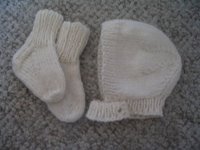
Also in the basket are this bonnet and booties in Patons Classic Wool. I want to embellish this little set but haven't decided how I want to go about it quite yet.

Perhaps I will add a crocheted edge to them, just a little something to dress them up a bit. Maybe I will choose a bolder look and add some crocheted flowers and colorful edging to them. There are so many options to choose from that it's hard to decide.

Here are some pieces that have made it out of the basket and are now finished.

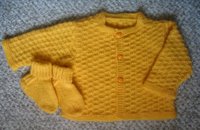
This is the Malicorne Jacket from Bouton d'Or's Layette & Junior book number 13. I've knit it in Plymouth's DreamBaby DK and adjusted the pattern for differences in gauge.

The baby socks are the same easy baby sock pattern that I have been using from Blossom Knitwear, adjusted to my gauge by using 28 stitches instead of 24.

Saturday, August 19, 2006

Finished Wedding Set

Here is a photo of the completed wedding set I was 'drafted' to make a few months ago. The wedding is today, so I can post about it without spoiling the surprise. The set is lovely and the recipient will cherish it. I do need to critique the pattern, however.

This set is crocheted with size 10 cotton thread using the pattern from the March/April 1998 issue of Quick & Easy Crochet magazine. There is an error in the pattern, but the publisher does not maintain a webpage for corrections.

The example in the magazine is crocheted with blue and white ombred thread and I have to say that it looks better than a solid color does. The reason for this is that the 3 pieces don't really look like they are part of a set. That is to say, they don't have a strong design element that is repeated in each item, such as using the same stitch pattern consistently in all 3 pieces. Using an ombred thread makes them look more like a matched set.

I feel compelled to improve upon this pattern and design a set of my own. I don't know why. It must be the little voice in the back of my mind telling me that I can do a better job of it. It may just be the challenge of it. I don't know, but I suspect I may end up posting a thread crocheted wedding set on my blog.

Friday, August 11, 2006

More Waiting Room Knitting

I really do recommend knitting while you wait (or crochet, embroidery, hand sewing etc.) because you don't feel your time has been wasted when you can see that you have made progress on a tangible project.

Just think how much of my time would have been wasted these last few weeks if it weren't for these lovely projects I've been working on?

There is a baby shower coming up in a few months and a family member let me know about it well in advance so that I may have plenty of time to knit. Wasn't that kind and thoughtful of her? The rewards are great for those who give the crafters in the family plenty of time to prepare. I don't know about you, but I know I'd rather get a full layette, lovingly handmade by my Aunt, than a quick pair of booties and package of diapers. I'm just saying.

So, here is yet another pair of those quick baby booties. I've made so many of them that I've memorized the pattern. It's really handy to be able to grab nothing more than a small ball of yarn, a set of needles and a pair of snips or nail clippers and keep them in your handbag to knit while you wait, wherever, whenever.

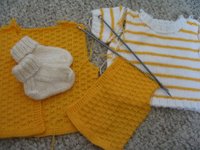
There's also a short-sleeved top in white with yellow stripes that is waiting to be sewed up and a yellow cardigan to match with a pretty stitch texture. The colors are so bright and cheerful and gender neutral, I know she'll just love them.

Thursday, June 29, 2006

Portable Knitting

Here is a bit of 'waiting room knitting' I did this week. Small projects like this pair of baby socks can fit in a pocket or handbag and are great for those times when you're waiting. Most appointments give plenty of knitting time, but I've managed to knit a bit in places you wouldn't normally expect, like standing in line at the bank, the dry cleaners, the cable company or the pharmacy.

This kind of public knitting seems to invite comment too. The most common is, "Is that knitting?" which can be a great conversation starter.

The free pattern for these socks can be found here. This pair knitted in Patons Classic Merino Wool, but any worsted weight yarn will do.

Wednesday, June 21, 2006

Projects Finished and New

All the time that I am working on my projects I am getting new ideas for things I'd like to try. That's not to say that I can't stay focused on one project; I just find that when I am using that creative problem solving part of my brain for one project, I get more than just the ideas needed for that item. Related ideas just sort of tumble out too. Creative multitasking. I thoroughly enjoy each item I work on, but sometimes one of those related ideas is so interesting that I just have to investigate it before I lose the inspiration. This is how the WIP pile grows.

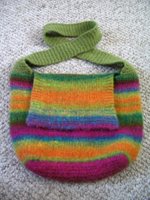
finished bag of Noro KureyonI have finished some projects and in the course of finishing them have started more. Of course.

Here is the finished Noro Kureyon bag I have been working on. It's based on the Booga Bag, with added flap and handle strap. It's perfect for my toddler son's toys. It's roomy, easy to carry, and the flap helps hold stuff in the bag yet is easy for him to open and close.

I had thought about adding some sort of closure, perhaps a magnetic button, to help hold his toys inside the bag, but decided against it. It's best to keep things simple for kids.

Pansy colorsThis little group of worsted weight yarns are destined to become matching hat and mittens. I love these pansy colors, but haven't decided on a pattern just yet. I have narrowed it down to a few different choices, but haven't found the 'perfect' one.

I have several projects like this one waiting to be started. Yarns with great promise just needing an equally great pattern. Often I know what sort of garment or accessory I want to make but not exactly what design.

Other projects I have planned out completely but am not working on them just now for one reason or another. For instance, I am planning a pair of Bazaar Socks (pattern here). I am in the process of knitting gauge swatches and deciding how I want to knit them to get my size. I am taking a break from it because I scraped my knuckles and find it painful to work on them right now.

In fact, with these gritched knuckles, I am avoiding knitting altogether. Until they have healed I will take advantage of the opportunity to do other creative things.

Some new clothing patternsI purchased some new sewing patterns to play around with. With the beginning of hot summer weather comes the desire to wear cool summer dresses. And as long as I'm sewing summer dresses, I should sew a little something for fall as well. Since I have the sewing machine out and all. The prospect of making some new pieces for my wardrobe is so appealing. You know, the kind of thing that makes you feel great when you wear it just because you love the fabric.

Oh, I can sew? Well, maybe while I'm sewing dresses anyway, I can help my neighbor who is having some trouble with a sundress?

You see where this leads.

I am helping a friend with a simple sheath dress for an informal wedding. Yes, I volunteered to make a wedding dress. Because it's what you do for a dear friend when you know how to sew well, enjoy sewing and see such a project as simple and uncomplicated. Since I already have the sewing machine out and all.

We'll see how reality compares to the estimate.

Guatemalan Gloves

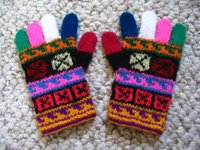
I found this pair of gloves in a tiny shop that sells imported South American handcrafts. They're bright and colorful, a delight for children, but only a knitter can truly appreciate the level of workmanship evident in these gloves. This is not a beginner's project, but rather a strong intermediate one due to the fiddly nature of stranded knitting in the round on such a small scale. If you are new to sock or mitten making, I recommend trying a solid colored pair in aran or chunky weight yarn first. In these instructions, I will be substituting duplicate stitch for the intarsia-in-the-round technique used in the original.

One set of instructions covers all sizes from toddler to adult. Sizing is achieved by using yarn of different weights or needles of different sizes with one exception-the finger lengths are given for size 2 years [all other sizes]. If you want the gloves to be a specific size, you must be precise with your gauge. These gloves are made with 14 colors of yarn, but you can certainly make them with fewer colors. My samples use between 3 and 9 colors each. This is an excellent project for using leftover bits of yarn. Yarn weights given are approximate, taken from my samples and my kitchen scale.

Abbreviations:
DPN = Double Pointed Needle
P = Purl
Sl = Slip stitch as if to purl
* = Repeat instructions between asterisks as instructed.
Inc = Increase
Rep = Repeat
St = Stitch
Sts = Stitches
Rnd = Round
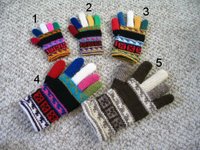
gloves in 5 sizes1. For size 2 years you will need small amounts of sock/fingering weight yarn to total about 14 grams, one set each of size 1US/2.25mm DPNs and size 2US/2.75mm DPNs or size needed to match gauge. Gauge: 30 stitches = 4"/10cm in stockinette stitch on larger needles. Original knit in shetland type yarn measures 2.5"/6.4cm wide at cuff and 5.5"/14cm long.

2. For size 3-4 years you will need small amounts of sock/fingering weight yarn to total about 18 grams, one set each of size 2US/2.75mm DPNs and size 3US/3.25mm DPNs or size needed to match gauge. Gauge: 28 stitches = 4"/10cm in stockinette stitch on larger needles. Sample knit in Regia and Lang Jawoll sock yarns measures 2.75"/7cm wide at cuff and 6.25"/16cm long.

3. For size 6-8 years you will need small amounts of DK/sport weight yarn to total about 36 grams, one set each of size 4US/3.5mm DPNs and size 5US/3.75mm DPNs or size needed to match gauge. Gauge: stitches = 4"/10cm in stockinette stitch on larger needles. Sample knit in Knit One Crochet Too's Creme Brulee DK measures 3.25"/8.25cm wide at cuff and 7.25"/18.4cm long.

4. For size 10-12 years you will need small amounts of worsted weight yarn to total about 52 grams, one set each of size 6US/4.0mm DPNs and size 7US/4.5mm DPNs or size needed to match gauge. Gauge: 20 stitches = 4"/10cm in stockinette stitch on larger needles. Sample knit in Patons Classic Wool measures 3.75"/9.5cm wide at cuff and 9"/23cm long.

5. For ladies size small/medium you will need small amounts of aran weight yarn to total about 56 grams, one set each of size 8 DPNs and size 9 DPNs or size needed to match gauge. Gauge: 16 stitches = 4"/10cm in stockinette stitch on larger needles. Sample knit in Lion Brand Fishermen's Wool measures 4.25"/11cm wide at cuff and 10"/25.5cm long.

For all sizes you will also need a tapestry needle and small scissors.
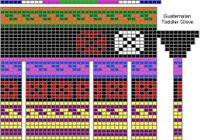
Chart showing colors and shaping of guatemalan glovesThe chart at left shows placement of the colors used and shaping of the gloves. Read this chart starting at the bottom right as you work.

List of the 14 glove colors in the order they are used:
Color A = yellow
Color B = purple
Color C = black
Color D = medium red
Color E = medium blue
Color F = light pink
Color G = dark green
Color H = orange
Color I = dark blue
Color J = white
Color K = medium green
Color L = dark pink
Color M = dark red
Color N = pale yellow

Casting On
Because the first knitted round is a different color than the cast-on round, I will call the cast-on round the first round for the purposes of following the chart. The joining actually takes place at the beginning of the second round after the cast-on, or what I call round 3.

Row 1:(Becomes round 1 after joining) Using the knitting-on method and the smaller size needles, cast on 36 stitches using 2 DPNs and color A. Move the stitches to the opposite end of the needle, so that the end with the short tail is close to the tip of the needle.
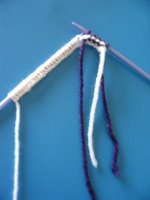
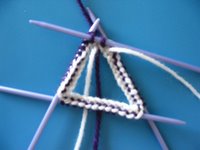
First round of purling after cast-onJoining work after purling first roundRow 2: (See photo left, becomes round 2 after joining) Using color B, p the first 12 stitches onto what we will call needle 1, p the next 12 stitches onto needle 2, p the last 12 stitches onto needle 3.

Round 3: (See photo right) Join the work into a round without twisting stitches and knit all stitches in this round.

Round 4: With color A, purl around.
Round 5: Knit around.
Round 6-23: Change to larger size needles and purl each round, following chart for color placement.
Round 24: P around, increasing 3 stitches positioned as shown in the chart; 39 stitches.

Begin Thumb Gusset
(This section is worked in solid black. The color motifs are duplicate stitched on the back after the glove is finished.)
Round 25: With color C, inc in the first 2 sts, p rem sts; 41 sts.
Round 26: P
Round 27: Inc in 1st and 4th sts, p rem sts; 43 sts.
Round 28: P
Round 29: Inc in 1st and 6th sts, p rem sts; 45 sts.
Round 30: P
Round 31: Inc in 1st and 8th sts, p rem sts; 47 sts.
Round 32: P
Round 33: Place first 10 sts onto a short scrap length of yarn to be worked later, p the 11th st and pull snugly to close the gap, p the rem sts; 37 sts. Change to color G.
Round 34-39: P each rnd, following chart for color placement.

Fingers
The fingers are worked using a technique that allows you to make a tube while working flat using 2 needles. Since these tubes are only 9 or 10 stitches around, this is easier than trying to work in the round with 3 or 4 stitches on each DPN.

Before you can actually work the stitches for the fingers, they need to be set up and transferred to a different needle. You can do this two different ways; 1) transfer them directly to the new needle from the current needles, or 2) take the stitches off the current needles onto a scrap of yarn before transferring each finger's stitches before working the finger. If you are experienced and comfortable using DPN's, I recommend the first method. If you aren't as comfortable keeping track of many needles poking out all over the place, I recommend the second method.

Start transferring stitches from the current needles or from yarn holder by slipping the stitches onto your working needle as if to purl them.

On the chart you can see a row of colors just above the rest of the glove. This represents the placement of each finger's stitches in relation to the body of the glove. You will work from right to left, index finger to little finger.

First or Index Finger
You should have 11 sts on needle 1, 13 sts on needle 2 and 13 sts on needle 3. You want the sts divided in 2 groups now, so slip 8 sts from needle 2 to needle 1 and the remaining 5 sts from needle 2 to needle 3; this makes 19 sts on needle 1 (front needle) and 18 sts on needle 3 (back needle).
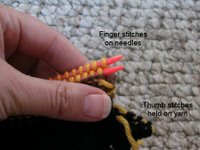
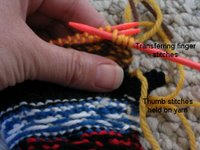
Holding your work as shown in photo at left, slip one st from the back needle (needle 3), slip one st from the front needle (needle 1), slip one from back needle, slip one from front needle (see photo right), continue in this manner until you have 9 stitches on needle. Slide the sts to the other end of the needle so that you can start working at the beginning of rnd position.
Row 1: With color I, sl 1, *p 1, sl 1* repeat to end of row. Turn.
Row 2: *p 1, sl 1* rep until last st, inc in last st; 10 sts, 1 rnd completed. Turn.
Row 3: Sl 2, *p 1, sl 1* rep to end. Turn.
Row 4: *P 1, sl 1* rep to end. 2 rnds completed. Turn.
Row 5: *P 1, sl 1* rep to end. Turn.
Row 6: *P 1, sl 1* rep to end. 3 rnds completed. Turn.

Repeat Rows 5 and 6 until finger is 24[30]rows/12[15]rnds long. Cut yarn 6-8 inches long, thread onto tapestry needle and thread it through the first st, and every alternate st across row, turn and rep on other side to draw yarn through all sts around. Pull up tightly to close fingertip, fasten off and weave in the end.

Second or Middle Finger
Sl 1 st from front needle, 1 from back needle, 1 from front needle, 1 from back needle, and so on until you have 10 sts on the needle. Slide the sts to the other end of the needle.

Row 1: With color J, *p 1, sl 1* rep to end of row. Turn.
Row 2: *P 1, sl 1* rep to end of row. 1 rnd completed. Turn.

Repeat Row 2 until finger is 30[36]rows/15[18]rnds long. Cut yarn and draw through stitches and pull tightly to close fingertip.

Third or Ring Finger
Sl 1 st from front needle, 1 st from back needle, 1 from front needle, 1 nfrom back needle, and so on until you have 9 sts on the needle. Slide the sts to the other end of the needle.

Row 1: With color F, p 1, *sl 1, p 1* rep across row. Turn.
Row 2: Slip 1, *p 1, sl 1* rep across row. 1 rnd completed. Turn.

Repeat Rows 1 and 2 until finger is 24[30]rows/12[15]rnds long. Cut yarn and draw through sts and pull tightly to close fingertip.

Fourth or Little Finger
Sl 1 st from front needle, 1 st from back needle, 1 from front needle, 1 from back needle, and so on until you have 9 sts on the needle. Slide the sts to the other end of the needle.

Row 1: With color K, p 1, *sl 1, p 1* rep across row. Turn.
Row 2: Sl 1, *p 1, sl 1* rep across row. 1 rnd completed. Turn.

Repeat Rows 1 and 2 until finger is 22[26]rows/11[13]rnds long. Cut yarn and draw through sts and pull tightly to close fingertip.

Thumb
Pick up stitches from the yarn holder in the same manner as the finger stitches, slipping one stitch from front half of yarn loop, slipping one stitch from back half of loop, alternating back and forth until you have 10 stitches on the needle.

Row 1: *P 1, sl 1* repeat across row. Turn.
Row 2: *P 1, sl 1* repeat across row. One rnd completed. Turn.

Rep rows 1 and 2 until thumb is 20[23]rows/10[13]rnds long. Cut yarn and draw through sts and pull tightly to close thumbtip.

Make another glove to match.


Finishing
These gloves were made using a yarn very similar to a shetland wool. It is fine, a little fuzzy, has very little stretch and has a tendency to stick to itself the way a feltable wool does. The knitter has chosen to tie the yarn ends in knots and cut them short whenever possible, rather than weaving them in. This works well in the small version, the knots are very small and disappear into the knit fabric. If you use a superwash wool or other yarn that doesn't cling to itself readily, like cotton, synthetic or other smooth fibers, you will probably want to weave in the ends.

There are little holes left in between the fingers and thumb that need to be closed up during the weaving-in process. The photos below show one way to do this.
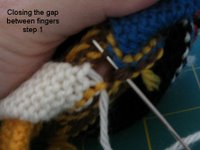
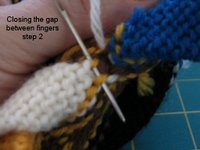
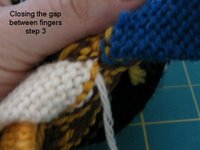
Step 1: With yarn end from base of second finger threaded on tapestry needle, catch stitches at base of first finger. Step 2: Catch stitches at base of second finger. Step 3: Pull up snugly to close gap. Weave in the end, reinforcing closure. Repeat in same manner until all fingers and thumb holes are closed.

Using duplicate stitch and colors M and N, add the large motifs to the wide black band on the back of the gloves, following chart for placement. The chart shows the left glove, you will want to mirror the design for the right glove.
Saturday, June 10, 2006

Softie for BackTack3 has Landed

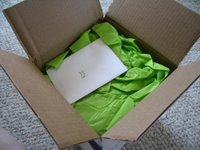
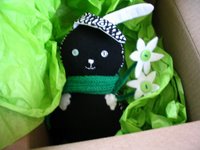
Opening the boxSoftie peeking outI have to tell you, Niki and I have been emailing back and forth furiously trying to figure out where this box went to. It should have arrived on Wednesday; after all, Priority Mail shouldn't take more than 3 days to get to its destination within the US. We had begun to fear the worst, that the package had been lost.

Thankfully, it has arrived safely. Who knows where it was misdirected before coming here, but we are so very glad that it is here now. We must open it immediately!

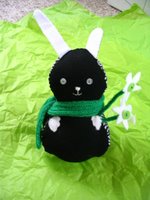
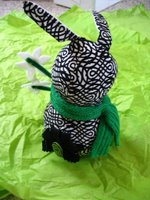
Ta-da!Bunny, rear viewTa-Da! Here's the cutie!

Front view on the left, rear view on the right.

This Wee Bunny has little button eyes and his nose and mouth are embroidered. In his hands he holds a cluster of felt daisies with lime green button centers and forest green chenille stems. He is wearing an emerald green scarf: knitted accessories! I love it!


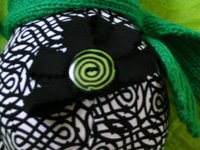
Button tailInitial A on the bottomHis tail is made from loops of pinked black twill fabric fastened in place with a fun spiral-design button. See photo, left.

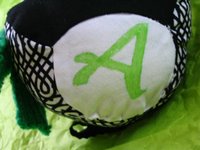
On the bottom, out of sight when he's sitting upright, is my initial A. See photo, right.


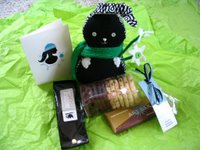
The Whole PackageHere you see all the contents of the package. There's wonderful ginger-ginseng tisane that I just can't wait to try. There are chocolate and ginger shortbread cookies, oh my. Ah, there's an Art Bar, Swiss dark chocolate...quite liquid, I'm afraid, but it will be most delicious once it's had a chance to firm up a bit in the fridge.

Chocolate always survives ;-)

It has been a perfectly lovely day!

Friday, June 09, 2006

BackTack 3 Softie

Here are my gifties for Jess, my swap buddy for BackTack 3. They have arrived safely at their destination, so I can now show you the details. I know you want the details!

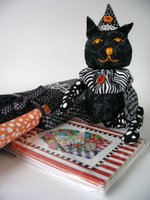
Jesster Kitty and her entourageJesster Kitty and her entourageI checked with Jess and found that her favorite color is orange, so chose that as my accent color for this project. Anything in your favorite color is going to make you feel good, so when I make a gift for someone, I try to use their favorite color whenever possible.

So, this is my little creation, Jesster Kitty. A performer never really travels light, so she has an entourage of sorts. With some of the leftover fabrics I made a knitting needle roll to match. Some cute note cards fill in nicely. Can you believe I fit it all into one of those small Priority Mailers?


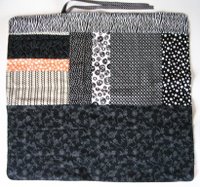
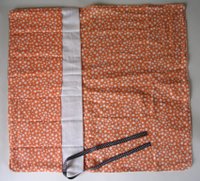
Needle roll exteriorNeedle roll interiorHere is the needle roll. The outside on the left, the inside on the right.

I used standard cotton calico prints for the cover and double-faced cotton flannel for the lining and pockets. This makes a rather thick and padded roll that provides a nice amount of cushioning to protect knitting needles. It is large enough to comfortably hold longer needles but can be folded to a smaller size for shorter needles too. I hope she finds it useful.

Do you think I should post the pattern? Let's do a poll and find out! It will be interesting to see what you think. Find the poll over in the right-hand sidebar.