
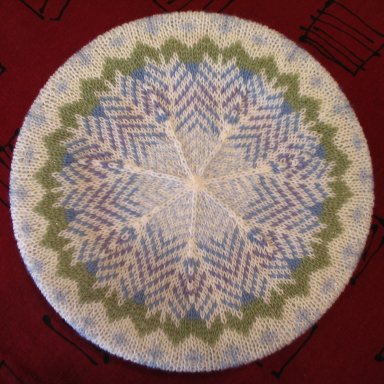
 This is Snowflakes, my fair-isle wheel patterned tam. It will fit most small to medium sized adult heads. It is my own design and I'm sharing it with you here. If you want to learn more about making these lovely hats you can see my list of reference books in this post.
This is not a beginner's project, I would call it intermediate level. It involves 2-color knitting in the round using tiny size 1 US/2.25mm and size 3 US/3.25mm circular and double pointed needles. The challenge is to keep your tension even throughout.
Materials: Fine wool yarn that knits to a gauge of 28 stitches=4"/10cm. It must be wool or it will not block to shape. I used GGH Merino Soft, Lane Borgosesia Merino Extra Fine, and Le Fibre Nobili Tajmahal. You will need one 50 gm ball each of 5 colors or leftover yarns in the following amounts-
24 grams white
8 grams green
12 grams blue
4 grams pale blue
4 grams lavender
You will also need one stitch marker or small loop of contrasting yarn and 16"/40cm circular needles in size 1 US/2.5mm and size 3 US/3.25mm and a set of 4 double pointed needles in size 3 US/3.25mm or whatever size you need to knit your yarn to gauge.
Directions: Using size 1/2.5mm circular needle and blue yarn, cast on 134 stitches for ribbing. Join, being careful not to twist stitches, place stitch marker on needle to mark beginning of row, and work 1x1 ribbing (knit one, purl one) until tube measures 1"/2.5cm, or about 11 rounds.
Increase round: Switch to size 3 US/3.25mm circular needles. Knit 3, increase by knitting into the front and back of next stitch, *Knit 4, increase in next stitch* repeat between *'s around ending Knit 3, increase in next stitch. 168 stitches.
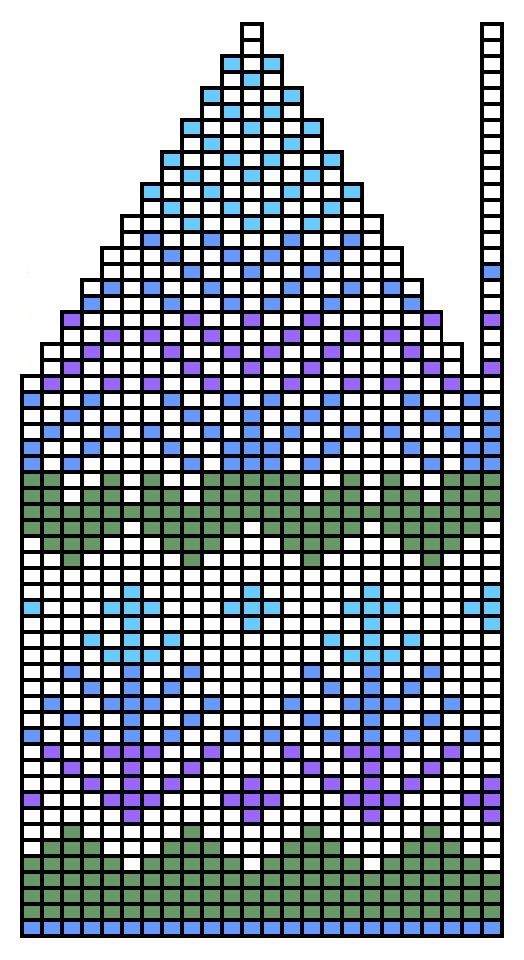 Brim: Knit every round following the chart at left for color placement. Read the chart from bottom to top, from right to left, the way that you knit the piece. The chart is repeated 7 times around the hat. Continue moving the stitch marker to keep track of beginning of round.
Crown: Starting on row 36 of the chart, you will begin making double decreases every second round to shape the crown of the hat, represented by the single column of stitches. (The chart makes a stair-step to represent the stitches decreased out of the crown.) The center stitch of the decrease is prominent and decorative, and is performed in this manner-slip 2 stitches as if to knit 2 together, knit the next stitch, pass the 2 slipped stitches over the stitch you've just knitted. You will want to keep your stitch marker at the edge of the decrease line.
Continue working, decreasing 14 stitches every other round, changing to double pointed needles when this becomes necessary. Draw yarn through last 14 stitches and pull tightly. Weave in yarn ends.

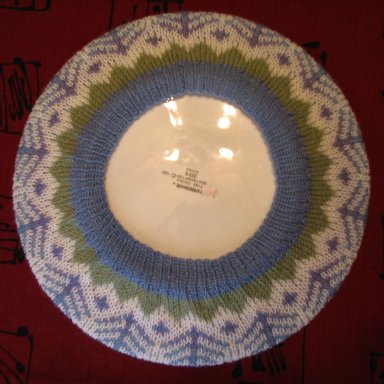
 Finishing: At this point, the tam will look like the photo at left. It will seem a little small to fit an adult, but it will be a little larger after blocking.
To block the hat, wet it well and roll it up in a towel to remove excess water without wringing or twisting the hat out of shape. Gently stretch the hat over a dinner plate and pat it into place. See the photos at the top of the page to see what it should look like. Allow it to dry completely, which will take a day or two.
The photo at right is what the finished hat looks like, modeled by one of my teens.


11 comments:
What a lovely pattern! I thank Nannette for directing us to it. I definitely intend to try this for my granddaughter. Thank you so much for sharing it!
That is a wonderful pattern. The color combinations are great and your knitting is excellent :).
Really, really PRETTY .... I love your color sense and artistry. I am anxious to try it myself, but don't think it will be as lovely as yours: your stitch work is so even and fine.
Thank You for such a beautiful tam!
A really nice pattern and the colour combination is so refreshing :) This's quite a challenge for me but more than worth a try! Thank you for posting this.
Thank you somuch for sharing. What a lovely tam.
Nicole
Looks very nice! Thanks for offering the pattern for free!
Thank you for your so lovely pattern.
I was enjoy to knit it. the result is beautiful.
bonjour
j'adore vos modeles malheureusement je ne comprend pas les explications car pas en francais dommage
mais merci pour ces beautees merci
breizh22110@hotmail.com
merci
sylvie
Love your tam pattern. I am looking for a tam for children and for stuffed bears and for dogs. Can you help me out here?
Thanks,
Suzanne
lickstone@gmail.com
I just cast on for this tam this afternoon and am now at the increases. It looks like the instructions for the increases should be to increase IN the 3rd st, and then IN the subsequent 4th st (i.e. K2, kfb, *k3, kfb, rep from *), rather than k3, kfb in the next st, *k4, kfb in the next st, rep from *, in order to get the necessary number of increases. Looking forward to working the rest of the tam!
Lovely post, thanks for posting.
Post a Comment