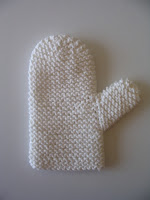
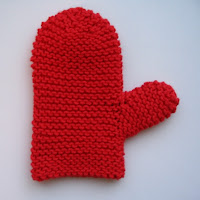
 As promised, here is the pattern for the bath mitts I made for my 4-year-old. They have been knitted flat in garter stitch in one piece and are seamed along the outer edge of the hand and inner edge of the thumb. They are designed to fit a preschool aged child loosely, which makes it easier for them to put them on by themselves.
Materials:
You will need 1 ball of worsted weight cotton yarn, a pair of size 7 US/4.5 mm needles, a tapestry needle and a stitch holder or a bit of contrasting yarn to hold thumb stitches.
Stitches used:
Garter stitch = knit every row.
M1 = increase a stitch by knitting into the front and the back of the next stitch, or using your favorite method.
K2tog = decrease by knitting 2 stitches together.
Cuff:
Cast on 30 stitches. Knit 16 rows in garter stitch (8 ribs).
 Row 17: Knit 14 stitches, m1, knit 2, m1, knit 14; 32 stitches.
Row 18: Knit across row.
Row 18: Knit 14, m1, knit 4, m1, knit 14; 34 stitches.
Row 19: Knit.
Row 20: Knit 14, m1, knit 6, m1, knit 14; 36 stitches.
Row 21: Knit.
Row 22: Knit 14, m1, knit 8, m1, knit 14; 38 stitches.
Row 23: Knit 14, place the next 10 stitches onto a holder, cast on 2 stitches, knit 14 making sure to not leave a gap (see photo right); 30 stitches on needle.
 Knit 24 more rows in garter stitch (12 ribs). Your mitt should look like the photo at left.
Row 48: *K2tog, knit 3* repeat between *'s across row; 24 stitches.
Row 49: Knit.
Row 50: *K2tog, knit 2* across; 18 stitches.

Row 51: Knit.
Row 52: *K2tog, knit 1* across; 12 stitches.
Row 53: Knit.
Row 54: *K2tog* across; 6 stitches.
Cut yarn leaving a 10"/25cm tail, thread the end onto a tapestry needle and draw the yarn through the remaining stitches and pull up tightly. Fasten off. It should now look like the photo at right.
Thumb:
Put the thumb gusset stitches back on the needle, as shown.
Row 1: Cast on 2 stitches onto right-hand needle, knit the 10 stitches from left needle, cast on 2 stitches; 14 stitches.

 Knit 14 rows (7 ribs).
Row 16: *K2tog* across; 7 stitches.
Cut yarn leaving a 6"/15cm tail, thread the end onto tapestry needle and draw yarn through remaining 7 stitches. Pull up tightly and fasten off. It should look like the photos at left and right. The knitting is done, now it's time to sew up.
 Finishing:If you're new at sewing up garter stitch using mattress stitch, Knitty has a great article with lots of photos that shows you how.
I recommend that you start sewing up the longer seam of the outer palm first. This stabilizes the mitt and seems to make it easier to work on the more fiddly thumb.
Start sewing up the thumb by seaming the length of the thumb seam, and finish by grafting those extra 4 thumb stitches to the 2 cast on palm stitches they match up with, smoothing and pulling up any little holes you come across. Weave in ends and you're done.
 Want to put a ruffle on the cuff for a feminine touch? I embellished this mitt with a simple crocheted edge.
Round 1: 2 Single crochet in each cast-on stitch around the cuff, slip stitch in first stitch to join, chain 2.
Round 2: Double crochet in each single crochet around the cuff, slip stitch to top of chain, fasten off. Weave in ends.


2 comments:
How cute!! And with 6 grandchildren (3 step-grandkids), and a BIG ball of cotton somewhere in one of the yet-to-be-unpacked boxes here, I'll have to make a few of these. Very nicely done... Thank you!
Great and easy pattern, except you list two of Row 18.
Post a Comment