
 Here is a roomy handbag to knit using 2 strands of worsted weight wool. Make sure your yarn is not superwash wool or a natural white color or it will not felt.
I used Cascade 220 and a 30"/76cm size 11US/8mm circular needle for this bag; 2 skeins green, 1 skein blue, 1 skein sand and a small bit of leftover black. Also, 4 stitch markers, one to mark end-of-row and 3 to mark the position of increases. I used a red marker and 3 blue markers, and will refer to them by these colors in these directions. Gauge is not very important for this bag, and the exact size will vary with the yarn and needle size used. (If you choose to make the alternate handle, you will need a size K/6.5mm or L/8mm crochet hook)
Begin with the bottom of the bag.
With two strands of main color (green) cast on 20 stitches. Working back and forth to make a flat piece of knitting, work stockinette stitch for 60 rows. (Knit one row, purl the next row)
With knit side facing you, place blue marker on right hand needle and pick up 27 stitches along the long side of the knitted rectangle; place another blue marker and pick up 20 stitches along the cast-on edge; place another blue marker and pick up 27 stitches along the other long edge of the piece, place red marker.
 Work the sides of the bag.
Begin knitting in the round. Following the chart at left for color stripe placement (or design of your choice), knit 55 rounds of stockinette stitch (knit every round) continuing to use two strands of yarn; at the same time increasing 4 stitches every 4 rounds placed as follows:
Increase Round: Slip red marker, increase in first stitch by knitting into the front and back of the stitch, knit to 1 stitch before first blue marker, increase in this stitch, slip blue marker, knit to second blue marker, slip marker, increase in next stitch, knit to 1 stitch before third blue marker, increase in this stitch, slip marker, knit to red marker.
Round 56: Change to main color and knit all stitches.
Round 57: Purl all stitches.
Round 58: Knit.
Round 59: Purl.
Round 60: Knit.
Bind off all stitches. Weave in ends.
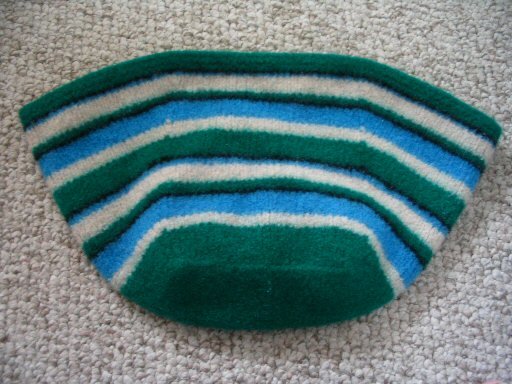
 This is what you should have. Laying flat like this, it measures about 24"/61cm wide and 17"/43cm long.
Make the handles.
Using 2 strands of yarn, cast on 5 stitches and work back and forth in garter stitch (knit every row) until the strap measures about 6'/2m long. Bind off.
Or, if you're in a hurry like I was, you can crochet an alternate handle:
Using a double strand of yarn and a size K/8mm crochet hook, make a chain about 6 feet (approx 2 meters) long.
Row 1: Starting in second chain from hook, single crochet in each loop of chain. Chain one, turn.
Row 2: Single crochet in each single crochet. Cut yarn and pull thru loop to fasten off.
The handle strap will be cut to length after felting.
Time to felt it.
Now throw the bag and the handle strap in the washing machine with a bit of detergent and a pair of jeans or other durable low-lint laundry items. Use the settings for high agitation, low water level, hot water wash and cold rinse. You will probably need to do this at least 2 times, depending on the machine.
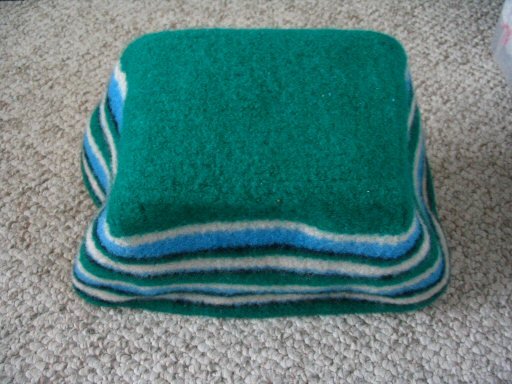
 This is what it looks like after felting. My bag now measures about 21"/53cm wide by 12"/30cm tall after 2 wash cycles. Most of the stitch definition is gone and it has a uniformly fuzzy look to it. The fabric has a nice thickness and stiffness to it, enough to hold its shape while in use without stretching.
It has shrunk a little bit more in height than in width. Different yarns shrink differently when felted, so the proportions of your bag may not be exactly the same as mine.
The handle strap has shrunk to about 4'/3.25m long, but after tugging on it and stretching it out as much as it will go it ended up at about 5'/2.5m long.
 Smooth the bag into a boxy shape and allow it to air dry over a box or basket of the right size to fit the bag bottom if possible to prevent creases.
Hang the handle strap over your shower curtain rod to dry.
Drying takes several hours. I left mine to dry overnight.
 When the pieces are dry it's time to assemble the bag.
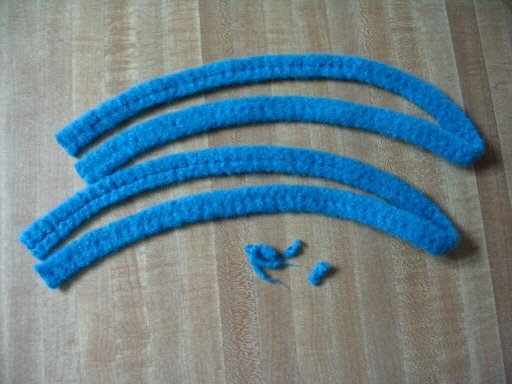
Take the long bag handle strap and trim the ends to make them square and even. Fold the strap in half to find the center and cut it in half. Now you should have 2 handle straps of the same size.
If you have made crocheted handles, you will notice that they curve. That's because the chain shrinks more than the single crochet does. This is ok, and it actually helps to pre-shape your handles for you.
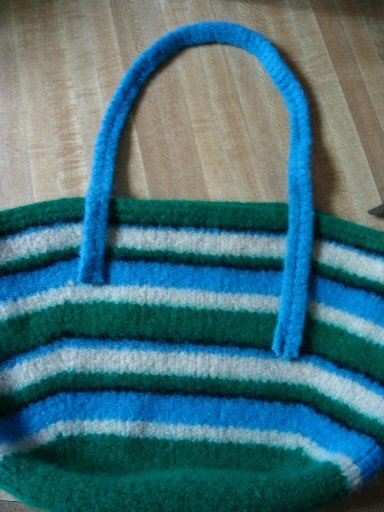 Now decide where you want your handles to be attached. You will want to use the vertical line of increases as your guide for placing the ends of the handles, but how far they overlap the top edge of the bag is up to you. The shorter the overlap, the longer the finished handle. The longer the overlap, the shorter the handle and the more support for carrying heavy objects. In the photo at left I show 2 possible ways to attach the handles.
Once you decide exact placement of the handles, you will want to sew them in place. You may use matching yarn and a tapestry needle to do the job or you may prefer to use a sewing machine for strength and durability. I used a sewing machine and matching sewing thread to sew the handles on my bag.
Once the handles are attached, the bag is complete. Enjoy!


5 comments:
I love the way those colours work together!
Those colors are great together! Love the bag!
I have some Noro Blossom and Cascade 220 that are just calling to be knitted into this bag!
Cora
Could you please email me at Cora.Levesque@shaw.ca ? I love the pattern and I wanted your permission to link back to your pattern. I am making some changes to the pattern. I am adding a partition and some pockets. I wanted to be able to post the variations on my blog at craftygal1965.blogspot.com.
Cora Shaw
If you would like to see Cora's version of the bag with a partition divider, she has posted it here: http://craftygal1965.blogspot.com/2007/10/i-am-finally-finished-felted-bag.html
Post a Comment