Wednesday, March 22, 2006

Child's Patterned Hat

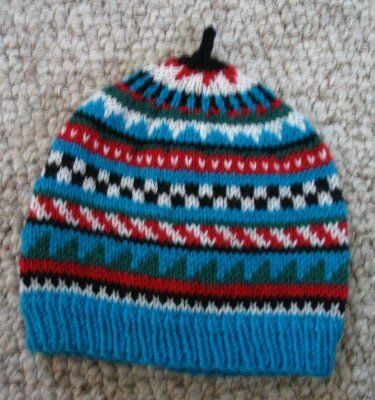
Childs Patterned HatAfter knitting so many infant hats for charity last week, I had to make a hat for my 3-year-old. He had informed me that I'd made all 'his' baby hats too small for him and that I needed to make them bigger. He needed a new hat. He lost his toque when we visited Lowe's last week, and it never showed up in the lost and found bin.

First, I measured his head: it's 19"/48cm around and the hat must be at least 7"/18cm tall in order to cover his ears well. I am getting a gauge of about 5 stitches to the inch with worsted weight wool(about 20 stitches to 4"/10cm), so that would be about 95 stitches. Make that 96 and you have a number divisible by 2, 3, 4, 6 and 8-that means more choices of motifs. I don't need a really dense fabric here in the warmer climate of California, so a size 7 circular needle is fine. Add in a size 6 for the ribbing and a set of double pointed needles for closing the crown. I used the same basic procedure that I used in the baby hats.

Click to enlarge chartCast on 96 stitches on a 16"/40cm size 6US/4mm circular needle.
Join without twisting the stitches to begin knitting in the round.
Work knit one purl one ribbing until piece measures 1.25"/3cm.

Change to a 16"/40cm size 7US/4.5mm needle and begin knitting stockinette stitch (knit every round) until the hat measures 6"/15cm long, including ribbing; at the same time, begin working color patterns from the chart or those of your own choice.

Begin decreasing using a guideline of 8 stitches evenly distributed every 2 rounds 11 times. (I decreased 16 stitches about every 4 rounds 5 times and 8 stitches every 2 rounds once to make it fit in between the pattern rounds of color motifs) You want to place your decreases so that they don't interfere in the color design. So, work decreases until you have 8 stitches left, changing to short double pointed size 7US/4.5mm needles when needed. K2tog across round. Make I-cord using remaining 4 stitches until the cord is about an inch long. Cut the yarn and thread it through the stitches with a tapestry needle to fasten it off. Weave in all the ends.

This hat fits my toddler with extra room on top for growth. It stretches and can be worn by older children and teens. It even stretches to fit me a little snugly. This would make a great charity knitting project. Enjoy!

P.S. more charts to use for this hat here and here.

Needle Exchange Arrives

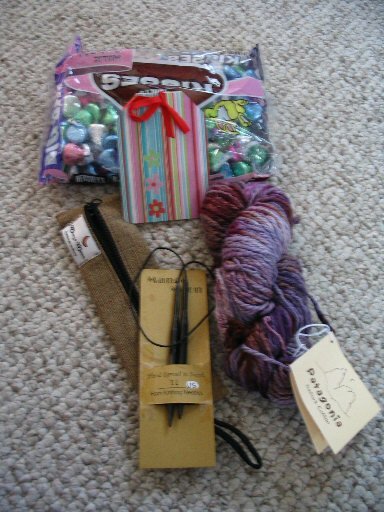
I have to show you what my Needle Exchange Pal sent to me. She sent me the greatest stuff!

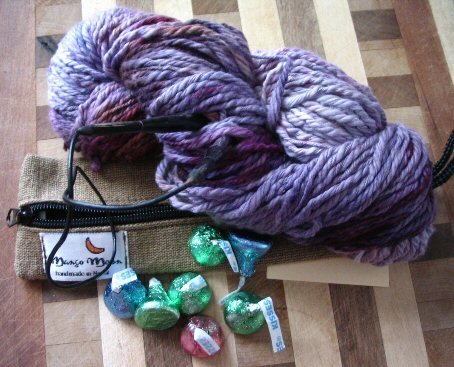
The first thing I saw when I opened the box was the huge bag of Hershey's Kisses. Mmmm, chocolate. Chocolate enough for weeks to come, chocolate to share if I feel like it. Chocolate is always a good thing. The next thing I found in the box was that cute little pouch. It was lumpy, there was something inside! I opened it to find... a beautiful circular needle of hand carved horn from Nepal! Wow! The final item in the box was a gorgeous hank of hand-dyed Patagonia Nature Cotton-in purple, my favorite color.

Isn't this the very picture of knitterly happiness? A hank of yarn, a set of needles and chocolate. What more could you want?

Thank you Amy for these delights!

Sunday, March 19, 2006

Infant Earflap Hat

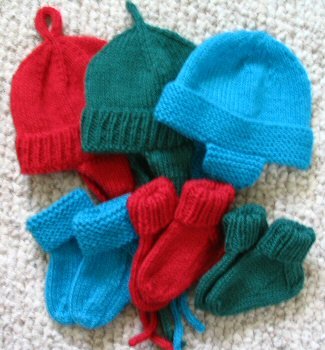
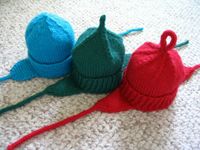
Baby hats with earflapsHere is my pattern for a newborn size hat with earflaps. By newborn size, I mean the hat is designed to fit a 13" to 15" head (33-38cm). You may make this hat without earflaps if you wish; I designed the pattern to meet the requirements of afghans for Afghans guidelines for their newborn hat and sock project. It has a fold-up cuff that can be unfolded as the baby grows. The pattern for the top-down version of the hat can be found here. To see a photo of Sarah's beautiful fairisle version visit here.

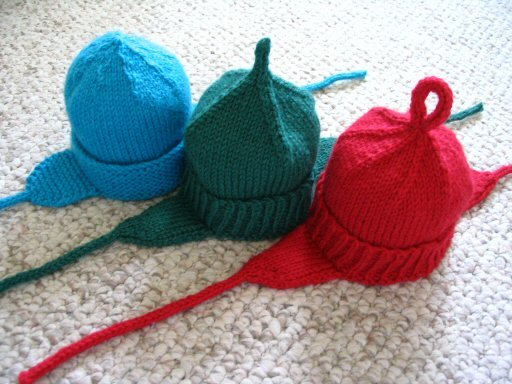
In the photo above left, you see from left to right a blue hat, a green hat and a red hat. Where there are variations in the pattern, I will use colored text to show the differences in the directions for each hat as shown. You may of course mix and match the design variations to suit yourself. The blue hat has a garter stitch cuff, a serpentine decrease design and a smooth top. The green hat has a ribbed cuff, a square decrease pattern and a short tail on the top. The red hat has a ribbed cuff, a spiral decrease pattern and a loop on top that may be used for hanging.

The hats take a little less than 50 grams of worsted weight yarn to make up. I used leftover wool yarn for my samples, Nature Spun worsted and Patons Classic Wool. The yarn ball bands recommend a size 7US/4.5mm needle, but I used a size 6US/4mm because I wanted the hats to be a little bit more densely knit for warmth. There isn't very much difference between the two needle sizes, so use the size that suits you. I recommend using a set of 4 or 5 double pointed needles (DPNs) and a 11.5"/29cm circular needle in your chosen size. At the very minimum you will need a set of DPNs to make the hat as directed.

Abbreviations and techniques:
Rnd=round
K2tog=knit 2 stitches together.
ssk=slip the next 2 stitches as if to knit, put left needle in front of stitches and knit.

How to make I-Cord:
Using 2 DPNs, CO 4 stitches (or use the remaining 3 or 4 stitches after decreasing in this pattern). Knit all stitches. Next Row: Instead of turning the work around to work back on the wrong side, slide all stitches to the other end of the needle, switch the needle back to your left hand, bring the yarn around the back of the work, and start knitting the stitches again. Repeat this row to form I-cord. After a few rows, the work will begin to form a tube.

Knitty Magazine has great articles on Increasing and Decreasing, Picking up Stitches and Weaving in Ends.

Begin by knitting the cuff.

Cuff 1: Ribbed cuff used on red and green hats.
Cast on 64 stitches using circular needle.
Join into a round without twisting stitches and begin working knit 1 purl 1 ribbing.
Work ribbing until it measures 1.5"/4cm

Cuff 2
: Garter stitch cuff used on blue hat.

Cast on 64 stitches using circular or DPN needle.
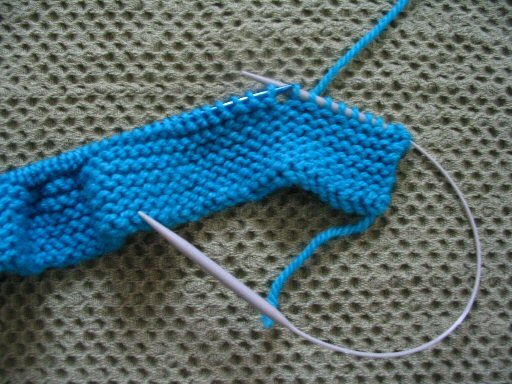
Work the piece flat, knitting every row until the cuff measures 1.5"/4cm
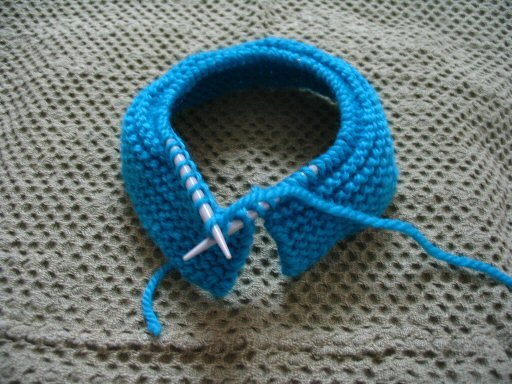
Join into a round without twisting the stitches and continue the hat working in the round.
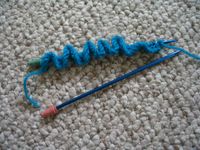
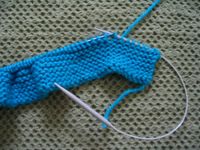
Knitting flat on DPNs using point protectorsKnitting from DPN to circular needleJoining flat knitting into a round
Next, work the body of the hat.
Work stockinette stitch (knit every round) until the hat measures 5"/13cm long including the cuff.

Now work the decreases.
All 3 hats are decreased 8 stitches every other round 7 times, the difference is where the decreases are placed and whether they lean to the left or the right. Change from circular needles to DPNs when necessary.

Decrease pattern 1: Spiral, used on red hat.
Rnd 1: *Knit 6, k2tog* repeat from * to * across round; 56 stitches.
Rnd 2: Knit all stitches.
Rnd 3: *Knit 5, k2tog* repeat; 48 stitches.
Rnd 4: Knit.
Rnd 5: *Knit 4, k2tog* repeat; 40 stitches.
Rnd 6: Knit.
Rnd 7: *Knit 3, k2tog* repeat; 32 stitches.
Rnd 8: Knit.
Rnd 9: *Knit 2, k2tog* repeat; 24 stitches.
Rnd 10: Knit.
Rnd 11: *Knit 1, k2tog* repeat; 16 stitches.
Rnd 12: Knit.
Rnd 13: *k2tog* repeat; 8 stitches.

Decrease pattern 2: Square, used on green hat.
Rnd 1: Knit 6, *k2tog, ssk, knit 12* 3 times, k2tog, ssk, knit 6; 56 stitches.
Rnd 2: Knit.
Rnd 3: Knit 5, *k2tog, ssk, knit 10* 3 times, k2tog, ssk, knit 5; 48 stitches.
Rnd 4: Knit.
Rnd 5: Knit 4, *k2tog, ssk, knit 8* 3 times, k2tog, ssk, knit 4; 40 stitches.
Rnd 6: Knit.
Rnd 7: Knit 3, *k2tog, ssk, knit 6* 3 times, k2tog, ssk, knit 3; 32 stitches.
Rnd 8: Knit.
Rnd 9: Knit 2, *k2tog, ssk, knit 4* 3 times, k2tog, ssk, knit 2; 24 stitches.
Rnd 10: Knit.
Rnd 11: Knit 1, *k2tog, ssk, knit 2* 3 times, k2tog, ssk, knit 1; 16 stitches.
Rnd 12: Knit.
Rnd 13: *k2tog, ssk* across rnd; 8 stitches.

Decrease pattern 3: used on blue hat.
Rnd 1: Knit 3, *k2tog, knit 6* 7 times, k2tog, knit 3; 56 stitches.
Rnd 2: Knit.
Rnd 3: Knit 3, *ssk, knit 5* 7 times, ssk, knit 2; 48 stitches.
Rnd 4: Knit.
Rnd 5: Knit 2, *k2tog, knit 4* 7 times, k2tog, knit 2; 40 stitches.
Rnd 6: Knit.
Rnd 7: Knit 2, *ssk, knit 3* 7 times, ssk, knit 1; 32 stitches.
Rnd 8: Knit.
Rnd 9: Knit 1, *k2tog, knit 2* 7 times, k2tog, knit 1; 24 stitches.
Rnd 10: Knit.
Rnd 11: Knit 1, *ssk, knit 1* 7 times, ssk; 16 stitches.
Rnd 12: Knit.
Rnd 13: *K2tog* across rnd; 8 stitches.

Finishing the top.

Top treatment 1: Loop on red hat.
Rnd 14: *k2tog* across rnd; 4 stitches.
Make I-Cord on remaining 4 stitches until it measures 4"/10cm long.
Cut yarn about 4"/10cm long, draw yarn through all stitches to fasten off. Sew the end of the cord to the base of the hat to make a loop.

Top treatment 2: Short tail on green hat.
Rnd 14: *k2tog* across rnd; 4 stitches.
Make I-Cord on remaining stitches until it measures 1"/2.5cm long.
Cut yarn about 3"/8cm long, draw yarn through all stitches to fasten off.

Top treatment 3: Smooth top on blue hat.
Cut yarn at about 3"/8cm long. Draw yarn through the remaining 8 stitches, pull tightly and fasten off.

At Last, The Earflaps
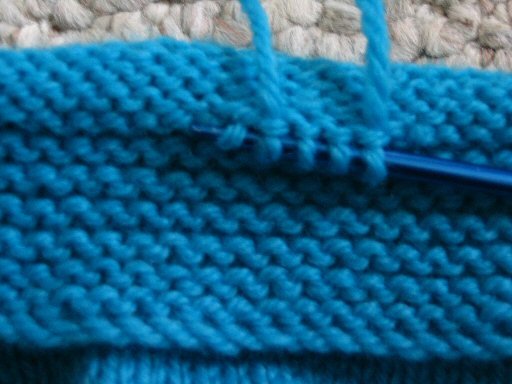
In this step you'll be picking up 12 stitches along the edge of the cuff and then knitting them to form the earflap and tie cord. These earflaps are spaced evenly apart on the two sides of the hat. You may wish to use the decrease lines to help position them neatly.

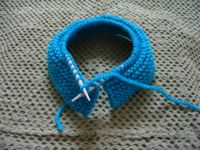
Place the hat in front of you upside-down with the cuff folded down so that you can just see the edge of the interior of the hat, as shown in the photos.

Edit: You will be picking up stitches along the folded edge of the cuff, where you changed from rib stitches to plain stockinette.
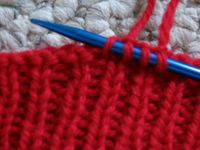
Picking up stitches next to ribbed cuffEarflap 1: Used on red and green hats.
Pick up 12 stitches along the edge of the cuff, as shown.
Row 1: Purl 1, knit 1, purl 8, knit 1, purl 1.
Row 2: Knit 1, purl 1, knit 8, purl 1, knit 1.
Repeat rows 1 and 2 until the flap is 11 rows long.
Row 12: Knit 1, purl 1, k2tog, knit 4, ssk, purl 1, knit 1; 10 stitches.
Row 13: Purl 1, knit 1, purl 6, knit 1, purl 1.
Row 14: Knit 1, purl 1, k2tog, knit 2, ssk, purl 1, knit 1. 8 stitches.
Row 15: Purl 1, knit 1, purl 4, knit 1, purl 1.
Row 16: Knit 1, purl 1, k2tog, ssk, purl 1, knit 1; 6 stitches.
Row 17: Purl 1, knit 1, purl 2, knit 1, purl 1.
Row 18: *K2tog* 3 times; 3 stitches.
Continue working the remaining 3 stitches as I-Cord until the cord measures 6"/15cm.
Cut yarn about 3"/8cm long. Draw yarn through all stitches and fasten off.

Repeat for second earflap. Weave in all ends.
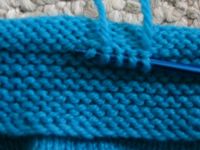
Picking up stitches next to garter stitch cuffEarflap 2: Used on blue hat.
Pick up 12 stitches along the edge of the cuff, as shown.
Row 1: Knit.
Row 2: Knit.
Repeat rows 1 and 2 until the flap is 11 rows long.
Row 12: Knit 1, k2tog, knit 6, ssk, knit 1; 10 stitches.
Row 13: Knit.
Row 14: Knit 1, k2tog, knit 4, ssk, knit 1. 8 stitches.
Row 15: Knit.
Row 16: Knit 1, k2tog, knit 2, ssk, knit 1; 6 stitches.
Row 17: Knit.
Row 18: *K2tog* 3 times; 3 stitches.
Continue working the remaining 3 stitches as I-Cord until the cord measures 6"/15cm.
Cut yarn about 3"/8cm long. Draw yarn through all stitches and fasten off.

Repeat for second earflap. Weave in all ends.


Come Sit And Have Some Tea

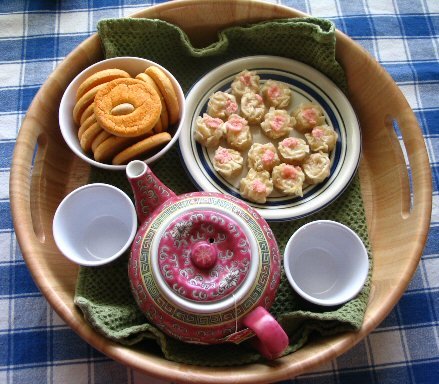
Chinese Tea PartyI think it's important to have tea parties regularly. Not formal affairs, just the casual everyday sort. It's one of the simple pleasures in life. Here is an example of the Friday Tea the toddler and I enjoyed this week.

We had a simple snack with a Chinese theme: green tea, crab shumai and almond cookies. For those unfamiliar with shumai, it is a little tidbit made of meat wrapped in a thin bit of dough that is cooked by steaming. They are available pre-made in the freezer case at asian markets. Quick to fix, they take 3 minutes in the microwave, and we just adore them. Very like a savory sort of bonbon, really, it is tempting to eat them in large quantities.

Infant hats and socksI've completed a total of 3 earflap hats and 3 matching pair of socks for afghans for Afghans this week. They were very quick to knit, and it gives a feeling of satisfaction to have a workbasket full of finished objects.

As promised, I will be posting the pattern for the Infant Earflap Hats later today. If you're like me, you like to have a little variety to break up the monotony of knitting the same thing over and over again, and I've tried to provide that in this pattern. There are 2 different cuff variations, one ribbed and one in garter stitch, and 3 different decrease patterns and finishes for the crown. You may also make the hat without earflaps.

To make the matching socks, use this pattern as written for the ribbed ankle cuffs, or substitute garter stitch for the ribbing to match the garter cuff hat.

Surprises for my Needle Exchange PalMy surprise for my Needle Exchange Pal is safely on its way to her, and in fact it may have arrived already. I hope she likes it!

How did I choose what to send? I started with a visit to my LYS (local yarn shop) to see what might inspire me. I found this lovely ball of Online Linie 131 Fantasy in shades of blue and gold. Nothing inspires like a ball of novelty yarn!

Needles came next, in the size recommended on the ball band. I like to use Brittany needles, they feel so good to knit with, and they are easy to decorate with beads. Oh-so-soft feltable wool in pastel mint matches perfectly.

Close-up of beaded itemsNext: Run all over town looking for beads and findings.

I had a very good time playing with the beads!

I decorated the needles, then made stitch markers and even a pair of earrings to match. What a fun color scheme to work with!

I wish I could be there to see her open the package!

Monday, March 13, 2006

Red Hat and Bootie Set

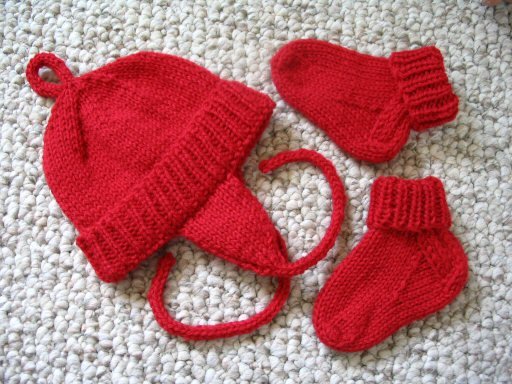
I've completed the red hat and bootie set. This is my March-Red item for Project Spectrum, but also an item to donate to the afghans for Afghans Wool Hats and Socks for Newborns Project.
I was going to use this hat pattern with some minor changes, but I ended up making so many changes that I just gave up and wrote my own pattern for a newborn earflap hat. I really wanted the design of the hat to go with those socks. I will be making more hats and socks for the newborn project to test variations in my pattern before posting it. It took about 4 hours to make this hat, and it's a prototype, so it promises to be a quick-to-make pattern.

Flash Your StashIt's time again to flash the stash. I did it last year, I gotta do it again this year. So that means I gotta unpack the stash so I can flash it. Can you think of a better way to motivate yourself to organize your house?

Man, I got work to do.

Saturday, March 11, 2006

Project Spectrum - Red

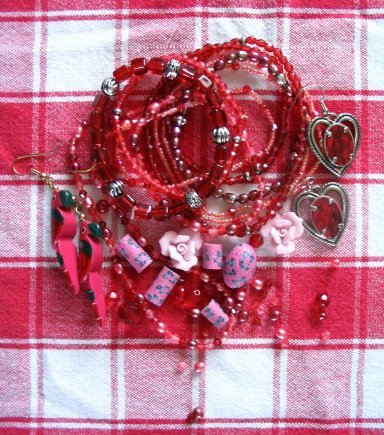
Red inspirationThe Project Spectrum color for March is red, so I went searching for things in my box-filled home to cluster together for a photo to celebrate the color. Yay, I managed to find a few beads!

What in the world to do for this project? I don't have very much free time right now, and I still haven't unpacked my yarn. What can I do that will be quick to make and use yarn that I can get to?

I received an email message from Knitzilla! about one of the afghans for Afghans projects, they are collecting newborn hats and booties for International Midwife Assistance participants to take with them to Bamiyan.

Hmmm, hats and booties are quick to make and don't take much yarn, so it would be easier to find something appropriate in the stash pile. I decided that this would make a good Project Spectrum activity.

There is only one important requirement; the hats and booties must be made from wool or another warm natural fiber, like alpaca or cashmere. Luckily for me, the second box I opened contained some leftover wool yarn from fairisle hats I made the December before last for holiday gifts.

I have one bootie finished and am working on its mate. I'm using this pattern from Blossom Knitwear, but I'm using size 6US/4.25mm needles to help tighten up my stitches. I plan on using a modified version of this pattern for the hat. You can find links to these and many other free patterns on the afghans for Afghans website.

Thursday, March 09, 2006

The Virtuoso Gloves

houseplantsI have some new baby houseplants to play around with. For now, I'll transplant them into indoor pots and let them lounge around the house. Later in the spring they will be moved outdoors to a shady patio. We'll see how well they tolerate the summer heat; the ones that can't take it can go back in the house, the others can stay outdoors year-round in this warm climate.

I haven't had a chance to knit anything during the last week, but I did find an example of someone else's knitting to share.

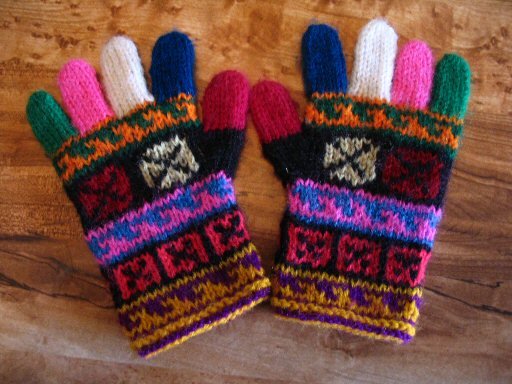
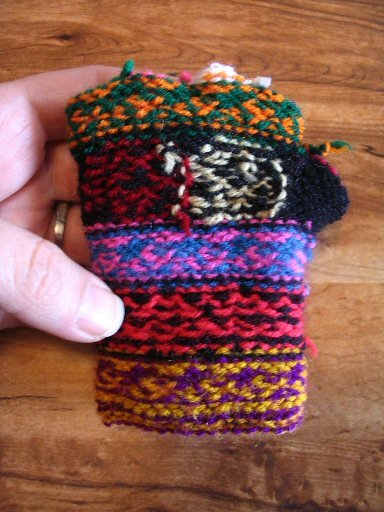
toddler glovesThis is a pair of toddler sized woolen gloves knit in Guatemala. I am a knitter, so you know I've turned them inside out and inspected them thoroughly. These little darlings are fairisle gloves knit in the round and the yarn is woven in while it's knit (that means there are no loops of yarn carried along the back of the work for tiny fingers to get caught in) and there is not a loose stitch anywhere.

reverse side of toddler glovesSee what I mean? The yarn is very fine, and worked at about 7 stitches to the inch. I admire this fine workmanship. Maybe with a lot of practice I can emulate it someday. But today? I still have problems with uneven tension when working fairisle socks in the round.

Aren't these some great little gloves?

My youngest just loves them. He practices putting them on and taking them off, which he can do easily since there are no yarn loops to catch his little fingers on. He adores the colors. But most of all, he rejoices in the the knowledge that they are his and his alone and that he doesn't have to share them.