Here is a bit of 'waiting room knitting' I did this week. Small projects like this pair of baby socks can fit in a pocket or handbag and are great for those times when you're waiting. Most appointments give plenty of knitting time, but I've managed to knit a bit in places you wouldn't normally expect, like standing in line at the bank, the dry cleaners, the cable company or the pharmacy.
This kind of public knitting seems to invite comment too. The most common is, "Is that knitting?" which can be a great conversation starter.
The free pattern for these socks can be found here. This pair knitted in Patons Classic Merino Wool, but any worsted weight yarn will do.
Thursday, June 29, 2006
Wednesday, June 21, 2006
Projects Finished and New
All the time that I am working on my projects I am getting new ideas for things I'd like to try. That's not to say that I can't stay focused on one project; I just find that when I am using that creative problem solving part of my brain for one project, I get more than just the ideas needed for that item. Related ideas just sort of tumble out too. Creative multitasking. I thoroughly enjoy each item I work on, but sometimes one of those related ideas is so interesting that I just have to investigate it before I lose the inspiration. This is how the WIP pile grows.
I have finished some projects and in the course of finishing them have started more. Of course.
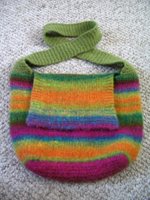
Here is the finished Noro Kureyon bag I have been working on. It's based on the Booga Bag, with added flap and handle strap. It's perfect for my toddler son's toys. It's roomy, easy to carry, and the flap helps hold stuff in the bag yet is easy for him to open and close.
I had thought about adding some sort of closure, perhaps a magnetic button, to help hold his toys inside the bag, but decided against it. It's best to keep things simple for kids.
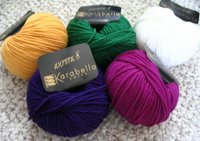
This little group of worsted weight yarns are destined to become matching hat and mittens. I love these pansy colors, but haven't decided on a pattern just yet. I have narrowed it down to a few different choices, but haven't found the 'perfect' one.
I have several projects like this one waiting to be started. Yarns with great promise just needing an equally great pattern. Often I know what sort of garment or accessory I want to make but not exactly what design.
Other projects I have planned out completely but am not working on them just now for one reason or another. For instance, I am planning a pair of Bazaar Socks (pattern here). I am in the process of knitting gauge swatches and deciding how I want to knit them to get my size. I am taking a break from it because I scraped my knuckles and find it painful to work on them right now.
In fact, with these gritched knuckles, I am avoiding knitting altogether. Until they have healed I will take advantage of the opportunity to do other creative things.
I purchased some new sewing patterns to play around with. With the beginning of hot summer weather comes the desire to wear cool summer dresses. And as long as I'm sewing summer dresses, I should sew a little something for fall as well. Since I have the sewing machine out and all. The prospect of making some new pieces for my wardrobe is so appealing. You know, the kind of thing that makes you feel great when you wear it just because you love the fabric.
Oh, I can sew? Well, maybe while I'm sewing dresses anyway, I can help my neighbor who is having some trouble with a sundress?
You see where this leads.
I am helping a friend with a simple sheath dress for an informal wedding. Yes, I volunteered to make a wedding dress. Because it's what you do for a dear friend when you know how to sew well, enjoy sewing and see such a project as simple and uncomplicated. Since I already have the sewing machine out and all.
We'll see how reality compares to the estimate.
Guatemalan Gloves
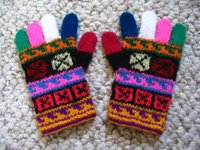
I found this pair of gloves in a tiny shop that sells imported South American handcrafts. They're bright and colorful, a delight for children, but only a knitter can truly appreciate the level of workmanship evident in these gloves. This is not a beginner's project, but rather a strong intermediate one due to the fiddly nature of stranded knitting in the round on such a small scale. If you are new to sock or mitten making, I recommend trying a solid colored pair in aran or chunky weight yarn first. In these instructions, I will be substituting duplicate stitch for the intarsia-in-the-round technique used in the original.
One set of instructions covers all sizes from toddler to adult. Sizing is achieved by using yarn of different weights or needles of different sizes with one exception-the finger lengths are given for size 2 years [all other sizes]. If you want the gloves to be a specific size, you must be precise with your gauge. These gloves are made with 14 colors of yarn, but you can certainly make them with fewer colors. My samples use between 3 and 9 colors each. This is an excellent project for using leftover bits of yarn. Yarn weights given are approximate, taken from my samples and my kitchen scale.
Abbreviations:
DPN = Double Pointed Needle
P = Purl
Sl = Slip stitch as if to purl
* = Repeat instructions between asterisks as instructed.
Inc = Increase
Rep = Repeat
St = Stitch
Sts = Stitches
Rnd = Round
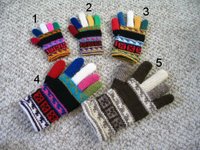
1. For size 2 years you will need small amounts of sock/fingering weight yarn to total about 14 grams, one set each of size 1US/2.25mm DPNs and size 2US/2.75mm DPNs or size needed to match gauge. Gauge: 30 stitches = 4"/10cm in stockinette stitch on larger needles. Original knit in shetland type yarn measures 2.5"/6.4cm wide at cuff and 5.5"/14cm long.
2. For size 3-4 years you will need small amounts of sock/fingering weight yarn to total about 18 grams, one set each of size 2US/2.75mm DPNs and size 3US/3.25mm DPNs or size needed to match gauge. Gauge: 28 stitches = 4"/10cm in stockinette stitch on larger needles. Sample knit in Regia and Lang Jawoll sock yarns measures 2.75"/7cm wide at cuff and 6.25"/16cm long.
3. For size 6-8 years you will need small amounts of DK/sport weight yarn to total about 36 grams, one set each of size 4US/3.5mm DPNs and size 5US/3.75mm DPNs or size needed to match gauge. Gauge: stitches = 4"/10cm in stockinette stitch on larger needles. Sample knit in Knit One Crochet Too's Creme Brulee DK measures 3.25"/8.25cm wide at cuff and 7.25"/18.4cm long.
4. For size 10-12 years you will need small amounts of worsted weight yarn to total about 52 grams, one set each of size 6US/4.0mm DPNs and size 7US/4.5mm DPNs or size needed to match gauge. Gauge: 20 stitches = 4"/10cm in stockinette stitch on larger needles. Sample knit in Patons Classic Wool measures 3.75"/9.5cm wide at cuff and 9"/23cm long.
5. For ladies size small/medium you will need small amounts of aran weight yarn to total about 56 grams, one set each of size 8 DPNs and size 9 DPNs or size needed to match gauge. Gauge: 16 stitches = 4"/10cm in stockinette stitch on larger needles. Sample knit in Lion Brand Fishermen's Wool measures 4.25"/11cm wide at cuff and 10"/25.5cm long.
For all sizes you will also need a tapestry needle and small scissors.
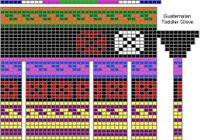
The chart at left shows placement of the colors used and shaping of the gloves. Read this chart starting at the bottom right as you work.
List of the 14 glove colors in the order they are used:
Color A = yellow
Color B = purple
Color C = black
Color D = medium red
Color E = medium blue
Color F = light pink
Color G = dark green
Color H = orange
Color I = dark blue
Color J = white
Color K = medium green
Color L = dark pink
Color M = dark red
Color N = pale yellow
Casting On
Because the first knitted round is a different color than the cast-on round, I will call the cast-on round the first round for the purposes of following the chart. The joining actually takes place at the beginning of the second round after the cast-on, or what I call round 3.
Row 1:(Becomes round 1 after joining) Using the knitting-on method and the smaller size needles, cast on 36 stitches using 2 DPNs and color A. Move the stitches to the opposite end of the needle, so that the end with the short tail is close to the tip of the needle.
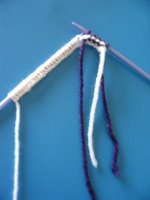
Row 2: (See photo left, becomes round 2 after joining) Using color B, p the first 12 stitches onto what we will call needle 1, p the next 12 stitches onto needle 2, p the last 12 stitches onto needle 3.
Round 3: (See photo right) Join the work into a round without twisting stitches and knit all stitches in this round.
Round 4: With color A, purl around.
Round 5: Knit around.
Round 6-23: Change to larger size needles and purl each round, following chart for color placement.
Round 24: P around, increasing 3 stitches positioned as shown in the chart; 39 stitches.
Begin Thumb Gusset
(This section is worked in solid black. The color motifs are duplicate stitched on the back after the glove is finished.)
Round 25: With color C, inc in the first 2 sts, p rem sts; 41 sts.
Round 26: P
Round 27: Inc in 1st and 4th sts, p rem sts; 43 sts.
Round 28: P
Round 29: Inc in 1st and 6th sts, p rem sts; 45 sts.
Round 30: P
Round 31: Inc in 1st and 8th sts, p rem sts; 47 sts.
Round 32: P
Round 33: Place first 10 sts onto a short scrap length of yarn to be worked later, p the 11th st and pull snugly to close the gap, p the rem sts; 37 sts. Change to color G.
Round 34-39: P each rnd, following chart for color placement.
Fingers
The fingers are worked using a technique that allows you to make a tube while working flat using 2 needles. Since these tubes are only 9 or 10 stitches around, this is easier than trying to work in the round with 3 or 4 stitches on each DPN.
Before you can actually work the stitches for the fingers, they need to be set up and transferred to a different needle. You can do this two different ways; 1) transfer them directly to the new needle from the current needles, or 2) take the stitches off the current needles onto a scrap of yarn before transferring each finger's stitches before working the finger. If you are experienced and comfortable using DPN's, I recommend the first method. If you aren't as comfortable keeping track of many needles poking out all over the place, I recommend the second method.
Start transferring stitches from the current needles or from yarn holder by slipping the stitches onto your working needle as if to purl them.
On the chart you can see a row of colors just above the rest of the glove. This represents the placement of each finger's stitches in relation to the body of the glove. You will work from right to left, index finger to little finger.
First or Index Finger
You should have 11 sts on needle 1, 13 sts on needle 2 and 13 sts on needle 3. You want the sts divided in 2 groups now, so slip 8 sts from needle 2 to needle 1 and the remaining 5 sts from needle 2 to needle 3; this makes 19 sts on needle 1 (front needle) and 18 sts on needle 3 (back needle).
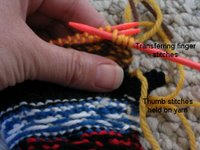
Holding your work as shown in photo at left, slip one st from the back needle (needle 3), slip one st from the front needle (needle 1), slip one from back needle, slip one from front needle (see photo right), continue in this manner until you have 9 stitches on needle. Slide the sts to the other end of the needle so that you can start working at the beginning of rnd position.
Row 1: With color I, sl 1, *p 1, sl 1* repeat to end of row. Turn.
Row 2: *p 1, sl 1* rep until last st, inc in last st; 10 sts, 1 rnd completed. Turn.
Row 3: Sl 2, *p 1, sl 1* rep to end. Turn.
Row 4: *P 1, sl 1* rep to end. 2 rnds completed. Turn.
Row 5: *P 1, sl 1* rep to end. Turn.
Row 6: *P 1, sl 1* rep to end. 3 rnds completed. Turn.
Repeat Rows 5 and 6 until finger is 24[30]rows/12[15]rnds long. Cut yarn 6-8 inches long, thread onto tapestry needle and thread it through the first st, and every alternate st across row, turn and rep on other side to draw yarn through all sts around. Pull up tightly to close fingertip, fasten off and weave in the end.
Second or Middle Finger
Sl 1 st from front needle, 1 from back needle, 1 from front needle, 1 from back needle, and so on until you have 10 sts on the needle. Slide the sts to the other end of the needle.
Row 1: With color J, *p 1, sl 1* rep to end of row. Turn.
Row 2: *P 1, sl 1* rep to end of row. 1 rnd completed. Turn.
Repeat Row 2 until finger is 30[36]rows/15[18]rnds long. Cut yarn and draw through stitches and pull tightly to close fingertip.
Third or Ring Finger
Sl 1 st from front needle, 1 st from back needle, 1 from front needle, 1 nfrom back needle, and so on until you have 9 sts on the needle. Slide the sts to the other end of the needle.
Row 1: With color F, p 1, *sl 1, p 1* rep across row. Turn.
Row 2: Slip 1, *p 1, sl 1* rep across row. 1 rnd completed. Turn.
Repeat Rows 1 and 2 until finger is 24[30]rows/12[15]rnds long. Cut yarn and draw through sts and pull tightly to close fingertip.
Fourth or Little Finger
Sl 1 st from front needle, 1 st from back needle, 1 from front needle, 1 from back needle, and so on until you have 9 sts on the needle. Slide the sts to the other end of the needle.
Row 1: With color K, p 1, *sl 1, p 1* rep across row. Turn.
Row 2: Sl 1, *p 1, sl 1* rep across row. 1 rnd completed. Turn.
Repeat Rows 1 and 2 until finger is 22[26]rows/11[13]rnds long. Cut yarn and draw through sts and pull tightly to close fingertip.
Thumb
Pick up stitches from the yarn holder in the same manner as the finger stitches, slipping one stitch from front half of yarn loop, slipping one stitch from back half of loop, alternating back and forth until you have 10 stitches on the needle.
Row 1: *P 1, sl 1* repeat across row. Turn.
Row 2: *P 1, sl 1* repeat across row. One rnd completed. Turn.
Rep rows 1 and 2 until thumb is 20[23]rows/10[13]rnds long. Cut yarn and draw through sts and pull tightly to close thumbtip.
Make another glove to match.
Finishing
These gloves were made using a yarn very similar to a shetland wool. It is fine, a little fuzzy, has very little stretch and has a tendency to stick to itself the way a feltable wool does. The knitter has chosen to tie the yarn ends in knots and cut them short whenever possible, rather than weaving them in. This works well in the small version, the knots are very small and disappear into the knit fabric. If you use a superwash wool or other yarn that doesn't cling to itself readily, like cotton, synthetic or other smooth fibers, you will probably want to weave in the ends.
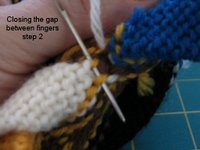
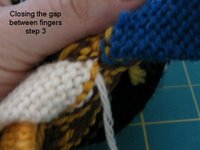
There are little holes left in between the fingers and thumb that need to be closed up during the weaving-in process. The photos below show one way to do this.
Step 1: With yarn end from base of second finger threaded on tapestry needle, catch stitches at base of first finger. Step 2: Catch stitches at base of second finger. Step 3: Pull up snugly to close gap. Weave in the end, reinforcing closure. Repeat in same manner until all fingers and thumb holes are closed.
Using duplicate stitch and colors M and N, add the large motifs to the wide black band on the back of the gloves, following chart for placement. The chart shows the left glove, you will want to mirror the design for the right glove.
One set of instructions covers all sizes from toddler to adult. Sizing is achieved by using yarn of different weights or needles of different sizes with one exception-the finger lengths are given for size 2 years [all other sizes]. If you want the gloves to be a specific size, you must be precise with your gauge. These gloves are made with 14 colors of yarn, but you can certainly make them with fewer colors. My samples use between 3 and 9 colors each. This is an excellent project for using leftover bits of yarn. Yarn weights given are approximate, taken from my samples and my kitchen scale.
Abbreviations:
DPN = Double Pointed Needle
P = Purl
Sl = Slip stitch as if to purl
* = Repeat instructions between asterisks as instructed.
Inc = Increase
Rep = Repeat
St = Stitch
Sts = Stitches
Rnd = Round
1. For size 2 years you will need small amounts of sock/fingering weight yarn to total about 14 grams, one set each of size 1US/2.25mm DPNs and size 2US/2.75mm DPNs or size needed to match gauge. Gauge: 30 stitches = 4"/10cm in stockinette stitch on larger needles. Original knit in shetland type yarn measures 2.5"/6.4cm wide at cuff and 5.5"/14cm long.
2. For size 3-4 years you will need small amounts of sock/fingering weight yarn to total about 18 grams, one set each of size 2US/2.75mm DPNs and size 3US/3.25mm DPNs or size needed to match gauge. Gauge: 28 stitches = 4"/10cm in stockinette stitch on larger needles. Sample knit in Regia and Lang Jawoll sock yarns measures 2.75"/7cm wide at cuff and 6.25"/16cm long.
3. For size 6-8 years you will need small amounts of DK/sport weight yarn to total about 36 grams, one set each of size 4US/3.5mm DPNs and size 5US/3.75mm DPNs or size needed to match gauge. Gauge: stitches = 4"/10cm in stockinette stitch on larger needles. Sample knit in Knit One Crochet Too's Creme Brulee DK measures 3.25"/8.25cm wide at cuff and 7.25"/18.4cm long.
4. For size 10-12 years you will need small amounts of worsted weight yarn to total about 52 grams, one set each of size 6US/4.0mm DPNs and size 7US/4.5mm DPNs or size needed to match gauge. Gauge: 20 stitches = 4"/10cm in stockinette stitch on larger needles. Sample knit in Patons Classic Wool measures 3.75"/9.5cm wide at cuff and 9"/23cm long.
5. For ladies size small/medium you will need small amounts of aran weight yarn to total about 56 grams, one set each of size 8 DPNs and size 9 DPNs or size needed to match gauge. Gauge: 16 stitches = 4"/10cm in stockinette stitch on larger needles. Sample knit in Lion Brand Fishermen's Wool measures 4.25"/11cm wide at cuff and 10"/25.5cm long.
For all sizes you will also need a tapestry needle and small scissors.
The chart at left shows placement of the colors used and shaping of the gloves. Read this chart starting at the bottom right as you work.
List of the 14 glove colors in the order they are used:
Color A = yellow
Color B = purple
Color C = black
Color D = medium red
Color E = medium blue
Color F = light pink
Color G = dark green
Color H = orange
Color I = dark blue
Color J = white
Color K = medium green
Color L = dark pink
Color M = dark red
Color N = pale yellow
Casting On
Because the first knitted round is a different color than the cast-on round, I will call the cast-on round the first round for the purposes of following the chart. The joining actually takes place at the beginning of the second round after the cast-on, or what I call round 3.
Row 1:(Becomes round 1 after joining) Using the knitting-on method and the smaller size needles, cast on 36 stitches using 2 DPNs and color A. Move the stitches to the opposite end of the needle, so that the end with the short tail is close to the tip of the needle.
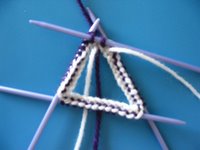
Row 2: (See photo left, becomes round 2 after joining) Using color B, p the first 12 stitches onto what we will call needle 1, p the next 12 stitches onto needle 2, p the last 12 stitches onto needle 3.
Round 3: (See photo right) Join the work into a round without twisting stitches and knit all stitches in this round.
Round 4: With color A, purl around.
Round 5: Knit around.
Round 6-23: Change to larger size needles and purl each round, following chart for color placement.
Round 24: P around, increasing 3 stitches positioned as shown in the chart; 39 stitches.
Begin Thumb Gusset
(This section is worked in solid black. The color motifs are duplicate stitched on the back after the glove is finished.)
Round 25: With color C, inc in the first 2 sts, p rem sts; 41 sts.
Round 26: P
Round 27: Inc in 1st and 4th sts, p rem sts; 43 sts.
Round 28: P
Round 29: Inc in 1st and 6th sts, p rem sts; 45 sts.
Round 30: P
Round 31: Inc in 1st and 8th sts, p rem sts; 47 sts.
Round 32: P
Round 33: Place first 10 sts onto a short scrap length of yarn to be worked later, p the 11th st and pull snugly to close the gap, p the rem sts; 37 sts. Change to color G.
Round 34-39: P each rnd, following chart for color placement.
Fingers
The fingers are worked using a technique that allows you to make a tube while working flat using 2 needles. Since these tubes are only 9 or 10 stitches around, this is easier than trying to work in the round with 3 or 4 stitches on each DPN.
Before you can actually work the stitches for the fingers, they need to be set up and transferred to a different needle. You can do this two different ways; 1) transfer them directly to the new needle from the current needles, or 2) take the stitches off the current needles onto a scrap of yarn before transferring each finger's stitches before working the finger. If you are experienced and comfortable using DPN's, I recommend the first method. If you aren't as comfortable keeping track of many needles poking out all over the place, I recommend the second method.
Start transferring stitches from the current needles or from yarn holder by slipping the stitches onto your working needle as if to purl them.
On the chart you can see a row of colors just above the rest of the glove. This represents the placement of each finger's stitches in relation to the body of the glove. You will work from right to left, index finger to little finger.
First or Index Finger
You should have 11 sts on needle 1, 13 sts on needle 2 and 13 sts on needle 3. You want the sts divided in 2 groups now, so slip 8 sts from needle 2 to needle 1 and the remaining 5 sts from needle 2 to needle 3; this makes 19 sts on needle 1 (front needle) and 18 sts on needle 3 (back needle).
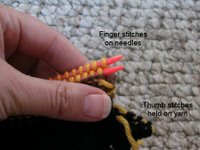
Holding your work as shown in photo at left, slip one st from the back needle (needle 3), slip one st from the front needle (needle 1), slip one from back needle, slip one from front needle (see photo right), continue in this manner until you have 9 stitches on needle. Slide the sts to the other end of the needle so that you can start working at the beginning of rnd position.
Row 1: With color I, sl 1, *p 1, sl 1* repeat to end of row. Turn.
Row 2: *p 1, sl 1* rep until last st, inc in last st; 10 sts, 1 rnd completed. Turn.
Row 3: Sl 2, *p 1, sl 1* rep to end. Turn.
Row 4: *P 1, sl 1* rep to end. 2 rnds completed. Turn.
Row 5: *P 1, sl 1* rep to end. Turn.
Row 6: *P 1, sl 1* rep to end. 3 rnds completed. Turn.
Repeat Rows 5 and 6 until finger is 24[30]rows/12[15]rnds long. Cut yarn 6-8 inches long, thread onto tapestry needle and thread it through the first st, and every alternate st across row, turn and rep on other side to draw yarn through all sts around. Pull up tightly to close fingertip, fasten off and weave in the end.
Second or Middle Finger
Sl 1 st from front needle, 1 from back needle, 1 from front needle, 1 from back needle, and so on until you have 10 sts on the needle. Slide the sts to the other end of the needle.
Row 1: With color J, *p 1, sl 1* rep to end of row. Turn.
Row 2: *P 1, sl 1* rep to end of row. 1 rnd completed. Turn.
Repeat Row 2 until finger is 30[36]rows/15[18]rnds long. Cut yarn and draw through stitches and pull tightly to close fingertip.
Third or Ring Finger
Sl 1 st from front needle, 1 st from back needle, 1 from front needle, 1 nfrom back needle, and so on until you have 9 sts on the needle. Slide the sts to the other end of the needle.
Row 1: With color F, p 1, *sl 1, p 1* rep across row. Turn.
Row 2: Slip 1, *p 1, sl 1* rep across row. 1 rnd completed. Turn.
Repeat Rows 1 and 2 until finger is 24[30]rows/12[15]rnds long. Cut yarn and draw through sts and pull tightly to close fingertip.
Fourth or Little Finger
Sl 1 st from front needle, 1 st from back needle, 1 from front needle, 1 from back needle, and so on until you have 9 sts on the needle. Slide the sts to the other end of the needle.
Row 1: With color K, p 1, *sl 1, p 1* rep across row. Turn.
Row 2: Sl 1, *p 1, sl 1* rep across row. 1 rnd completed. Turn.
Repeat Rows 1 and 2 until finger is 22[26]rows/11[13]rnds long. Cut yarn and draw through sts and pull tightly to close fingertip.
Thumb
Pick up stitches from the yarn holder in the same manner as the finger stitches, slipping one stitch from front half of yarn loop, slipping one stitch from back half of loop, alternating back and forth until you have 10 stitches on the needle.
Row 1: *P 1, sl 1* repeat across row. Turn.
Row 2: *P 1, sl 1* repeat across row. One rnd completed. Turn.
Rep rows 1 and 2 until thumb is 20[23]rows/10[13]rnds long. Cut yarn and draw through sts and pull tightly to close thumbtip.
Make another glove to match.
Finishing
These gloves were made using a yarn very similar to a shetland wool. It is fine, a little fuzzy, has very little stretch and has a tendency to stick to itself the way a feltable wool does. The knitter has chosen to tie the yarn ends in knots and cut them short whenever possible, rather than weaving them in. This works well in the small version, the knots are very small and disappear into the knit fabric. If you use a superwash wool or other yarn that doesn't cling to itself readily, like cotton, synthetic or other smooth fibers, you will probably want to weave in the ends.
There are little holes left in between the fingers and thumb that need to be closed up during the weaving-in process. The photos below show one way to do this.
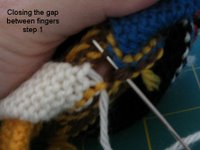
Step 1: With yarn end from base of second finger threaded on tapestry needle, catch stitches at base of first finger. Step 2: Catch stitches at base of second finger. Step 3: Pull up snugly to close gap. Weave in the end, reinforcing closure. Repeat in same manner until all fingers and thumb holes are closed.
Using duplicate stitch and colors M and N, add the large motifs to the wide black band on the back of the gloves, following chart for placement. The chart shows the left glove, you will want to mirror the design for the right glove.
Saturday, June 10, 2006
Softie for BackTack3 has Landed
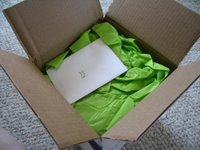
I have to tell you, Niki and I have been emailing back and forth furiously trying to figure out where this box went to. It should have arrived on Wednesday; after all, Priority Mail shouldn't take more than 3 days to get to its destination within the US. We had begun to fear the worst, that the package had been lost.
Thankfully, it has arrived safely. Who knows where it was misdirected before coming here, but we are so very glad that it is here now. We must open it immediately!
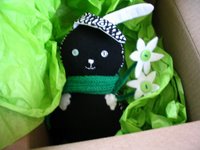
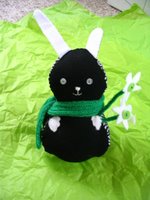
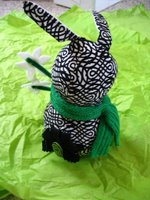
Ta-Da! Here's the cutie!
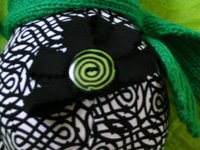
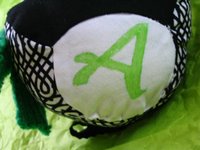
Front view on the left, rear view on the right.
This Wee Bunny has little button eyes and his nose and mouth are embroidered. In his hands he holds a cluster of felt daisies with lime green button centers and forest green chenille stems. He is wearing an emerald green scarf: knitted accessories! I love it!
His tail is made from loops of pinked black twill fabric fastened in place with a fun spiral-design button. See photo, left.
On the bottom, out of sight when he's sitting upright, is my initial A. See photo, right.
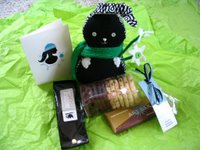
Here you see all the contents of the package. There's wonderful ginger-ginseng tisane that I just can't wait to try. There are chocolate and ginger shortbread cookies, oh my. Ah, there's an Art Bar, Swiss dark chocolate...quite liquid, I'm afraid, but it will be most delicious once it's had a chance to firm up a bit in the fridge.
Chocolate always survives ;-)
It has been a perfectly lovely day!
Friday, June 09, 2006
BackTack 3 Softie
Here are my gifties for Jess, my swap buddy for BackTack 3. They have arrived safely at their destination, so I can now show you the details. I know you want the details!
I checked with Jess and found that her favorite color is orange, so chose that as my accent color for this project. Anything in your favorite color is going to make you feel good, so when I make a gift for someone, I try to use their favorite color whenever possible.
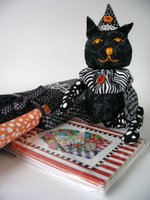
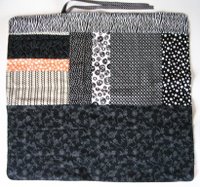
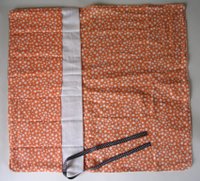
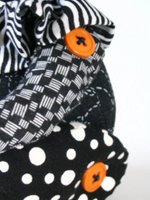
So, this is my little creation, Jesster Kitty. A performer never really travels light, so she has an entourage of sorts. With some of the leftover fabrics I made a knitting needle roll to match. Some cute note cards fill in nicely. Can you believe I fit it all into one of those small Priority Mailers?
Here is the needle roll. The outside on the left, the inside on the right.
I used standard cotton calico prints for the cover and double-faced cotton flannel for the lining and pockets. This makes a rather thick and padded roll that provides a nice amount of cushioning to protect knitting needles. It is large enough to comfortably hold longer needles but can be folded to a smaller size for shorter needles too. I hope she finds it useful.
Do you think I should post the pattern? Let's do a poll and find out! It will be interesting to see what you think. Find the poll over in the right-hand sidebar.
Tuesday, June 06, 2006
BT3 and Project Spectrum
What is this? It's a hint of the softie I sent to Jess. I don't want to spoil the surprise for her, so I will wait until I get confirmation from her that it has arrived safely before I post the full spread.
I don't know about other folks, but I just love surprises. For me, the surprise is more important than the giftie every time.
I chose to create my own pattern for this softie. Since it is my own original work, I may decide to post the pattern. If anyone's interested, that is. We'll see after I put up the full set of photos.
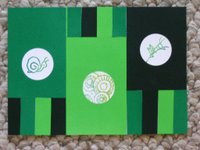
I can show you what I made for the Project Spectrum Postcard Swap. A celebration of green for May.
I didn't get as many green things finished this month as I had hoped. Of course, the kitchen plumbing blowing up like it did put a real damper on my crafting time. But all in all, it's been a pretty productive month.
June brings the color blue. That deserves a post all its own.
Saturday, June 03, 2006
A Little Break
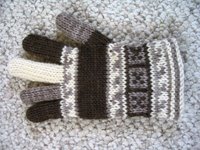
I needed a little break from glove knitting. Now, I did my best to make it interesting. I used different yarns. I challenged myself to use only the yarns I had in my stash. I even reduced the number of colors while still trying to create an attractive glove. See my brown version at left, using only 3 colors, for those with more conservative tastes in their outerwear.
It's been a lot of fun. But it is also a bit repetitive. Must...knit...something...else...
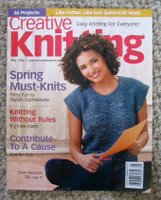
I really like the cover project from Creative Knitting Magazine May 2006. A simple top with a little bit of texture. Sleeveless, but the drop shoulder creates a little cap sleeve effect. The design is nice enough to wear alone in a casual workplace or under a jacket in a more formal one. The perfect summer top.
I bought some Knitting Fever King Tut cotton in soft green 8580 last summer to make a simple top for myself but hadn't chosen a pattern yet. When I saw this magazine I thought I'd found the perfect pattern.
Alas, I am one skein short of the yardage requirements for this top, and it's too late to find the same dye lot. That's ok, it gives me an excuse to buy more yarn. The search for the perfect cotton yarn with which to make this top should take me to every yarn shop within 100 miles. How fun!
Meanwhile, what to do with the King Tut?
I found a great free pattern at Garnstudio that I do have enough yarn for. I think I like it even better than the previous pattern. It calls for 2 strands of yarn, one cotton and one alpaca, but the gauge of the combined yarns is fairly close to my worsted weight cotton. So, I got out the calculator and converted the pattern to my slightly-finer gauge.
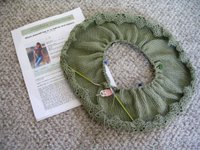
Here you see the beginnings of my top after knitting one skein. The lacy edge will need blocking to lie flat, but the sheen of the yarn sets it off well. I'm excited to see how it turns out. I just might knit this pattern again. There's a matching cardigan pattern too, so maybe a twinset? We'll see how it goes.
Subscribe to:
Posts (Atom)