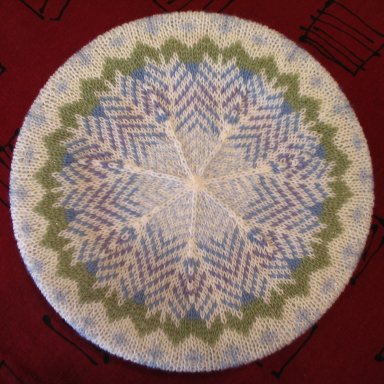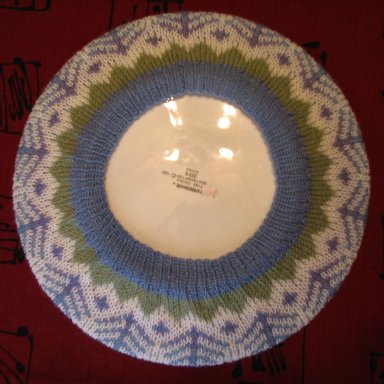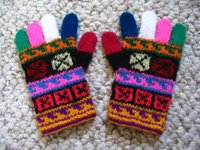
I found this pair of gloves in a tiny shop that sells imported South American handcrafts. They're bright and colorful, a delight for children, but only a knitter can truly appreciate the level of workmanship evident in these gloves. This is not a beginner's project, but rather a strong intermediate one due to the fiddly nature of
stranded knitting in the round on such a small scale. If you are new to sock or mitten making, I recommend trying a solid colored pair in aran or chunky weight yarn first. In these instructions, I will be substituting duplicate stitch for the intarsia-in-the-round technique used in the original.
One set of instructions covers all sizes from toddler to adult. Sizing is achieved by using yarn of different weights or needles of different sizes with one exception-the finger lengths are given for size 2 years [all other sizes].
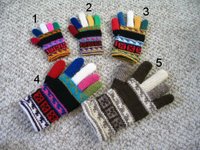
If you want the gloves to be a specific size, you must be precise with your gauge. These gloves are made with 14 colors of yarn, but you can certainly make them with fewer colors. My samples use between 3 and 9 colors each. This is an excellent project for using leftover bits of yarn. Yarn weights given are approximate, taken from my samples and my kitchen scale.
Abbreviations:
DPN = Double Pointed Needle
P = Purl
Sl = Slip stitch as if to purl
* = Repeat instructions between asterisks as instructed.
Inc = Increase
Rep = Repeat
St = Stitch
Sts = Stitches
Rnd = Round
1. For size 2 years you will need small amounts of sock/fingering weight yarn to total about 14 grams, one set each of size 1US/2.25mm DPNs and size 2US/2.75mm DPNs
or size needed to match gauge. Gauge: 30 stitches = 4"/10cm in stockinette stitch on larger needles. Original knit in shetland type yarn measures 2.5"/6.4cm wide at cuff and 5.5"/14cm long.
2. For size 3-4 years you will need small amounts of sock/fingering weight yarn to total about 18 grams, one set each of size 2US/2.75mm DPNs and size 3US/3.25mm DPNs
or size needed to match gauge. Gauge: 28 stitches = 4"/10cm in stockinette stitch on larger needles. Sample knit in Regia and Lang Jawoll sock yarns measures 2.75"/7cm wide at cuff and 6.25"/16cm long.
3. For size 6-8 years you will need small amounts of DK/sport weight yarn to total about 36 grams, one set each of size 4US/3.5mm DPNs and size 5US/3.75mm DPNs
or size needed to match gauge. Gauge: stitches = 4"/10cm in stockinette stitch on larger needles. Sample knit in Knit One Crochet Too's Creme Brulee DK measures 3.25"/8.25cm wide at cuff and 7.25"/18.4cm long.
4. For size 10-12 years you will need small amounts of worsted weight yarn to total about 52 grams, one set each of size 6US/4.0mm DPNs and size 7US/4.5mm DPNs
or size needed to match gauge. Gauge: 20 stitches = 4"/10cm in stockinette stitch on larger needles. Sample knit in Patons Classic Wool measures 3.75"/9.5cm wide at cuff and 9"/23cm long.
5. For ladies size small/medium you will need small amounts of aran weight yarn to total about 56 grams, one set each of size 8 DPNs and size 9 DPNs
or size needed to match gauge. Gauge: 16 stitches = 4"/10cm in stockinette stitch on larger needles. Sample knit in Lion Brand Fishermen's Wool measures 4.25"/11cm wide at cuff and 10"/25.5cm long.
For all sizes you will also need a tapestry needle and small scissors.
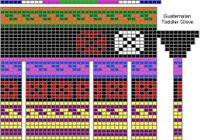
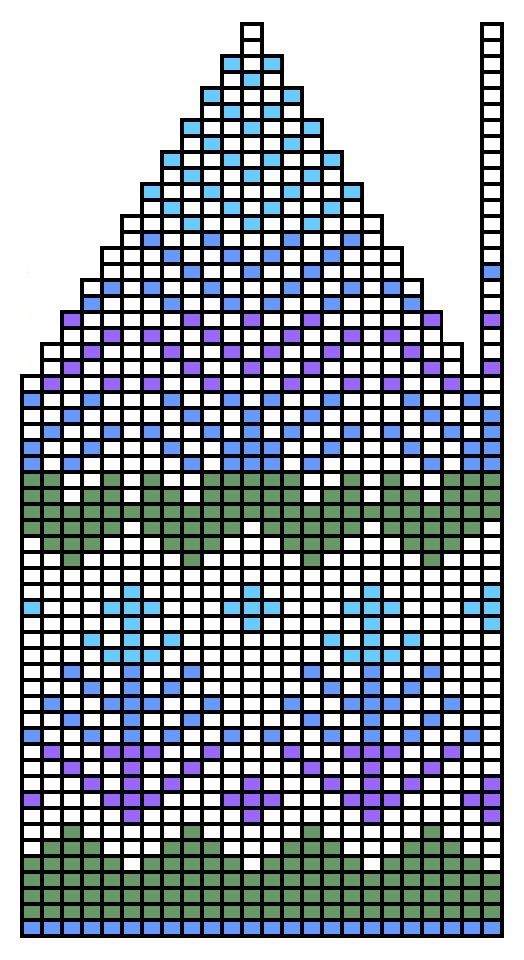
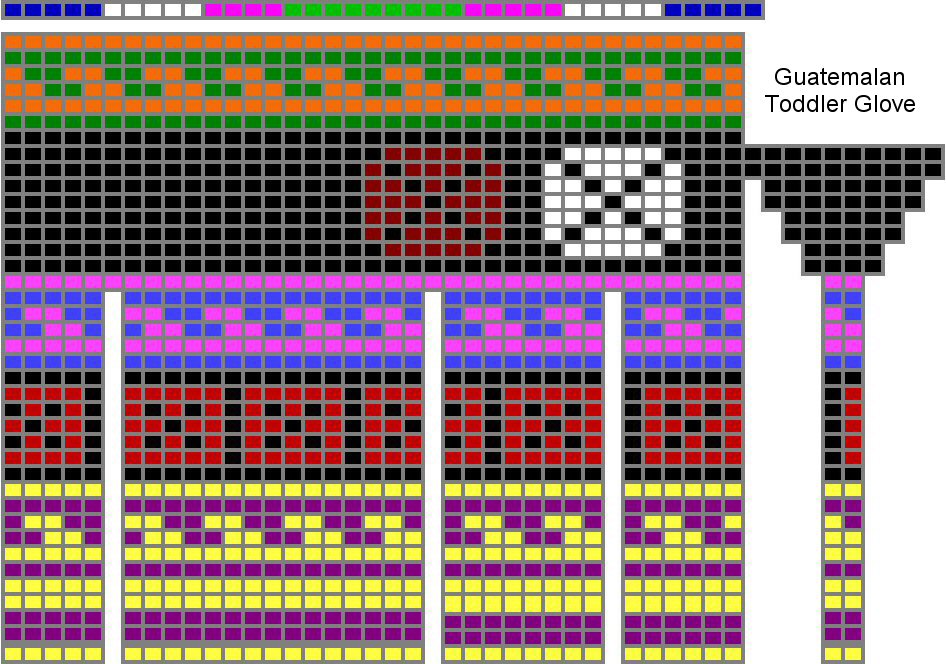
The chart at left shows placement of the colors used and shaping of the gloves. Read this chart starting at the bottom right as you work.
List of the 14 glove colors in the order they are used:
Color A = yellow
Color B = purple
Color C = black
Color D = medium red
Color E = medium blue
Color F = light pink
Color G = dark green
Color H = orange
Color I = dark blue
Color J = white
Color K = medium green
Color L = dark pink
Color M = dark red
Color N = pale yellow
Casting OnBecause the first knitted round is a different color than the cast-on round, I will call the cast-on round the first round for the purposes of following the chart. The joining actually takes place at the beginning of the second round after the cast-on, or what I call round 3.
Row 1:(Becomes round 1 after joining) Using the
knitting-on method and the smaller size needles, cast on 36 stitches using 2 DPNs and color A. Move the stitches to the opposite end of the needle, so that the end with the short tail is close to the tip of the needle.
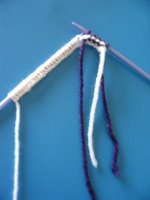
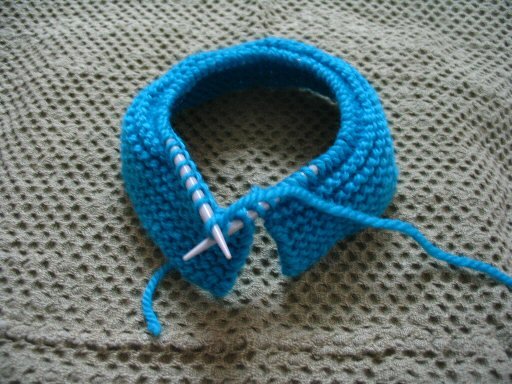
Row 2: (See photo left, becomes round 2 after joining) Using color B, p the first 12 stitches onto what we will call needle 1, p the next 12 stitches onto needle 2, p the last 12 stitches onto needle 3.
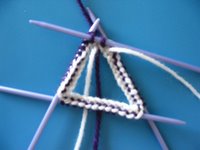
Round 3: (See photo right) Join the work into a round without twisting stitches and knit all stitches in this round.
Round 4: With color A, purl around.
Round 5: Knit around.
Round 6-23: Change to larger size needles and purl each round, following chart for color placement.
Round 24: P around, increasing 3 stitches positioned as shown in the chart; 39 stitches.
Begin Thumb Gusset(This section is worked in solid black. The color motifs are duplicate stitched on the back after the glove is finished.)
Round 25: With color C, inc in the first 2 sts, p rem sts; 41 sts.
Round 26: P
Round 27: Inc in 1st and 4th sts, p rem sts; 43 sts.
Round 28: P
Round 29: Inc in 1st and 6th sts, p rem sts; 45 sts.
Round 30: P
Round 31: Inc in 1st and 8th sts, p rem sts; 47 sts.
Round 32: P
Round 33: Place first 10 sts onto a short scrap length of yarn to be worked later, p the 11th st and pull snugly to close the gap, p the rem sts; 37 sts. Change to color G.
Round 34-39: P each rnd, following chart for color placement.
FingersThe fingers are worked using a technique that allows you to make a tube while working flat using 2 needles. Since these tubes are only 9 or 10 stitches around, this is easier than trying to work in the round with 3 or 4 stitches on each DPN.
Before you can actually work the stitches for the fingers, they need to be set up and transferred to a different needle. You can do this two different ways; 1) transfer them directly to the new needle from the current needles, or 2) take the stitches off the current needles onto a scrap of yarn before transferring each finger's stitches before working the finger. If you are experienced and comfortable using DPN's, I recommend the first method. If you aren't as comfortable keeping track of many needles poking out all over the place, I recommend the second method.
Start transferring stitches from the current needles or from yarn holder by slipping the stitches onto your working needle as if to purl them.
On the chart you can see a row of colors just above the rest of the glove. This represents the placement of each finger's stitches in relation to the body of the glove. You will work from right to left, index finger to little finger.
First or Index FingerYou should have 11 sts on needle 1, 13 sts on needle 2 and 13 sts on needle 3. You want the sts divided in 2 groups now, so slip 8 sts from needle 2 to needle 1 and the remaining 5 sts from needle 2 to needle 3; this makes 19 sts on needle 1 (front needle) and 18 sts on needle 3 (back needle).
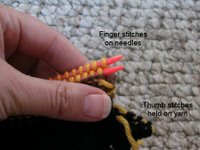
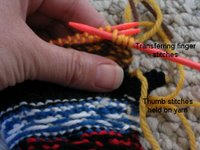
Holding your work as shown in photo at left, slip one st from the back needle (needle 3), slip one st from the front needle (needle 1), slip one from back needle, slip one from front needle (see photo right), continue in this manner until you have 9 stitches on needle. Slide the sts to the other end of the needle so that you can start working at the beginning of rnd position.
Row 1: With color I, sl 1, *p 1, sl 1* repeat to end of row. Turn.
Row 2: *p 1, sl 1* rep until last st, inc in last st; 10 sts, 1 rnd completed. Turn.
Row 3: Sl 2, *p 1, sl 1* rep to end. Turn.
Row 4: *P 1, sl 1* rep to end. 2 rnds completed. Turn.
Row 5: *P 1, sl 1* rep to end. Turn.
Row 6: *P 1, sl 1* rep to end. 3 rnds completed. Turn.
Repeat Rows 5 and 6 until finger is 24[30]rows/12[15]rnds long. Cut yarn 6-8 inches long, thread onto tapestry needle and thread it through the first st, and every alternate st across row, turn and rep on other side to draw yarn through all sts around. Pull up tightly to close fingertip, fasten off and weave in the end.
Second or Middle FingerSl 1 st from front needle, 1 from back needle, 1 from front needle, 1 from back needle, and so on until you have 10 sts on the needle. Slide the sts to the other end of the needle.
Row 1: With color J, *p 1, sl 1* rep to end of row. Turn.
Row 2: *P 1, sl 1* rep to end of row. 1 rnd completed. Turn.
Repeat Row 2 until finger is 30[36]rows/15[18]rnds long. Cut yarn and draw through stitches and pull tightly to close fingertip.
Third or Ring FingerSl 1 st from front needle, 1 st from back needle, 1 from front needle, 1 nfrom back needle, and so on until you have 9 sts on the needle. Slide the sts to the other end of the needle.
Row 1: With color F, p 1, *sl 1, p 1* rep across row. Turn.
Row 2: Slip 1, *p 1, sl 1* rep across row. 1 rnd completed. Turn.
Repeat Rows 1 and 2 until finger is 24[30]rows/12[15]rnds long. Cut yarn and draw through sts and pull tightly to close fingertip.
Fourth or Little FingerSl 1 st from front needle, 1 st from back needle, 1 from front needle, 1 from back needle, and so on until you have 9 sts on the needle. Slide the sts to the other end of the needle.
Row 1: With color K, p 1, *sl 1, p 1* rep across row. Turn.
Row 2: Sl 1, *p 1, sl 1* rep across row. 1 rnd completed. Turn.
Repeat Rows 1 and 2 until finger is 22[26]rows/11[13]rnds long. Cut yarn and draw through sts and pull tightly to close fingertip.
ThumbPick up stitches from the yarn holder in the same manner as the finger stitches, slipping one stitch from front half of yarn loop, slipping one stitch from back half of loop, alternating back and forth until you have 10 stitches on the needle.
Row 1: *P 1, sl 1* repeat across row. Turn.
Row 2: *P 1, sl 1* repeat across row. One rnd completed. Turn.
Rep rows 1 and 2 until thumb is 20[23]rows/10[13]rnds long. Cut yarn and draw through sts and pull tightly to close thumbtip.
Make another glove to match.
FinishingThese gloves were made using a yarn very similar to a shetland wool. It is fine, a little fuzzy, has very little stretch and has a tendency to stick to itself the way a feltable wool does. The knitter has chosen to tie the yarn ends in knots and cut them short whenever possible, rather than weaving them in. This works well in the small version, the knots are very small and disappear into the knit fabric. If you use a superwash wool or other yarn that doesn't cling to itself readily, like cotton, synthetic or other smooth fibers, you will probably want to
weave in the ends.
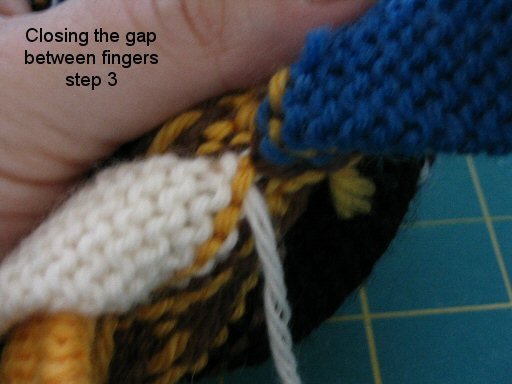
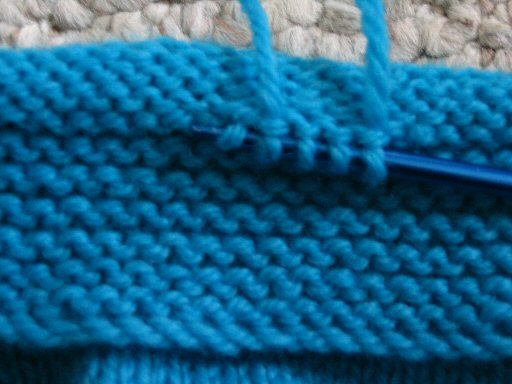
There are little holes left in between the fingers and thumb that need to be closed up during the weaving-in process. The photos below show one way to do this.
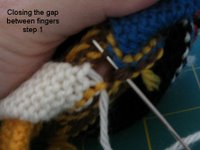
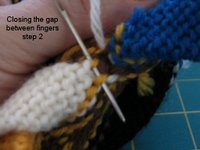
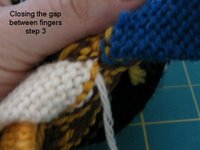
Step 1: With yarn end from base of second finger threaded on tapestry needle, catch stitches at base of first finger. Step 2: Catch stitches at base of second finger. Step 3: Pull up snugly to close gap. Weave in the end, reinforcing closure. Repeat in same manner until all fingers and thumb holes are closed.
Using
duplicate stitch and colors M and N, add the large motifs to the wide black band on the back of the gloves, following chart for placement. The chart shows the left glove, you will want to mirror the design for the right glove.

 As promised, here is the pattern for the bath mitts I made for my 4-year-old. They have been knitted flat in garter stitch in one piece and are seamed along the outer edge of the hand and inner edge of the thumb. They are designed to fit a preschool aged child loosely, which makes it easier for them to put them on by themselves.
 Row 17: Knit 14 stitches, m1, knit 2, m1, knit 14; 32 stitches.
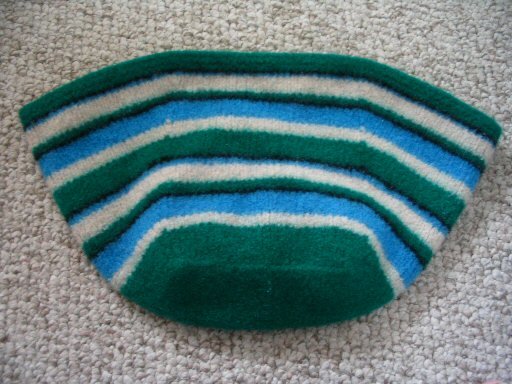
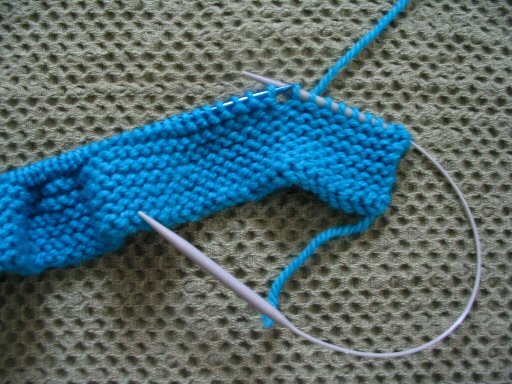
 Knit 24 more rows in garter stitch (12 ribs). Your mitt should look like the photo at left.

 Knit 14 rows (7 ribs).
 Finishing:If you're new at sewing up garter stitch using mattress stitch, Knitty has a great article with lots of photos that shows you how.
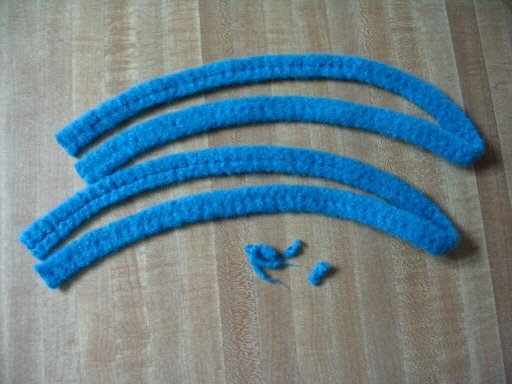
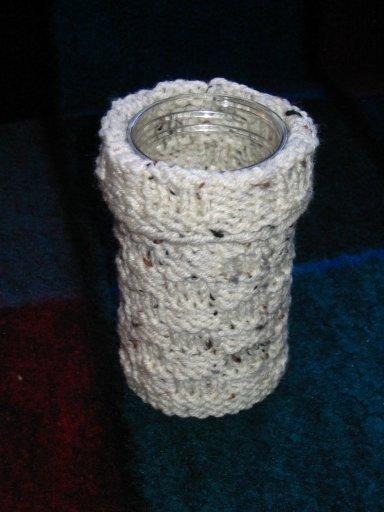
 Want to put a ruffle on the cuff for a feminine touch? I embellished this mitt with a simple crocheted edge.