It's always busy this time of year, so many things to do. Whether baking, decorating or shopping in preparation for get-togethers with friends and family, our to-do lists are full.
I am trying to simplify my life (and my list) to make more room for just enjoying time with family. I have a houseful of family members staying from out of town this year and it is tempting to over-schedule myself trying to make everything 'perfect'. I am resisting by scaling things down a bit. For instance, I chose a small tabletop tree instead of the traditional 6-footer because it takes much less time for the group to decorate and is more enjoyable for the folks with shorter attention spans.
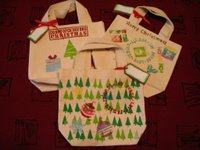
I am also taking fewer shopping trips and choosing more enjoyable places to visit. I refuse to participate in the frenzy that has become all too common at popular retail stores with mega sales that encourage people to push and shove and fight over this bargain or that. Instead, I take my family to responsible stores like my local scrapbooking shop. A creative bunch, they hosted a 'Make and Take' event that even the 3-year-old could enjoy. Hubby and teenagers all had fun with foam stamps and acrylic paint decorating little canvas bags that we plan to use as gift bags.
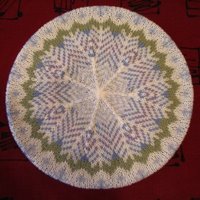
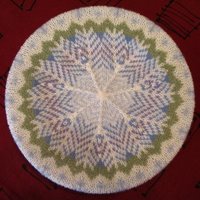
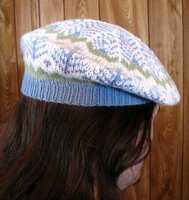
This effort has paid off. I've had much more time to spend with my loved ones, and I've even had time to knit a bit in the evenings. Here is my new fair-isle wheel tam. I have decided to follow Mary Rowe's lead and give it a title- Snowflakes.
The pattern is my own, but it is inspired by the work of many people. I have studied books, magazine articles and examples on the internet. Some good books on the topic - Knitted Tams by Mary Rowe, Traditional Fair Isle Knitting by Sheila McGregor, 45 Fine and Fanciful Hats to Knit by Anna Zilboorg and 1000 Great Knitting Motifs by Luise Roberts.
Find the pattern here.
Sunday, December 10, 2006
Snowflakes Tam Pattern
This is Snowflakes, my fair-isle wheel patterned tam. It will fit most small to medium sized adult heads. It is my own design and I'm sharing it with you here. If you want to learn more about making these lovely hats you can see my list of reference books in this post.
This is not a beginner's project, I would call it intermediate level. It involves 2-color knitting in the round using tiny size 1 US/2.25mm and size 3 US/3.25mm circular and double pointed needles. The challenge is to keep your tension even throughout.
Materials: Fine wool yarn that knits to a gauge of 28 stitches=4"/10cm. It must be wool or it will not block to shape. I used GGH Merino Soft, Lane Borgosesia Merino Extra Fine, and Le Fibre Nobili Tajmahal. You will need one 50 gm ball each of 5 colors or leftover yarns in the following amounts-
24 grams white
8 grams green
12 grams blue
4 grams pale blue
4 grams lavender
You will also need one stitch marker or small loop of contrasting yarn and 16"/40cm circular needles in size 1 US/2.5mm and size 3 US/3.25mm and a set of 4 double pointed needles in size 3 US/3.25mm or whatever size you need to knit your yarn to gauge.
Directions: Using size 1/2.5mm circular needle and blue yarn, cast on 134 stitches for ribbing. Join, being careful not to twist stitches, place stitch marker on needle to mark beginning of row, and work 1x1 ribbing (knit one, purl one) until tube measures 1"/2.5cm, or about 11 rounds.
Increase round: Switch to size 3 US/3.25mm circular needles. Knit 3, increase by knitting into the front and back of next stitch, *Knit 4, increase in next stitch* repeat between *'s around ending Knit 3, increase in next stitch. 168 stitches.
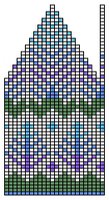
Brim: Knit every round following the chart at left for color placement. Read the chart from bottom to top, from right to left, the way that you knit the piece. The chart is repeated 7 times around the hat. Continue moving the stitch marker to keep track of beginning of round.
Crown: Starting on row 36 of the chart, you will begin making double decreases every second round to shape the crown of the hat, represented by the single column of stitches. (The chart makes a stair-step to represent the stitches decreased out of the crown.) The center stitch of the decrease is prominent and decorative, and is performed in this manner-slip 2 stitches as if to knit 2 together, knit the next stitch, pass the 2 slipped stitches over the stitch you've just knitted. You will want to keep your stitch marker at the edge of the decrease line.
Continue working, decreasing 14 stitches every other round, changing to double pointed needles when this becomes necessary. Draw yarn through last 14 stitches and pull tightly. Weave in yarn ends.
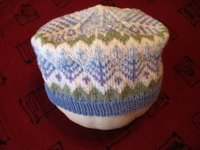
Finishing: At this point, the tam will look like the photo at left. It will seem a little small to fit an adult, but it will be a little larger after blocking.
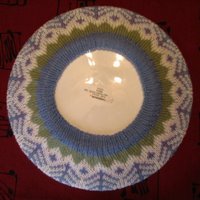
To block the hat, wet it well and roll it up in a towel to remove excess water without wringing or twisting the hat out of shape. Gently stretch the hat over a dinner plate and pat it into place. See the photos at the top of the page to see what it should look like. Allow it to dry completely, which will take a day or two.
The photo at right is what the finished hat looks like, modeled by one of my teens.
Subscribe to:
Posts (Atom)