Wednesday, August 29, 2007

More Dishcloths

6 4-corners dishclothsI've taken a break from the sock knitting to work on some dishcloths. There are 2 weddings coming up next month and I like to include a little something handmade with my gifts.

I had been browsing around and found a pattern I just had to try and I must say that I love it. It looks wonderful in a space dyed yarn as well as a solid, but I think it's especially nice using both solid and ombre yarns in a 2-row stripe pattern.

Based on Elizabeth Zimmerman's Square Baby Blanket, the basic pattern is here. Another one of those garter stitch items that are so versatile.

Tuesday, August 21, 2007

More Granny Squares

a few assembled granny squaresargyle vest in progressI now have enough granny squares to make a small blanket, just the right size for a pre-schooler to play on or nap under. I've started putting the blocks together to see how the mix of large and small squares will look. The sample (see photo, left) is still too small to decide yet, so I will continue adding to it.

The yarn I'm using is left over from a baby sweater I started knitting 3 years ago. After knitting the fronts, back and part of one of the sleeves (see photo, above right) I discovered that it had been designed as a short and wide garment that would not fit my tall and slim son. In order to fix it I would need to remove the bottom ribbing, add another row of diamonds to the argyle pattern, and put the ribbing back on. The boy outgrew it before I got around to fixing it. So I have decided to turn the sweater into a vest and save it for a future gift-giving occasion.

one blue sock in progressHere you can see my current portable knitting project (see photo, left). I'm knitting some socks for Mom, in her favorite color. I expect to take them along with me to doctor's appointments, the park, riding in the car with my hubby and maybe the bowling alley. So far the most exotic place they've been to is the laundry room.

The yarn I'm using? It's some Regia sock yarn I picked up way back in 1998. I think I bought the needles at the same time too.

Wednesday, July 25, 2007

Summer Days

Basket full of granny squaresThese hot summer days just leave me feeling drained. At the end of the day I don't have a lot of knitting energy or enthusiasm. I still want to work through my stash, however.

One solution for me is to make afghan squares. Sometimes I like to knit them, sometimes I like to crochet them. This week I'm crocheting granny squares.

I have a lot of colors in my stash, but no black to use for that neutral background that is so traditional in granny square afghans. I do have some very neutral taupe brown though, and that is what I'm using. We'll see how it turns out.

What we do have enthusiasm around here for is barbeque. It doesn't matter what it is, there's probably a way it can be cooked on the barbeque. We have a lot of fun trying to find ways to bbq most anything. Why not? It doesn't heat up the kitchen.

Here's a simple recipe that we enjoy whenever we can get really fresh corn on the cob.

Corn Roasted on the Barbie

6 ears of corn, shucked and cleaned
2 Tablespoons melted butter or olive oil
salt and pepper
aluminum foil
optional: a few teaspoons of minced fresh herbs like parsley, basil, dill or mint.

Pull off 6 squares of aluminum foil to wrap the ears of corn. Lay an ear of corn diagonally across one square of foil. Rub the corn with butter or oil until it is well coated. Sprinkle the corn with salt and pepper to taste and sprinkle with herbs if desired. Wrap the foil around the corn making sure it's completely covered. Repeat with remaining ears of corn.

Place the foil wrapped corn packets on your barbeque grill over medium coals and close the lid. Turn the packets every 5 minutes or so to prevent scorching. Check them after about 20 minutes for doneness. If you begin to smell cooking corn, it's probably done. The corn usually darkens in color when it's ready.

Tuesday, July 10, 2007

Simple Tea Cozy

Tea cozy for large teapotEvery now and then I like to sit down, relax and have a cup of tea. Unfortunately, just when I am relaxing seems to be the time for domestic disasters to occur. I'm sure most mothers have experienced this phenomenon. The end result is a cold pot of tea.

Since I cannot seem to have an uninterrupted teatime, I truly needed a tea cozy to help keep my pot of tea warm long enough to actually drink it. So I went a-googling for a pattern that I might like. I found several patterns, but none that I really loved. Ah well, I knew I would find one later, and didn't give it much thought for a few weeks.

This morning I paused near a box full of yarn that I'd been sorting through the day before. On top was a lovely ball of Berroco Medley. Thick and thin and full of lots of colors, I had just loved it and bought it a couple of years ago without a clue what to do with it but certain that 'it would come to me'. It's mostly wool, so it's insulating. I suddenly knew that this was The Yarn for the tea cozy. I grabbed the yarn, a pair of needles and set to it.

Measuring my larger teapotFirst, I measured my teapot. It's about 7 inches tall including the knob on the lid and about 7" in diameter. I knit a good sized swatch and figured out what dimensions of knitted fabric I would need to cover it. The yarn makes a powerful statement all by itself, so I don't need any fancy stitch textures because they'd just get lost. When in doubt, go with garter stitch. Here's the pattern I made up, just this morning. Enjoy!

Yarn: Berroco Medley, 1 ball; 75% wool, 15% acrylic, 10% nylon, 73 yds/67 m (used the whole ball, minus 3 yds). Gauge 14 stitches x 22 rows in stockinette using size 10 US/6 mm needles.

Measure your teapot from the bottom up to the place where the top edge of the spout meets the pot. (see photo, above left) We'll call this the 'spout measurement', and mine is about 4.5".

Starting at the bottom of the cozy, cast on 42 stitches.

Working in garter stitch (knit every row) knit 5 rows.

Row 6: *Knit 2, increase in next stitch by knitting into the front and back* repeat across row; 56 stitches.

Row 7: Knit across.

Continue working in garter stitch until the piece measures your 'spout measurement' in length (or 4.5 inches for most teapots). At this point you'll make an opening for the spout, something like a buttonhole.

Separation row: Knit 24 stitches, bind off the next 8 stitches loosely, knit the remaining 24 stitches.
Rejoining row: Knit 24 stitches, cast on 8 stitches, knit the remaining 24 stitches; 56 stitches.

Knit 2 more rows.

First decrease row: *Knit 2, decrease by knitting the next 2 stitches together* repeat across the row; 42 stitches.

Knit 5 more rows.

Second decrease row: *Knit 1, knit 2 stitches together* repeat across the row; 28 stitches.

Knit 5 more rows.

Third decrease row: *Knit 2 stitches together* repeat across the row; 14 stitches.

Knit 1 more row.

Last decrease row: *knit 2 stitches together* repeat 6 times; 7 stitches. Cut yarn and draw it through all the stitches, pull tightly and fasten off the top of the cozy.

Fold the cozy in half, sides together, and sew a partial seam at upper and lower edges, leaving an opening for the teapot handle to poke through. Try the cozy on your teapot for seam placement, or sew 2 inches at bottom edge and 3 inches at the top like mine.


Measuring my smaller teapotSmaller tea cozy
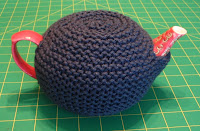
I also have a smaller teapot. It measures about 5.5" in diameter and 4" tall and the shape is a little different. I thought I'd try out the pattern in worsted weight yarn to see if it fit, and to give you an example of what the cozy looks like knit in a smooth yarn.

Yarn: Red Heart worsted, size 8 US needles. I cast on and knit the same as for the larger teapot, until the piece measured 3" in length. I finished the cozy the same way as for the larger pot.

Sewing the cozy together was similar, I sewed 1" at the bottom edge and 2.5" at the top.

It fits a little snugly, but it works. I like the modern smoothness of it. I want to play around with it, make stripes or geometric shapes on it, make it modular, attach embellishments and crocheted flowers to it. You know, explore the potential of it. Maybe you'd like to play with it too. If you do, I'd love to see a snapshot.

Wednesday, June 27, 2007

Recycled Placemat Purse

Handbag made from placematI was browsing my local thrift shop and came across a lovely placemat-unfortunately there was only one on the shelf. What can you do with just one placemat? Well, I really liked that placemat and I knew I could come up with a project for it, so I bought it.

Here is what I did with it. This bag measures about 9"x 3" x 6" with handles folded down. It was easy and I thought others would like to try making their own recycled placemat bag. Here's what you need:

1 placemat with fringed sides.
2 pieces of lining fabric, one cut to 2"x 10", and another piece cut the same size as the placemat.
1 pair purchased purse handles.

first seamsecond seamFold your placemat, right sides and short fringed edges together, and sew the 2 unfringed sides together using 1/2" seam allowance (see photo, left). You now have a flat pouch. Open this pouch up, forming a bag bottom, and sew diagonally across the corner about 1.5" away from the point (see photo, right). Repeat these 2 steps with the larger piece of lining fabric. Fold down 1/2" seam allowance along top edge of lining to the wrong side and press.

making anchor strips for handlesclose-up of anchor strip on finished bagFold 2"x 10" strip of lining fabric in half lengthwise, right sides together, and sew along the length using 1/2" seam allowance (see photo left). Turn the strip right-side-out (use a chopstick or safety pin to help the process along) and press it flat.

Cut the strip into 4 equal pieces. Fold one piece in half over the ring at the end of one of the purse handles and sew in place on the upper edge of the bag, about 1" in from the corner. Repeat with 3 other strips, anchoring the purse handles to the bag (see photo, right). Tuck lining into place inside the bag and either hand whipstitch or machine topstitch around upper edge to finish.

Friday, June 22, 2007

Finished Coat

Seed Stitch Coat-FinishedI have finally finished the little seed-stitch coat. In the end I chose to put a simple collar on it because there wasn't enough yarn left to knit a hood. I think it is probably better this way, we don't have much need for hoods in this warm climate anyway.

After sewing the coat together I looked at it for a while and decided that it needed something. A simple little trim to help define the edges, I thought. I looked through the yarn stash for coordinating colors and previewed their effect by laying a single or double strand of the yarn along the edge of the front band. The one I thought looked best was Lion Brand Homespun color 322 Baroque (that's a lovely shade of purple). One row of single crochet around all the edges did the trick. I even had matching buttons in my button stash.

I think this was a very successful stash-only project.

Monday, June 18, 2007

Too Hot to Knit

Orange sunset image courtesy Stock.xchngIt may not technically be summer yet, but the summer weather has certainly arrived. We've had our first triple-digit temperatures of the year during the previous week. Father's day was not quite as hot, but it was hot enough to banish everyone to the swimming pool for the afternoon.

It's too hot to knit. Or, rather, it's too hot to try to figure out solutions to knitterly problems. Swimming in the pool seems like a much more attractive way to spend my time at the moment.

Seed stitch coat with some seams sewn.Here is my progress on the seed stitch coat. I've worked matching pieces for the back and sleeves, and sewn the back pieces together and the shoulder seams. Next: Sew on the sleeves, and face the challenge of the hood.

I started with 2 skeins of Lion Brand Homespun for this project, and there is approximately a sleeve's worth of yarn left, with several small scraps in the pink transition color. It simply isn't enough for the hood as written in the pattern, but it may be enough if I work the hood in a different way. I'll knit and reknit and see what I can do. If all else fails, I'll put a simple collar on it and call it good.

Once it cools down a bit, that is.