Wednesday, July 25, 2007

Summer Days

Basket full of granny squaresThese hot summer days just leave me feeling drained. At the end of the day I don't have a lot of knitting energy or enthusiasm. I still want to work through my stash, however.

One solution for me is to make afghan squares. Sometimes I like to knit them, sometimes I like to crochet them. This week I'm crocheting granny squares.

I have a lot of colors in my stash, but no black to use for that neutral background that is so traditional in granny square afghans. I do have some very neutral taupe brown though, and that is what I'm using. We'll see how it turns out.

What we do have enthusiasm around here for is barbeque. It doesn't matter what it is, there's probably a way it can be cooked on the barbeque. We have a lot of fun trying to find ways to bbq most anything. Why not? It doesn't heat up the kitchen.

Here's a simple recipe that we enjoy whenever we can get really fresh corn on the cob.

Corn Roasted on the Barbie

6 ears of corn, shucked and cleaned
2 Tablespoons melted butter or olive oil
salt and pepper
aluminum foil
optional: a few teaspoons of minced fresh herbs like parsley, basil, dill or mint.

Pull off 6 squares of aluminum foil to wrap the ears of corn. Lay an ear of corn diagonally across one square of foil. Rub the corn with butter or oil until it is well coated. Sprinkle the corn with salt and pepper to taste and sprinkle with herbs if desired. Wrap the foil around the corn making sure it's completely covered. Repeat with remaining ears of corn.

Place the foil wrapped corn packets on your barbeque grill over medium coals and close the lid. Turn the packets every 5 minutes or so to prevent scorching. Check them after about 20 minutes for doneness. If you begin to smell cooking corn, it's probably done. The corn usually darkens in color when it's ready.

Tuesday, July 10, 2007

Simple Tea Cozy

Tea cozy for large teapotEvery now and then I like to sit down, relax and have a cup of tea. Unfortunately, just when I am relaxing seems to be the time for domestic disasters to occur. I'm sure most mothers have experienced this phenomenon. The end result is a cold pot of tea.

Since I cannot seem to have an uninterrupted teatime, I truly needed a tea cozy to help keep my pot of tea warm long enough to actually drink it. So I went a-googling for a pattern that I might like. I found several patterns, but none that I really loved. Ah well, I knew I would find one later, and didn't give it much thought for a few weeks.

This morning I paused near a box full of yarn that I'd been sorting through the day before. On top was a lovely ball of Berroco Medley. Thick and thin and full of lots of colors, I had just loved it and bought it a couple of years ago without a clue what to do with it but certain that 'it would come to me'. It's mostly wool, so it's insulating. I suddenly knew that this was The Yarn for the tea cozy. I grabbed the yarn, a pair of needles and set to it.

Measuring my larger teapotFirst, I measured my teapot. It's about 7 inches tall including the knob on the lid and about 7" in diameter. I knit a good sized swatch and figured out what dimensions of knitted fabric I would need to cover it. The yarn makes a powerful statement all by itself, so I don't need any fancy stitch textures because they'd just get lost. When in doubt, go with garter stitch. Here's the pattern I made up, just this morning. Enjoy!

Yarn: Berroco Medley, 1 ball; 75% wool, 15% acrylic, 10% nylon, 73 yds/67 m (used the whole ball, minus 3 yds). Gauge 14 stitches x 22 rows in stockinette using size 10 US/6 mm needles.

Measure your teapot from the bottom up to the place where the top edge of the spout meets the pot. (see photo, above left) We'll call this the 'spout measurement', and mine is about 4.5".

Starting at the bottom of the cozy, cast on 42 stitches.

Working in garter stitch (knit every row) knit 5 rows.

Row 6: *Knit 2, increase in next stitch by knitting into the front and back* repeat across row; 56 stitches.

Row 7: Knit across.

Continue working in garter stitch until the piece measures your 'spout measurement' in length (or 4.5 inches for most teapots). At this point you'll make an opening for the spout, something like a buttonhole.

Separation row: Knit 24 stitches, bind off the next 8 stitches loosely, knit the remaining 24 stitches.
Rejoining row: Knit 24 stitches, cast on 8 stitches, knit the remaining 24 stitches; 56 stitches.

Knit 2 more rows.

First decrease row: *Knit 2, decrease by knitting the next 2 stitches together* repeat across the row; 42 stitches.

Knit 5 more rows.

Second decrease row: *Knit 1, knit 2 stitches together* repeat across the row; 28 stitches.

Knit 5 more rows.

Third decrease row: *Knit 2 stitches together* repeat across the row; 14 stitches.

Knit 1 more row.

Last decrease row: *knit 2 stitches together* repeat 6 times; 7 stitches. Cut yarn and draw it through all the stitches, pull tightly and fasten off the top of the cozy.

Fold the cozy in half, sides together, and sew a partial seam at upper and lower edges, leaving an opening for the teapot handle to poke through. Try the cozy on your teapot for seam placement, or sew 2 inches at bottom edge and 3 inches at the top like mine.

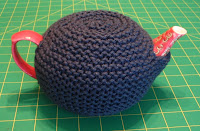
Measuring my smaller teapotSmaller tea cozyI also have a smaller teapot. It measures about 5.5" in diameter and 4" tall and the shape is a little different. I thought I'd try out the pattern in worsted weight yarn to see if it fit, and to give you an example of what the cozy looks like knit in a smooth yarn.

Yarn: Red Heart worsted, size 8 US needles. I cast on and knit the same as for the larger teapot, until the piece measured 3" in length. I finished the cozy the same way as for the larger pot.

Sewing the cozy together was similar, I sewed 1" at the bottom edge and 2.5" at the top.

It fits a little snugly, but it works. I like the modern smoothness of it. I want to play around with it, make stripes or geometric shapes on it, make it modular, attach embellishments and crocheted flowers to it. You know, explore the potential of it. Maybe you'd like to play with it too. If you do, I'd love to see a snapshot.

Wednesday, June 27, 2007

Recycled Placemat Purse

Handbag made from placematI was browsing my local thrift shop and came across a lovely placemat-unfortunately there was only one on the shelf. What can you do with just one placemat? Well, I really liked that placemat and I knew I could come up with a project for it, so I bought it.

Here is what I did with it. This bag measures about 9"x 3" x 6" with handles folded down. It was easy and I thought others would like to try making their own recycled placemat bag. Here's what you need:

1 placemat with fringed sides.
2 pieces of lining fabric, one cut to 2"x 10", and another piece cut the same size as the placemat.
1 pair purchased purse handles.

first seamsecond seamFold your placemat, right sides and short fringed edges together, and sew the 2 unfringed sides together using 1/2" seam allowance (see photo, left). You now have a flat pouch. Open this pouch up, forming a bag bottom, and sew diagonally across the corner about 1.5" away from the point (see photo, right). Repeat these 2 steps with the larger piece of lining fabric. Fold down 1/2" seam allowance along top edge of lining to the wrong side and press.

making anchor strips for handlesclose-up of anchor strip on finished bagFold 2"x 10" strip of lining fabric in half lengthwise, right sides together, and sew along the length using 1/2" seam allowance (see photo left). Turn the strip right-side-out (use a chopstick or safety pin to help the process along) and press it flat.

Cut the strip into 4 equal pieces. Fold one piece in half over the ring at the end of one of the purse handles and sew in place on the upper edge of the bag, about 1" in from the corner. Repeat with 3 other strips, anchoring the purse handles to the bag (see photo, right). Tuck lining into place inside the bag and either hand whipstitch or machine topstitch around upper edge to finish.

Friday, June 22, 2007

Finished Coat

Seed Stitch Coat-FinishedI have finally finished the little seed-stitch coat. In the end I chose to put a simple collar on it because there wasn't enough yarn left to knit a hood. I think it is probably better this way, we don't have much need for hoods in this warm climate anyway.

After sewing the coat together I looked at it for a while and decided that it needed something. A simple little trim to help define the edges, I thought. I looked through the yarn stash for coordinating colors and previewed their effect by laying a single or double strand of the yarn along the edge of the front band. The one I thought looked best was Lion Brand Homespun color 322 Baroque (that's a lovely shade of purple). One row of single crochet around all the edges did the trick. I even had matching buttons in my button stash.

I think this was a very successful stash-only project.

Monday, June 18, 2007

Too Hot to Knit

Orange sunset image courtesy Stock.xchngIt may not technically be summer yet, but the summer weather has certainly arrived. We've had our first triple-digit temperatures of the year during the previous week. Father's day was not quite as hot, but it was hot enough to banish everyone to the swimming pool for the afternoon.

It's too hot to knit. Or, rather, it's too hot to try to figure out solutions to knitterly problems. Swimming in the pool seems like a much more attractive way to spend my time at the moment.

Seed stitch coat with some seams sewn.Here is my progress on the seed stitch coat. I've worked matching pieces for the back and sleeves, and sewn the back pieces together and the shoulder seams. Next: Sew on the sleeves, and face the challenge of the hood.

I started with 2 skeins of Lion Brand Homespun for this project, and there is approximately a sleeve's worth of yarn left, with several small scraps in the pink transition color. It simply isn't enough for the hood as written in the pattern, but it may be enough if I work the hood in a different way. I'll knit and reknit and see what I can do. If all else fails, I'll put a simple collar on it and call it good.

Once it cools down a bit, that is.

Sunday, June 10, 2007

Sales Everywhere

Baskets full of novelty yarnsI have to admit, I couldn't resist the Memorial Day sales. It seemed like every store that carried any kind of crafting supplies was having a big sale last weekend. I took the opportunity to stock up on some novelty yarns. They are so handy for embellishing many types of projects. I plan to use these for trimmimg knitwear, quilts and scrapbook pages.

I resisted the urge to buy staple yarns; that is, the main yarns I use for the body of the garment or other knitted/crocheted objects. I have enough of these to keep me busy for years. And since I have a large stock of yarns just waiting to be used, I decided to start a new project using yarns I have on hand.

I have a little cousin who is just a few months old. The many baby shower gifts our rather large family contributed should keep her well clothed for a while, but she is growing rapidly and will most likely be in need of more goodies come winter. I did some calculations, based on her birth weight and current rate of growth, and made a good estimate of the size she will most likely be wearing by that time. I checked my yarn supply and discovered that I have a limited selection of girly colors. I want the garment to be washable, so Lion Brand Homespun it is. Then I searched through my books for an appropriate pattern.

Coat from Bouton d'Or Layette book 14, model 72This little seed-stitch coat is from Bouton d'Or layette book 14, model 72, and it has a gauge very close to what I get with the Homespun on size 10 US needles (6mm, or 4 UK). The book is still available at the Bouton d'Or website.

The yarn that I have chosen is very different from the yarn the pattern calls for. The sample is knit in Laika, a solid colored bulky weight wool that would have nice elasticity for ribbed edges. I am using Lion Brand Homespun, color 315 Tudor, which produces a broad color stripe and doesn't have enough elasticity for a good ribbed front band in my opinion. I will need to make changes to the pattern to allow for these differences. It will require patience and a good amount of unknitting I'm sure.

Fronts and back of toddler coatI have made good progress so far. I started by finding a color change in the yarn that I could easily identify and repeat from piece to piece. I followed the directions and knit the back. I don't like the striping on the back at all, but I wanted to see what the fronts would look like before ripping it out. I then knit the right front, adding extra stitches for the front band to be knit along with the front because I liked the firm edge I was getting in seed stitch. I had to calculate button placement and work buttonholes into the piece as I went along. I knit the left front to match.

One half of the back of toddler coatI like the patterning on the fronts. I want the back to match the fronts, so I will knit it in 2 pieces and seam it down the center. This should be fairly easy to do since seed stitch can be sewn together in a similar way to garter stitch and leave a smooth seam.

Next I will work out the sleeves and hood. I can tell I will be doing a lot of testing, unknitting and reknitting for these parts of the coat. The width of these pieces are different and therefore make a different color pattern. I have to decide where to start these different yarn color change locations. I also now have less yarn to work with and therefore fewer color ranges to choose from, which will give me fewer options.

After that, I have to decide how I want to finish the coat. The pattern uses some novelty eyelash yarn as trimming around the edges and some little butterflies attached here and there for interest. I know that I will be doing something different because these trims can be hazardous for children under 3, but I don't know what yet. It will be interesting to see how it turns out.

Saturday, May 26, 2007

Pattern Book Review

As I have mentioned before, I collect the Bouton d'Or layette pattern books and I was looking forward to seeing this year's new book. Last year's book was absolutely fantastic, with 8 knitted soft toys and a wide variety of great-looking garments to knit and crochet for babies and children up to age 10. I love these books. In my opinion, if you only have one layette book, it should be one of these. So, naturally, I had great expectations.

I was in a very great hurry the day I stopped by my local yarn shop in between errands to see if they had the new book yet. When I found it had finally arrived, I quickly paid for the book, grabbed it up and dashed out the door. I didn't look at it until after I returned home.

The quality of the patterns is all that I have come to expect from Bouton d'Or, wonderful designs with fine details, a mixture of classic styles and fun, trendy pieces. A good variety of items to choose from to suit many tastes, great for gifts. There are some new non-traditional color combinations here as well, some that I like and some that I don't, but they encourage you to try new things.

Views from Bouton d'Or layette book #16afghan from Bouton d'Or layette book #16Here are some of the models that I would like to try:

#39 is such a great looking little dress that I just have to make one.

Sweater #27 has a cute car theme that my little boy would just love, but I am not fond of the color scheme. I'll choose different colors for this one.

Sometimes I find that the yarns I have to work with are too close together in color and don't give enough contrast for some of my favorite designs. #11 is a very attractive way to solve that problem and still end up with a classic garment with wide appeal.

#34 is a little tunic top with puffed sleeves that would be perfect for summer wear. There's even a pattern for matching bloomers.

There's a crocheted afghan that promises to be a quick project for last-minute gifts. The photos of #12 aren't very clear, so the finished look will be something of a surprise.

View #19 from Bouton d'Or layette book #16This cardigan, #19, is gorgeous. I just love working with color patterns. During my first browse through the pages of this book I thought to myself, "Hmm, I may knit this one first." After a more detailed inspection, I have changed my mind. While I would like to knit this design at some point, it will have to wait for a while. This is the most difficult pattern in the book and is worked using more than 2 colors per row, and in some places up to 6 colors are used in a single row. I simply don't have much time or concentration to work on a pattern this complicated right now.

This book has great things in it, but I have to admit to feeling a bit disappointed. The layette books that Bouton d'Or has published the last several years were thicker, each containing between 70 and 80 patterns for children from infancy to age 10 or 12 years. This new version offers about half that number-37 designs for ages 0 to 6 years.

Bouton d'Or has a lower price on the cover for this smaller booklet, 6 Euros compared to last years 9 Euros. It's just too bad that my local yarn shop isn't paying attention to it. They are charging the same $20 price as the previous issues.