I've been to the post office today to ship my charity knits. It was hard for the 4-year-old to let them go, he had the idea that they were all for him, but then, he tends to think everything is for him anyway.
The totals: 14 4" squares of sock yarn on their way to Kay for Oliver's blanket project and 7 sets of baby hats and socks on their way to afghans for Afghans. I tied each set of hat and socks together in its own little bundle so that they wouldn't 'lose' each other in transit.
The baby hats and socks made such a lovely little rainbow, I just had to share the photo here. They were so cute that I just wanted to keep making more, and I will, after I get my holiday knitting done. For now, I just wanted to get these little darlings shipped in time for the deadline.
So, back to that purple sock I was working on. It's nearly done, but it doesn't seem as interesting as those darling little baby hats, does it?
Tuesday, November 27, 2007
Saturday, November 24, 2007
Top-Down Baby Hat
I had a small amount of some leftover Noro that wasn't enough to make an item by itself, but if I added a bit of a matching solid colored yarn it would make a baby hat. I didn't know how much area the Noro would cover. If I started knitting at the cuff, it would make a narrow stripe of varied color, leaving most of the hat a boring solid color. I wanted to make the most of the special yarn, so I decided to knit the hat upside-down. I started at the top of the crown with a few stitches and increased as I worked my way down to the brim. It worked very well! Here are the details so that you can try it too.
Top-Down Baby Hat
You will need a small bit of leftover Noro Kureyon (or other worsted-weight self-striping yarn) between 6g and 10g, and some matching solid worsted weight yarn. My completed sample hats all weigh 28g and use Patons Classic Merino Wool as the solid.
You will also need a set of 4 or 5 size 7US/4.5mm double-pointed needles, one needle 2 or 3 sizes larger for binding off, a tapestry needle to weave in the ends, a tape measure and a pair of scissors or other cutting device. If you don't have size 7 needles, use size 6 or 8. For this project, precise gauge isn't important.
Using Noro, cast on 8 stitches, leaving a 4-inch/10cm tail.
Row 1: Increase by knitting in the front and the back (KFB) of every stitch; 16 stitches. Arrange stitches on 3 needles in the following manner: 6 stitches on the first needle, 4 stitches on the second needle, 6 stitches on the 3rd needle. Join, without twisting the work, and begin knitting in the round. Edit: Or use the Emily Ocker Circular Cast-On, here.
Rnd 2: Knit.
Rnd 3: *Knit 1 stitch, KFB in next stitch* repeat between *'s across row; 24 stitches.
Rnd 4: Knit.
Rnd 5: *Knit 2 stitches, KFB in next stitch* across row; 32 stitches.
Rnd 6: Knit.
Rnd 7: *Knit 3 stitches, KFB in next stitch* across row; 40 stitches.
Rnd 8: Knit.
Rnd 9: *Knit 4 stitches, KFB in next stitch* across row; 48 stitches.
Rnd 10: Knit.
Rnd 11: *Knit 5 stitches, KFB in next stitch* across row; 56 stitches.
Rnd 10: Knit.
Rnd 11: *Knit 6 stitches, KFB in next stitch* across row; 64 stitches.
Rnd 12: Mark this row with a bit of yarn tied around the first stitch. Knit across the row.
At this point your hat should look something like the photo at right. Yes, there's a hole in the middle, but that's alright, you'll close that up when the hat's all done.
Continue knitting every row on 64 stitches, changing to your solid color when you run out of Noro, until the work measures 3.5 inches/9cm in length from the marked row.
Start working K1P1 ribbing for the cuff (or K2P2, or garter stitch) and continue until cuff is 1.5 inches/4cm long. Bind off with larger needle and cut yarn leaving a 4-inch/10cm tail. Remove yarn marker. Using tapestry needle, weave in the tail from the cast-off edge.
Edit: If you have used the Emily Ocker Cast-On, disregard the next section and simply weave in the yarn tail from the crown of the hat.
Thread the tail at the crown of the hat onto the tapestry needle. Run the needle through the 8 stitches on the cast-on edge (see photo at left) and pull through gently, and run the needle through stitches a second time.
Pull up yarn, gathering up the cast-on edge until it closes completely. Weave in the end.
If you want, you can add earflaps to it. See my pattern here to find out how.
Now all you have left to do is to make a pair of simple 24-stitch socks to match. Some patterns can be found here and here. These patterns make the same basic sock, the only difference is the stitch used for the leg and the heel flap.
Knitting Holiday
We had a nice Thanksgiving at our place, it was imperfect but absolutely delightful, just like the cherry pie. I hope my U.S. readers all had a pleasant holiday as well. One of the unexpected pleasures was the chance to knit while others napped.
As for the Canadians, well, we all know you had a fine time last month. "Firstest with the mostest" as my grandmother would say. Don't rub it in.
The downside is that the Christmas season is officially open and the materialistic feeding frenzy has really begun. Let's all try to resist that impulse to buy, buy, buy! that the manufacturers have paid so much to have hammered into our brains through the medium of television, hm?
Lately I've been spending my time making baby hats and socks to donate to afghans for Afghans. Yes, I have done this before, and I'm doing it again. I'm knitting as many as I can before the deadline, which is December 3rd. There's a Knit-And-Crochet-Along too.
I'm using my Infant Earflap Hat pattern without the earflaps. This makes a simple toque with a fold-up cuff that allows for growth room. When my babies outgrew their hats, it was never a case of the hat being too tight, the hat would be too short and no longer cover their ears. Giving a little extra height to the hat is a good idea.
I had very small amounts of leftover Noro Kureyon in my stash that I used to good effect in some of these hats. I really like the way they turned out, these are my favorites so far. I will tell you how I made them in my next post.
Won't you join us and make a set this weekend? Whether you make them for charity, your favorite little one, or for a future baby shower, these are very fun to make. You can come up with an excuse to make some, can't you?
Monday, November 19, 2007
The Atrocity
There is a story in my family about the time Grandma had her house 'done' by an interior decorator. The living room was formal, low-slung and the furniture was all white and gold-except for one tall wing chair upholstered in a green/black toile. It was the one piece that kept things from being too matchy-matchy as we would say today. The decorator called it The Atrocity, and stressed that every room needed one.
I am taking a cue from this design philosophy and including an Atrocity in my shipment of afghan squares to Kay for the Oliver's Blanket fund raiser. This one square does not match in any way the others I've made, but I know that other knitters have made brightly colored squares to go with it. I've also made a set of mitered squares, just because. Kay should have fun working with these.
Friday, November 09, 2007
Knitting For Boys
For a while now, in between socks, I've been knitting little 4-inch squares from leftover sock yarn for Oliver's benefit. Michaela has organized a little fund-raiser in the U.K., and Kay is helping out by collecting squares here in the U.S. (You can click on the names to read more about it).
My effort has been going slowly. Coming down with this head cold hasn't helped much either. I still manage to put in at least an hour of knitting in the morning and another hour in the evening. When I feel up to it, I grab odd moments of knitting when I can. I hope to contribute at least a dozen afghan squares before the end of the month.
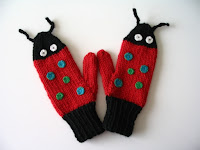
I've just finished sewing the spots on this pair of Buggy Mitts for my little boy. He said he wanted lady bug mittens, but when he saw me grab a square of black felt off the shelf to make the dots he insisted he wanted bright colors instead.
You can find the pattern here. I have added a few rows of length to this pair to fit my son's long, tapered fingers.
He says he wants me to make him a pair of bumble bee mittens next!
Monday, November 05, 2007
Mom's Sock Blowout
The sock was whole and in good condition when she put it on this morning, but somewhere between breakfast and the Carol Duvall Show the heel blew up.
Fortunately it doesn't take long to reknit a heel. Cut out the old one, insert needles into the live stitches, knit the heel flap and turn the heel, weave the seam and you're done.
Apparently I didn't use reinforcement yarn when I made that pair of socks. Regia sock yarn doesn't come with any. I made sure to include some reinforcement when I reknit the heel.
This is the first of a purple pair of socks I'm making for myself using the Basic Ribbed Socks pattern from Vogue Knitting On The Go: Socks Two. I made the child's size for my youngest and they turned out so well that I decided to make a pair for myself.
The yarn I'm using is Socka and it doesn't come with reinforcement yarn. After what happened to Mom's Regia sock after such a short time, I think I'd better not omit reinforcement of some sort. It's going to be difficult to find a matching color nylon thread or yarn. I've been reading about others experiments with wooly nylon and think I'll try weaving some in from the wrong side.