I have to admit, I couldn't resist the Memorial Day sales. It seemed like every store that carried any kind of crafting supplies was having a big sale last weekend. I took the opportunity to stock up on some novelty yarns. They are so handy for embellishing many types of projects. I plan to use these for trimmimg knitwear, quilts and scrapbook pages.
I resisted the urge to buy staple yarns; that is, the main yarns I use for the body of the garment or other knitted/crocheted objects. I have enough of these to keep me busy for years. And since I have a large stock of yarns just waiting to be used, I decided to start a new project using yarns I have on hand.
I have a little cousin who is just a few months old. The many baby shower gifts our rather large family contributed should keep her well clothed for a while, but she is growing rapidly and will most likely be in need of more goodies come winter. I did some calculations, based on her birth weight and current rate of growth, and made a good estimate of the size she will most likely be wearing by that time. I checked my yarn supply and discovered that I have a limited selection of girly colors. I want the garment to be washable, so Lion Brand Homespun it is. Then I searched through my books for an appropriate pattern.

This little seed-stitch coat is from Bouton d'Or layette book 14, model 72, and it has a gauge very close to what I get with the Homespun on size 10 US needles (6mm, or 4 UK). The book is still available at the
Bouton d'Or website.
The yarn that I have chosen is very different from the yarn the pattern calls for. The sample is knit in Laika, a solid colored bulky weight wool that would have nice elasticity for ribbed edges. I am using Lion Brand Homespun, color 315 Tudor, which produces a broad color stripe and doesn't have enough elasticity for a good ribbed front band in my opinion. I will need to make changes to the pattern to allow for these differences. It will require patience and a good amount of unknitting I'm sure.

I have made good progress so far. I started by finding a color change in the yarn that I could easily identify and repeat from piece to piece. I followed the directions and knit the back. I don't like the striping on the back at all, but I wanted to see what the fronts would look like before ripping it out. I then knit the right front, adding extra stitches for the front band to be knit along with the front because I liked the firm edge I was getting in seed stitch. I had to calculate button placement and work buttonholes into the piece as I went along. I knit the left front to match.
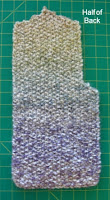
I like the patterning on the fronts. I want the back to match the fronts, so I will knit it in 2 pieces and seam it down the center. This should be fairly easy to do since seed stitch can be sewn together in a similar way to garter stitch and leave a smooth seam.
Next I will work out the sleeves and hood. I can tell I will be doing a lot of testing, unknitting and reknitting for these parts of the coat. The width of these pieces are different and therefore make a different color pattern. I have to decide where to start these different yarn color change locations. I also now have less yarn to work with and therefore fewer color ranges to choose from, which will give me fewer options.
After that, I have to decide how I want to finish the coat. The pattern uses some novelty eyelash yarn as trimming around the edges and some little butterflies attached here and there for interest. I know that I will be doing something different because these trims can be hazardous for children under 3, but I don't know what yet. It will be interesting to see how it turns out.

 I was browsing my local thrift shop and came across a lovely placemat-unfortunately there was only one on the shelf. What can you do with just one placemat? Well, I really liked that placemat and I knew I could come up with a project for it, so I bought it.
 Fold your placemat, right sides and short fringed edges together, and sew the 2 unfringed sides together using 1/2" seam allowance (see photo, left). You now have a flat pouch. Open this pouch up, forming a bag bottom, and sew diagonally across the corner about 1.5" away from the point (see photo, right). Repeat these 2 steps with the larger piece of lining fabric. Fold down 1/2" seam allowance along top edge of lining to the wrong side and press.
 Fold 2"x 10" strip of lining fabric in half lengthwise, right sides together, and sew along the length using 1/2" seam allowance (see photo left). Turn the strip right-side-out (use a chopstick or safety pin to help the process along) and press it flat.